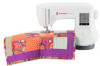
Singer Legacy C440Q Instruction Manual and Troubleshooting Guide - Page 25
Blind, Stitching
 |
View all Singer Legacy C440Q manuals
Add to My Manuals
Save this manual to your list of manuals |
Page 25 highlights
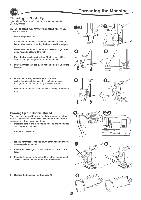
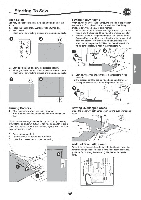
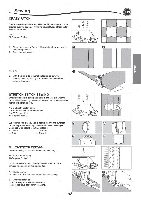
Sewing Satin Stitching To sew a satin stitch, shorten the stitch length and attach the Satin Foot. (B) Refer to next page for using the zigzag to overcast. BLIND HEM STITCHING The hem is sewn without stitches showing on right side of fabric. The illustration to the right shows an example of a finished blind hem. The right side of the fabric is shown in white, the wrong side is shown in gray. No. 2 Blind hem for non-stretch fabric No. 8 Blind hem for stretch fabric Blind Hem Foot (D) 1. Fold the fabric as shown in the illustration. a. Medium, heavy weight fabric b. Light weight fabric c. Wrong side of fabric d. Overcasting 0® 5mm 1cm _511-Irn 2. The guide (e) on the Blind Hem Foot helps ensure that the fabric fold is guided evenly when blind hem stitching. The guide (e) is adjusted by turning the adjusting screw (f). 3. Place fabric so that the straight stitches (or small zigzag stitches) are on the protruding hem edge and the large zigzag stitches just catch one thread of the folded edge (g). If necessary, turn the screw (f) to adjust the foot so that the needle slightly touches the folded edge of the fabric. 4. Lower the presser foot and sew hem, guiding fabric evenly along the guide. 5. Turn the fabric over when you have completed sewing. c. Wrong side of fabric h. Right side of fabric NOTE: Test on a scrap piece of fabric similar to your project so you can determine the best placement of the foot's guide. You can also adjust the width and length settings to set the stitch as needed for the fabric being sewn f e 0
-
 1
1 -
2
-
3
-
4
-
5
-
6
-
7
-
8
-
9
-
10
-
11
-
12
-
13
-
14
-
15
-
16
-
17
-
18
-
19
-
 20
20 -
 21
21 -
 22
22 -
 23
23 -
 24
24 -
 25
25 -
 26
26 -
 27
27 -
 28
28 -
 29
29 -
 30
30 -
31
-
32
-
33
-
34
-
35
-
36
-
37
-
38
-
39
-
40
-
41
-
42
-
43
-
44
-
45
-
46
-
47
-
48
-
49
-
50
-
51
-
52
-
53
-
54
-
55
-
56
-
57
-
58
-
59
-
60
-
61
-
62
-
63
-
64
-
65
-
66
-
67
-
68
-
69
-
70
-
71
-
72
-
73
-
74
-
75
-
76
-
77
-
78
-
79
-
80
-
81
-
82
-
83
-
84
-
85
-
86
-
87
-
88
-
89
-
90
-
91
-
92
-
93
-
94
-
95
-
96
-
97
-
98
-
99
-
100
-
101
-
102
-
103
-
104
-
105
-
106
-
107
-
108
-
109
-
110
-
111
-
112
-
113
-
114
-
115
-
116
-
117
-
118
-
119
-
120
-
121
-
122
-
123
-
124
-
125
-
126
-
127
-
128
-
129
-
130
-
131
-
132
-
133
-
134
-
135
-
136
-
137
-
138
-
139
-
140
 |
 |
