Singer Legacy C440Q Instruction Manual and Troubleshooting Guide - Page 23
Stitch, Turning, Corners, Sewing, Heavy, Fabric, Overlapped, Areas, Width, Allowance
 |
View all Singer Legacy C440Q manuals
Add to My Manuals
Save this manual to your list of manuals |
Page 23 highlights
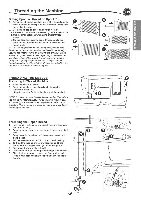
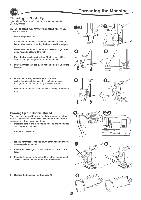
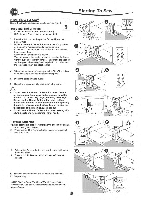
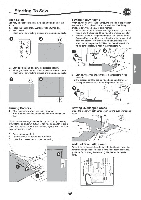
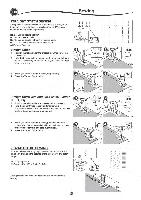
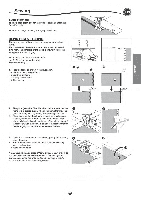
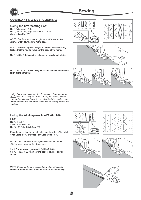
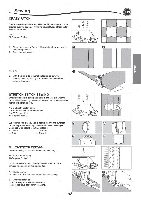
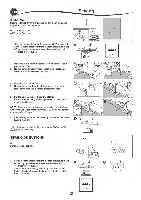
Starting To Sew Tack Stitch You may sew tack stitches at the beginning and end of the stitch. 1. Press the Tack button. LED light will be turned on. 2. Start to sew. Machine will sew tacking stitches and stop automatically. O 0 Sewing Heavy Fabric When sewing heavy or thick fabrics, the toe end of the presser foot tends to lift up when it comes to seams or other bulky areas. To sew these heavy or thick fabrics: 1. When the toe of the presser foot begins to tilt up. lower the needle into the fabric and then raise the presser foot lifter. 2. Push the stabilizer pin (located on the right side of the All- Purpose Foot) and at the same time lower the presser foot lifter. The presser foot should now be level on the thick fabric. Once the presser foot lifter has been lowered, it is no longer necessary to hold in the stabilizer pin. I 0 3. Start sewing again and sew the selected pattern. 4. When you reach the end of seam, press the Tack button. Machine will sew tacking stitches and stop automatically. Co 3. Start sewing. After a few stitches, the stabilizer pin will release. a. The presser bar lifter can be raised one step higher for placing heavy materials under the presser foot easily. Ltu OO Turning Corners 1. Stop the machine when you reach a corner. 2. Turn the handwheel toward you to insert the needle into fabric. Sewing Overlapped Areas Guide the fabric with both hands when sewing over overlapped areas. NOTE. You can change the needle stop position by pressing the needle stop up/down button. When needle position is set to down, the LED will turn on. You can also tap the foot control to raise or lower the needle. 3. Raise the presser foot. 4. Use the needle as a pivot and turn fabric. 5. Lower the presser foot and resume sewing. Width of Seam Allowance Guide lines on the needle plate indicate the distance from the center needle position. To keep a consistent seam allowance, guide the fabric along the desired guide line on the needle plate. o:Ncl !II I 4 4 I 3 O 1/4" O O •
-
 1
1 -
2
-
3
-
4
-
5
-
6
-
7
-
8
-
9
-
10
-
11
-
12
-
13
-
14
-
15
-
16
-
17
-
 18
18 -
 19
19 -
 20
20 -
 21
21 -
 22
22 -
 23
23 -
 24
24 -
 25
25 -
 26
26 -
 27
27 -
 28
28 -
29
-
30
-
31
-
32
-
33
-
34
-
35
-
36
-
37
-
38
-
39
-
40
-
41
-
42
-
43
-
44
-
45
-
46
-
47
-
48
-
49
-
50
-
51
-
52
-
53
-
54
-
55
-
56
-
57
-
58
-
59
-
60
-
61
-
62
-
63
-
64
-
65
-
66
-
67
-
68
-
69
-
70
-
71
-
72
-
73
-
74
-
75
-
76
-
77
-
78
-
79
-
80
-
81
-
82
-
83
-
84
-
85
-
86
-
87
-
88
-
89
-
90
-
91
-
92
-
93
-
94
-
95
-
96
-
97
-
98
-
99
-
100
-
101
-
102
-
103
-
104
-
105
-
106
-
107
-
108
-
109
-
110
-
111
-
112
-
113
-
114
-
115
-
116
-
117
-
118
-
119
-
120
-
121
-
122
-
123
-
124
-
125
-
126
-
127
-
128
-
129
-
130
-
131
-
132
-
133
-
134
-
135
-
136
-
137
-
138
-
139
-
140
 |
 |
