Singer One Instruction Manual 2 - Page 12
compartment
 |
View all Singer One manuals
Add to My Manuals
Save this manual to your list of manuals |
Page 12 highlights
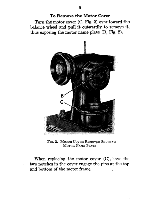
10 Raise the sewing machine head out of the cabinet as shown in Fig. 5, being very careful not to touch the electric lamp or shade, then turn down the hinged flaps of the table top and lower the machine so that it rests on the table as shown in Fig. 10. Zgtg. FIG. 10. KNEE LEVER LOWERED TO OPERATING POSITION ON CABINET 306 ALSO ELECTRICAL CONNECTION Pull down the knee lever (Q) to the vertical position as shown in Fig. 10. Fig. 10 shows the swing-out drawer at the left of the table. This drawer is provided with holders for spools, bobbins and oil can and has a compartment for the box of attachments.
-
 1
1 -
2
-
3
-
4
-
5
-
6
-
 7
7 -
 8
8 -
 9
9 -
 10
10 -
 11
11 -
 12
12 -
 13
13 -
 14
14 -
 15
15 -
 16
16 -
 17
17 -
18
-
19
-
20
-
21
-
22
-
23
-
24
-
25
-
26
-
27
-
28
-
29
-
30
-
31
-
32
-
33
-
34
-
35
-
36
-
37
-
38
-
39
-
40
-
41
-
42
-
43
-
44
-
45
-
46
-
47
-
48
-
49
-
50
-
51
-
52
-
53
-
54
 |
 |

10
Raise
the
sewing
machine
head
out
of
the
cabinet
as
shown
in
Fig.
5,
being
very
careful
not
to
touch
the
electric
lamp
or
shade,
then
turn
down
the
hinged
flaps
of
the
table
top
and
lower
the
ma-
chine
so
that
it
rests
on
the
table
as
shown
in
Fig.
10.
Zgtg.
FIG.
10.
KNEE
LEVER
LOWERED
TO
OPERATING
POSITION
ON
CABINET
306
ALSO
ELECTRICAL
CONNECTION
Pull
down
the
knee
lever
(Q)
to
the
vertical
posi-
tion
as
shown
in
Fig.
10.
Fig.
10
shows
the
swing
-out
drawer
at
the
left
of
the
table.
This
drawer
is
provided
with
holders
for
spools,
bobbins
and
oil
can
and
has
a
compartment
for
the
box
of
attachments.