Singer One Instruction Manual 2 - Page 33
grease, connect, electric, wiring, machine, motor., Unscrew, wicks, interior, should, thoroughly,
 |
View all Singer One manuals
Add to My Manuals
Save this manual to your list of manuals |
Page 33 highlights
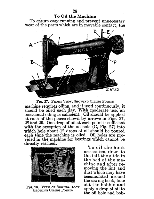
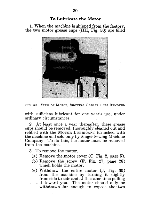
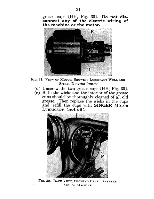
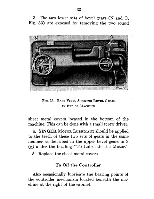
31 grease cups (1111, Fig. 30). Do not disconnect any of the electric wiring of the machine or the motor. •.:l•• ' • kat. £ 3954 FIG. 31. VIEW OF MOTOR. SHOWING LUBRICANT WELL AND SPIRAL DRIVING PINION (d) Unscrew the two grease cups (HIT, Fig. 30). (e) Both the wicks and the interior of the grease cups should be thoroughly cleaned of all old grease. Then replace the wicks in the cups and retell the cups with SINGER MOTOR LUBRICANT, (not oil). r gicL FIG. 32. BACK VIEW, SHOWING BEVEL GEARS IN ARM OF MACHINE
-
 1
1 -
2
-
3
-
4
-
5
-
6
-
7
-
8
-
9
-
10
-
11
-
12
-
13
-
14
-
15
-
16
-
17
-
18
-
19
-
20
-
21
-
22
-
23
-
24
-
25
-
26
-
27
-
 28
28 -
 29
29 -
 30
30 -
 31
31 -
 32
32 -
 33
33 -
 34
34 -
 35
35 -
 36
36 -
 37
37 -
 38
38 -
39
-
40
-
41
-
42
-
43
-
44
-
45
-
46
-
47
-
48
-
49
-
50
-
51
-
52
-
53
-
54
 |
 |

31
grease
cups
(1111,
Fig.
30).
Do
not
dis-
connect
any
of
the
electric
wiring
of
the
machine
or
the
motor.
•.:l••
'
•
£
3954
kat.
FIG.
31.
VIEW
OF
MOTOR.
SHOWING
LUBRICANT
WELL
AND
SPIRAL
DRIVING
PINION
(d)
Unscrew
the
two
grease
cups
(HIT,
Fig.
30).
(e)
Both
the
wicks
and
the
interior
of
the
grease
cups
should
be
thoroughly
cleaned
of
all
old
grease.
Then
replace
the
wicks
in
the
cups
and
retell
the
cups
with
SINGER
MOTOR
LUBRICANT,
(not
oil).
r
gicL
FIG.
32.
BACK
VIEW,
SHOWING
BEVEL
GEARS
IN
ARM
OF
MACHINE