Singer One Instruction Manual 2 - Page 28
regulating
 |
View all Singer One manuals
Add to My Manuals
Save this manual to your list of manuals |
Page 28 highlights
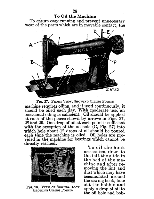
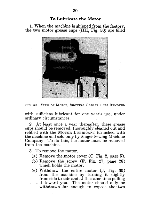
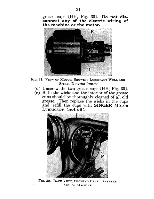
26 To Regulate the Tensions The tension on the needle thread should only be regulated when the presser foot is down. Having lowered the presser foot, turn the small thumb nut (A, Fig. 15, page 17) at the front of the tension discs over to the right to increase the tension. To decrease the tension, turn the thumb nut over to the left. The tension on the bobbin thread is regulated by the larger screw (A, Fig. 18, page 20) which is nearest the back in the bobbin case tension spring. To increase the tension, turn the screw over toward you. To decrease the tension, turn the screw over from you. When the tension on the bobbin thread has been once properly adjusted it is seldom necessary to change it, as a correct stitch can usually be obtained by varying the tension on the needle thread. To Turn a Corner Stop the machine with the needle at its lowest point. Raise the presser foot and turn the work as desired, using the needle as a pivot. To Regulate the Length of Stitch The length of the stitch is regulated by the feed regulating disc (D, Fig. 17, page 19) located on the bed of the machine, at the right. This disc is marked with arbitrary numbers, ranging from 6 to 30, which indicate the various lengths of stitches that the machine will make, No. 6 being the longest stitch and No. 30 the shortest stitch (The numerals do not denote the number of stitches to the inch). The length of stitch that the machine is ready to make is indicated by the number nearest the arrow marked on the cloth plate of the machine.
-
 1
1 -
2
-
3
-
4
-
5
-
6
-
7
-
8
-
9
-
10
-
11
-
12
-
13
-
14
-
15
-
16
-
17
-
18
-
19
-
20
-
21
-
22
-
 23
23 -
 24
24 -
 25
25 -
 26
26 -
 27
27 -
 28
28 -
 29
29 -
 30
30 -
 31
31 -
 32
32 -
 33
33 -
34
-
35
-
36
-
37
-
38
-
39
-
40
-
41
-
42
-
43
-
44
-
45
-
46
-
47
-
48
-
49
-
50
-
51
-
52
-
53
-
54
 |
 |
