Singer One Instruction Manual 22 - Page 12
electricity
 |
View all Singer One manuals
Add to My Manuals
Save this manual to your list of manuals |
Page 12 highlights
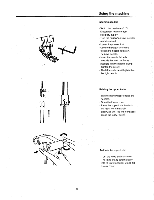
L t Using the machine Inserting needles - Switch the machine off "0". Disconnect machine from electricity supply. - Turn the handwheel until needles are fully raised. - Lower the presser foot. - Use the hexagon wrench to loosen the needle setscrew. Remove needle. - Insert the needle flat side towards the back,.as far as possible intathe needle clamp. Tighten the screw. - The left needle is set higher than the right needle. Raising the upper knife - Turn the handwheel to raise the needles. - Open the looper cover. - Press the upper knife holder to the right. Turn the knob clockwise until the knife engages. - Close the looper cover. To lower the upper knife: - Turn the knob anti-clockwise. The knife snaps automatically into its lower position. Close the looper cover. 15
-
 1
1 -
2
-
3
-
4
-
5
-
6
-
 7
7 -
 8
8 -
 9
9 -
 10
10 -
 11
11 -
 12
12 -
 13
13 -
 14
14 -
 15
15 -
 16
16 -
 17
17 -
18
-
19
-
20
-
21
-
22
-
23
-
24
-
25
-
26
-
27
-
28
-
29
-
30
-
31
-
32
-
33
-
34
-
35
-
36
-
37
-
38
-
39
-
40
 |
 |
