Singer One Instruction Manual 22 - Page 8
Power/light
 |
View all Singer One manuals
Add to My Manuals
Save this manual to your list of manuals |
Page 8 highlights
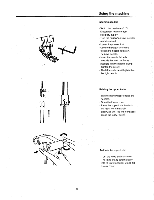
Preparing the machine Attaching the foot control Plug foot control into machine socket (A) and then into main socket (B). Sewing speed The sewing speed can be adjusted by increasing or decreasing the pressure on the foot control(C). Assembling the thread stand Raise the support rod fully, turning slightly until the positioning catches engage. Thread cones The anti-vibration cone should be used with the wider edge to the bottom on the spool holder pin when sewing with cones. When using household spools remove the anti-vibration cones. Place spool on spool holder pins and push the spool caps on. If threads slip and get twisted, cover the spools with the nets supplied in the accessory box. Power/light switch The power switch is conveniently placed on the handwheel side of the machine. "I" - ON "O" - OFF 11
-
 1
1 -
2
-
 3
3 -
 4
4 -
 5
5 -
 6
6 -
 7
7 -
 8
8 -
 9
9 -
 10
10 -
 11
11 -
 12
12 -
 13
13 -
14
-
15
-
16
-
17
-
18
-
19
-
20
-
21
-
22
-
23
-
24
-
25
-
26
-
27
-
28
-
29
-
30
-
31
-
32
-
33
-
34
-
35
-
36
-
37
-
38
-
39
-
40
 |
 |
