Singer Pixie Plus the crafting machine by SINGER Instruction Manual - Page 14
Sewing
 |
View all Singer Pixie Plus the crafting machine by SINGER manuals
Add to My Manuals
Save this manual to your list of manuals |
Page 14 highlights
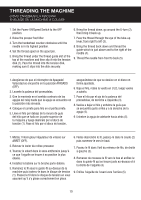
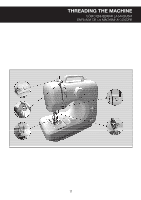
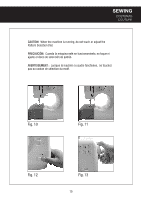
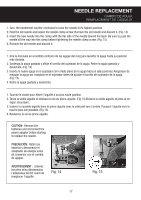
SEWING COSTURAS COUTURE 1. Turn the handwheel counter-clockwise to raise the after four AA batteries have been installed. When set needle to its highest position. in the left position (L), the machine will automatically 2. Lift the presser foot with the presser foot lifter, and then start sewing at a slower speed, and when set to the place the fabric under the presser foot. (Fig. 10) right (H), the machine will automatically start sewing 3. Lower the presser foot. (Fig. 11) at ah higher speed. To stop sewing in the automatic mode, slide the Power off/Speed Switch to the OFF 4. The machine can be operated in two ways: with the position. food pedal or with the Power Off/ Speed Switch (Fig. 12) 5. Turn the handwheel counter-clockwise to raise the needle to its highest position. Lift the presser foot, then a) To operate the machine with the food pedal, simply gently remove the fabric from the machine (Fig. 13) press your foot down on the pedal. Stop sewing any time by releasing your foot from the pedal. 6. Cut the threads with the thread cutter at the side of the machine. b) To operate the machine without the foot pedal, set the Power Off/Speed Switch to either the left or right, 1. Gire la manivela en el sentido contrario de las agujas la derecha o hacia la izquierda, luego de haber del reloj para levantar la aguja hasta su posición más instalado cuatro baterías AA. Cuando se coloca elevada. hacia la izquierda (L), la máquina automáticamente 2. Eleve el prensatelas con la palanca del prensatelas y comienza a coser a baja velocidad y cuando luego coloque la tela debajo del prensatelas. (Fig. 10) se coloca hacia la derecha (H), la máquina 3. Baje el prensatelas. (Fig. 11) automáticamente comienza a coser a mayor velocidad. Para dejar de coser en modo automático, 4. La máquina puede operarse de dos maneras diferentes: deslice el interruptor de Apagado/Velocidad a la con el pedal de pie o con el interruptor de Apagado/ posición APAGADO (OFF). Velocidad (Fig. 12) 5. Gire la manivela en el sentido contrario de las agujas a) Para operar la máquina con el pedal de pie, del reloj para levantar la aguja hasta su posición simplemente presione con el pie sobre el pedal. más elevada. Levante el prensatelas, luego retire Cuando desee detener el proceso de costura, suavemente la tela de la máquina (Fig. 13) levante el pie del pedal. 6. Corte los hilos con el cortahilos que se encuentra al b) Para operar la máquina sin el pedal de pie, costado de la máquina. coloque el interruptor de Apagado/Velocidad hacia 1. Tournez le volant sur le côté de la machine en sens inverse des aiguilles d'une montre afin d'élever l'aiguille à sa plus haute position. 2. Levez le pied presseur et placez le matériel que vous souhaitez coudre sous le pied presseur (Fig.10) 3. Rabaissez le pied presseur (Fig.11) 4. Vous pouvez faire fonctionner la machine à coudre de deux façons : avec le rhéostat ou avec l'interrupteur "Power Off/Speed" (Fig. 12) a) Pour faire fonctionner la machine à coudre avec le rhéostat, simplement pressez votre pied sur le rhéostat, et pour cesser de coudre à n'importe quel moment, simplement enlevez votre pied du rhéostat. b) Autrement, quand vous êtes prêt à coudre, glissez l'interrupteur "Power Off/Speed" vers la gauche à la position basse (L) ou vers la droite à la position haute (H) et la machine à coudre commencera automatiquement à coudre. Afin d'arrêter de coudre, glissez l'interrupteur "power off/speed" à la position OFF. 5. Tournez le volant sur le côté de la machine à coudre en sens inverse des aiguilles d'une montre afin d'élever l'aiguille à sa plus haute position. Relevez le pied presseur, et enlevez doucement le matériel de la machine à coudre (Fig.13). 6. Coupez le fil en utilisant le coupe-fils. 14
-
 1
1 -
2
-
3
-
4
-
5
-
6
-
7
-
8
-
 9
9 -
 10
10 -
 11
11 -
 12
12 -
 13
13 -
 14
14 -
 15
15 -
 16
16 -
 17
17 -
 18
18 -
 19
19 -
20
-
21
-
22
-
23
-
24
 |
 |