Singer Pixie Plus the crafting machine by SINGER Instruction Manual - Page 8
Winding The Bobbin
 |
View all Singer Pixie Plus the crafting machine by SINGER manuals
Add to My Manuals
Save this manual to your list of manuals |
Page 8 highlights
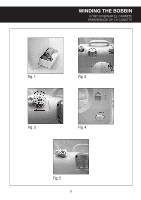
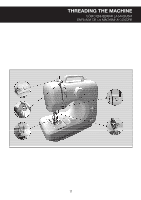
WINDING THE BOBBIN CÓMO BOBINAR EL CARRETE EMBOBINAGE DE LA CANETTE Note: Bobbins and thread spools may be stored in 5. Wrap the end of the thread counter-clockwise the small drawer on the side of the machine. around the bobbin several times. (Fig. 3) (Fig. 1) 6. Set the Power Off/Speed Switch to the left (or set 1. Turn the machine so that you are facing the back the switch to the OFF position and press the foot of it. pedal) to start winding. (Fig. 4) 2. Place a spool of thread on the spool pin. 7. Stop winding after the desired amount of thread 3. Guide the thread to the right of the bobbin winder is wound onto the bobbin. (Fig. 5) tension disk and slip it into the disk securely. 8. Push the bobbin winder and bobbin back to the (Fig. 2) right. 4. Place the empty bobbin onto the bobbin winder 9. Remove the bobbin from the bobbin winder pin pin and push it to the left. and then cut the thread. Nota: las bobinas y los carretes pueden guardarse 6. Coloque el interruptor de Apagado/Velocidad en el cajón inferior pequeño en el lado de la hacia la izquierda (o coloque el interruptor en la máquina. (Fig. 1) posición APAGADO (OFF) y presione el pedal de 1. Dé vuelta la máquina de modo que usted quede pie) para comenzar a bobinar. (Fig. 4) de frente al lado posterior. 7. Detenga el bobinado luego de que la cantidad de 2. Coloque un carrete de hilo en el portacarrete. hilo deseada haya sido bobinada en el carrete. 3. Lleve el hilo hacia la derecha del disco de (Fig. 5) tensión del bobinador de carrete y deslícelo en el 8. Empuje el dispositivo de bobinado de carrete y la disco en forma segura. (Fig. 2) bobina hacia la derecha. 4. Coloque la bobina vacía en el bobinador y empújela hacia la izquierda. 9. Retire la bobina del portacarrete de bobinado y luego corte el hilo. 5. Envuelva el extremo del hilo en el sentido contrario de las agujas del reloj alrededor de la bobina varias veces. (Fig. 3) REMARQUE : Sur le côté de la machine à coudre (vers l'arrière) vous découvrirez un tiroir pratique pour le remisage des accessoires. (Fig. 1) 1. Tournez la machine de manière à faire face à l'arrière de cette dernière. 2. Installez une bobine de fil sur la broche portebobine. 3. Placez le fil à la droite du disque de tension du bobineur de canette. (Fig.2) 4. Poussez la canette sur la tige du bobineur de canette et déplaceza la vers la gauche. 5. Enroulez le fil plusieurs tours dans le sens des aiguilles d'une montre. (Fig. 3) 6. Ouvrir l'interrupteur de vitesse pour commencer à remplir. (Fig. 4) 7. Arrêtez le remplissage lorsque le volume de fil enroulé sur la canette est suffisant. (Fig. 5) 8. Repoussez le bobineur et la bobine à droite. 9. Enlevez la canette de l'axe et coupez le fil. 8
-
 1
1 -
2
-
 3
3 -
 4
4 -
 5
5 -
 6
6 -
 7
7 -
 8
8 -
 9
9 -
 10
10 -
 11
11 -
 12
12 -
 13
13 -
14
-
15
-
16
-
17
-
18
-
19
-
20
-
21
-
22
-
23
-
24
 |
 |