Sony DCR-TRV39 Operating Instructions (primary manual) - Page 163
Capturing images from an analog video unit on a computer – Signal convert function
 |
View all Sony DCR-TRV39 manuals
Add to My Manuals
Save this manual to your list of manuals |
Page 163 highlights
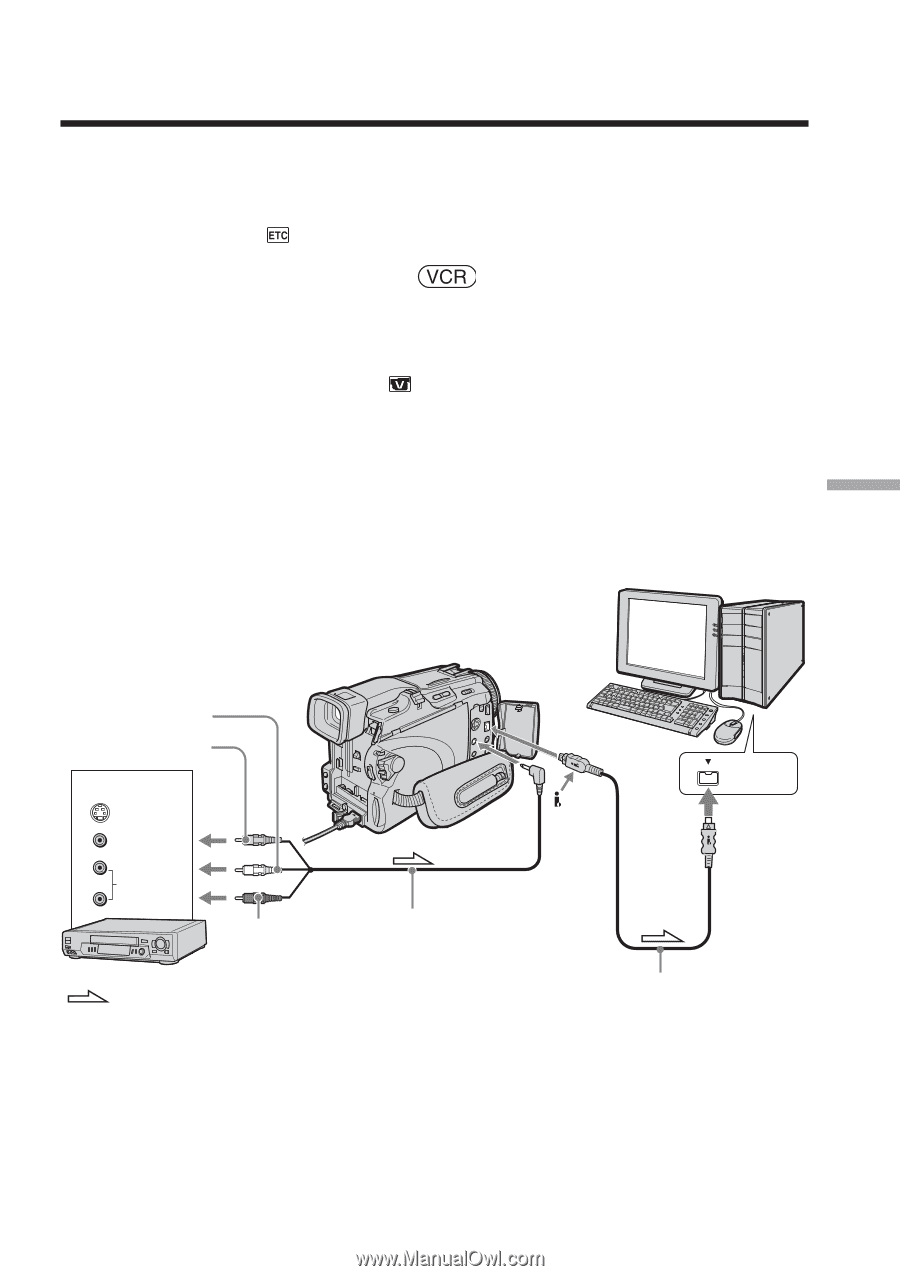
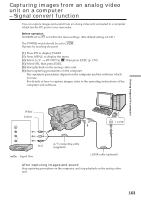
Capturing images from an analog video unit on a computer - Signal convert function You can capture images and sound from an analog video unit connected to a computer which has the DV port to your camcorder. Before operation Set DISPLAY in to LCD in the menu settings. (The default setting is LCD.) The POWER switch should be set to . Operate by touching the panel. (1) Press FN to display PAGE1. (2) Press MENU to display the menu. (3) Select A/V t DV OUT in , then press EXEC (p. 170). (4) Select ON, then press EXEC. (5) Start playback on the analog video unit. (6) Start capturing procedures on the computer. The operation procedures depend on the computer and the software which you use. For details of how to capture images, refer to the operating instructions of the computer and software. Viewing images with a computer White Yellow OUT S VIDEO VIDEO AUDIO Red VCR : Signal flow AUDIO/ VIDEO i.LINK A/V connecting cable (supplied) i.LINK cable (optional) After capturing images and sound Stop capturing procedures on the computer, and stop playback on the analog video unit. 163
-
 1
1 -
2
-
3
-
4
-
5
-
6
-
7
-
8
-
9
-
10
-
11
-
12
-
13
-
14
-
15
-
16
-
17
-
18
-
19
-
20
-
21
-
22
-
23
-
24
-
25
-
26
-
27
-
28
-
29
-
30
-
31
-
32
-
33
-
34
-
35
-
36
-
37
-
38
-
39
-
40
-
41
-
42
-
43
-
44
-
45
-
46
-
47
-
48
-
49
-
50
-
51
-
52
-
53
-
54
-
55
-
56
-
57
-
58
-
59
-
60
-
61
-
62
-
63
-
64
-
65
-
66
-
67
-
68
-
69
-
70
-
71
-
72
-
73
-
74
-
75
-
76
-
77
-
78
-
79
-
80
-
81
-
82
-
83
-
84
-
85
-
86
-
87
-
88
-
89
-
90
-
91
-
92
-
93
-
94
-
95
-
96
-
97
-
98
-
99
-
100
-
101
-
102
-
103
-
104
-
105
-
106
-
107
-
108
-
109
-
110
-
111
-
112
-
113
-
114
-
115
-
116
-
117
-
118
-
119
-
120
-
121
-
122
-
123
-
124
-
125
-
126
-
127
-
128
-
129
-
130
-
131
-
132
-
133
-
134
-
135
-
136
-
137
-
138
-
139
-
140
-
141
-
142
-
143
-
144
-
145
-
146
-
147
-
148
-
149
-
150
-
151
-
152
-
153
-
154
-
155
-
156
-
157
-
 158
158 -
 159
159 -
 160
160 -
 161
161 -
 162
162 -
 163
163 -
 164
164 -
 165
165 -
 166
166 -
 167
167 -
 168
168 -
169
-
170
-
171
-
172
-
173
-
174
-
175
-
176
-
177
-
178
-
179
-
180
-
181
-
182
-
183
-
184
-
185
-
186
-
187
-
188
-
189
-
190
-
191
-
192
-
193
-
194
-
195
-
196
-
197
-
198
-
199
-
200
-
201
-
202
-
203
-
204
-
205
-
206
-
207
-
208
-
209
-
210
-
211
-
212
 |
 |