Sony DCR-TRV39 Operating Instructions (primary manual) - Page 92
Adding an audio sound on the recorded tape, Audio dubbing, The A DUB CTRL screen appears. - dcr trv38 camcorder
 |
View all Sony DCR-TRV39 manuals
Add to My Manuals
Save this manual to your list of manuals |
Page 92 highlights
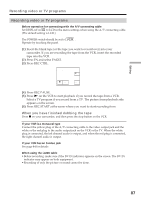
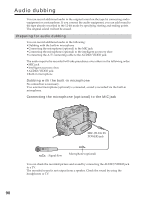
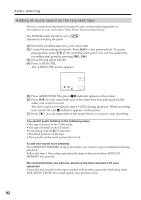
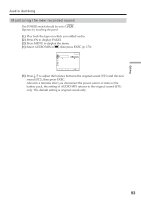
Audio dubbing Adding an audio sound on the recorded tape Choose a connection mentioned on page 90, and connect audio equipment or microphone to your camcorder. Then follow the procedure below. The POWER switch should be set to . Operate by touching the panel. (1) Insert the recorded tape into your camcorder. (2) Locate the recording start point. Press to start playing back. To pause playing back, press at the recording start point. You can fine-adjust the recording start point by pressing / . (3) Press FN and select PAGE3. (4) Press A DUB CTRL. The A DUB CTRL screen appears. A DUB CTRL RET. AUDIO DUB (5) Press AUDIO DUB. The green X indicator appear on the screen. (6) Press on your camcorder and at the same time start playing back the audio you want to record. The new sound is recorded in stereo 2 (ST2) during playback. While recording new sound, the red indicator appears on the screen. (7) Press on your camcorder at the point where you want to stop recording. You cannot audio dubbing in the following cases: •The tape recorded in the 16-bit mode •The tape recorded in the LP mode •Connecting with the DV Interface •The blank portions of the tape •The cassette set the write-protect tab to lock To add new sound more precisely Press ZERO SET MEMORY at the point where you want to stop recording later during playback. Follow the step 2. Recording automatically stops at the point where ZERO SET MEMORY was pressed. We recommend that you add new sound on the tape recorded with your camcorder If you add new sound on the tape recorded with another camcorder (including other DCR-TRV38/TRV39), the sound quality may become worse. 92
-
 1
1 -
2
-
3
-
4
-
5
-
6
-
7
-
8
-
9
-
10
-
11
-
12
-
13
-
14
-
15
-
16
-
17
-
18
-
19
-
20
-
21
-
22
-
23
-
24
-
25
-
26
-
27
-
28
-
29
-
30
-
31
-
32
-
33
-
34
-
35
-
36
-
37
-
38
-
39
-
40
-
41
-
42
-
43
-
44
-
45
-
46
-
47
-
48
-
49
-
50
-
51
-
52
-
53
-
54
-
55
-
56
-
57
-
58
-
59
-
60
-
61
-
62
-
63
-
64
-
65
-
66
-
67
-
68
-
69
-
70
-
71
-
72
-
73
-
74
-
75
-
76
-
77
-
78
-
79
-
80
-
81
-
82
-
83
-
84
-
85
-
86
-
 87
87 -
 88
88 -
 89
89 -
 90
90 -
 91
91 -
 92
92 -
 93
93 -
 94
94 -
 95
95 -
 96
96 -
 97
97 -
98
-
99
-
100
-
101
-
102
-
103
-
104
-
105
-
106
-
107
-
108
-
109
-
110
-
111
-
112
-
113
-
114
-
115
-
116
-
117
-
118
-
119
-
120
-
121
-
122
-
123
-
124
-
125
-
126
-
127
-
128
-
129
-
130
-
131
-
132
-
133
-
134
-
135
-
136
-
137
-
138
-
139
-
140
-
141
-
142
-
143
-
144
-
145
-
146
-
147
-
148
-
149
-
150
-
151
-
152
-
153
-
154
-
155
-
156
-
157
-
158
-
159
-
160
-
161
-
162
-
163
-
164
-
165
-
166
-
167
-
168
-
169
-
170
-
171
-
172
-
173
-
174
-
175
-
176
-
177
-
178
-
179
-
180
-
181
-
182
-
183
-
184
-
185
-
186
-
187
-
188
-
189
-
190
-
191
-
192
-
193
-
194
-
195
-
196
-
197
-
198
-
199
-
200
-
201
-
202
-
203
-
204
-
205
-
206
-
207
-
208
-
209
-
210
-
211
-
212
 |
 |
