Sony DG910 Instructions Manual
Sony DG910 - STR AV Receiver Manual
 |
UPC - 027242707023
View all Sony DG910 manuals
Add to My Manuals
Save this manual to your list of manuals |
Sony DG910 manual content summary:
- Sony DG910 | Instructions Manual - Page 1
AV Receiver Operating Instructions Owner's Record The model and serial numbers are located on the rear of the unit. Record the serial number in the space provided below. Refer to them whenever you call upon your Sony dealer regarding this product. Model No. Serial No. STR-DG910 ©2007 Sony - Sony DG910 | Instructions Manual - Page 2
event of trouble. Don't throw user to the presence of important operating and maintenance (servicing) instructions receiver is connected. - Consult the dealer or an experienced radio/TV technician for help. CAUTION You are cautioned that any changes or modification not expressly approved in this manual - Sony DG910 | Instructions Manual - Page 3
About This Manual • The instructions in this manual are for model STR-DG910. Check your model number by looking at the lower right corner of the front panel. • The instructions in this manual describe the controls on the supplied remote. You can also use the controls on the receiver if they have the - Sony DG910 | Instructions Manual - Page 4
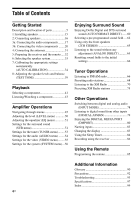
of parts 5 1: Installing speakers 15 2: Connecting speakers 16 3a: Connecting the audio components.........17 3b: Connecting the video components ........20 4: Connecting the antennas 31 5: Preparing the receiver and the remote .....32 6: Selecting the speaker system 33 7: Calibrating the - Sony DG910 | Instructions Manual - Page 5
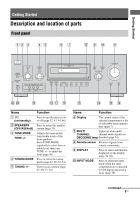
SPEAKERS (OFF/A/B/A+B) TONE MODE TONE TUNING MODE TUNING AUTO CAL MIC PHONES receiver on or off (page 32, 43, 44, 66). Press to select the speaker system (page 33). Adjusts the tonal quality (bass/treble level) of the front speakers 44). H Remote sensor Receives signals from remote commander. I - Sony DG910 | Instructions Manual - Page 6
adjust the volume level of all speakers at the same time (page 40, 41, 43, 44). Press to listen to high quality analog sound (page 65). Press to Connects to a camcorder or PORTABLE AV video game (page 28, 41). IN jacks T PHONES jack Connects to headphones (page 94). U AUTO CAL MIC jack Connects - Sony DG910 | Instructions Manual - Page 7
9 6 / 2 4 CAT MEMORY ST SP B HDMI COAX NEO:6 D.RANGE MONO LCR SL S SR SBL speaker output is turned off or if headphones are connected. Lights up when the receiver is decoding Dolby Digital signals. "; D EX" lights up when the receiver speakers are set to "NO" (page 48) and you select a sound - Sony DG910 | Instructions Manual - Page 8
connected via a HDMI IN jack (page 21). Name Q Playback channel indicators L R C SL SR S SBL SBR SB Function The letters (L, C, R, etc.) indicate the channels being played back. The boxes around the letters vary to show how the receiver downmixes the source sound (based on the speaker settings - Sony DG910 | Instructions Manual - Page 9
BACK SPEAKERS R SURROUND AC OUTLET 6 5 A DIGITAL INPUT/OUTPUT section OPTICAL IN Connects to a DVD jacks player, etc. The COAXIAL jack provides a better COAXIAL IN quality of loud jacks sound (page 25, 27). HDMI IN/ OUT jacks* Connects to a DVD player, satellite tuner, or a Blu-ray - Sony DG910 | Instructions Manual - Page 10
. (page 18, 19, 23). * You can watch the selected input image when you connect the HDMI OUT or MONITOR OUT jack to a TV (page 23). Remote commander You can use the supplied remote to operate the receiver and to control the Sony audio/video components that the remote is assigned to operate. You can - Sony DG910 | Instructions Manual - Page 11
, or PSX. To enter the value of Sony TV, press TV (wj) and then press ENTER. Press to store a station during tuner operation. Press to select information displayed on the TV screen of the VCR, VCD player, LD player, DVD player, CD player, MD deck, Blu-ray disc recorder, PSX, satellite tuner, DVD/VHS - Sony DG910 | Instructions Manual - Page 12
and select items from the option menus for DVD player or DVD/VHS COMBO. To display the options of Sony TV, press TV (wj) and then press OPTIONS TOOLS. Press to display the menus of the receiver, VCR, DVD player, satellite tuner, Blu-ray disc recorder, PSX, DVD/ VHS COMBO, or DVD/HDD COMBO on the - Sony DG910 | Instructions Manual - Page 13
selection. Press also to enter the selection of the receiver, VCR, satellite tuner, DVD player, Blu-ray disc recorder, PSX, DVD/VHS COMBO, or DVD/HDD COMBO. Press to display the EPG (Electronic Program Guide) of the TV, DVD player, satellite tuner, Blu-ray disc recorder, PSX, or DVD/HDD COMBO. Press - Sony DG910 | Instructions Manual - Page 14
/EXIT O (T), (U), and V/v/B/b (U) buttons to perform menu operations for Sony TVs only. Press to set up the remote. a)The number 5, TV CH +, PRESET + and H buttons have tactile dots. Use the tactile dots as references when operating the receiver. b)This button is also available for DIGITAL MEDIA - Sony DG910 | Instructions Manual - Page 15
Started 1: Installing speakers This receiver allows you to use a 7 channel speaker with 4 sub woofer system. Enjoying a 5.1/7.1 channel system To fully enjoy theater-like multi channel surround sound requires five speakers (two front speakers, a center speaker, and two surround speakers) and a sub - Sony DG910 | Instructions Manual - Page 16
2: Connecting speakers H B A F A B SPEAKERS FRONT B terminalsa) VIDEO 2/BD IN OUT XM Y PB/CB PR/CR VIDEO IN VIDEO IN VIDEO OUT VIDEO IN VIDEO OUT VIDEO IN VIDEO OUT SAT IN DVD IN VIDEO 1 IN MONITOR OUT MONITOR COMPONENT VIDEO L L L L R FRONT A SPEAKERS L L R FRONT B L R R R - Sony DG910 | Instructions Manual - Page 17
the SPEAKERS SURROUND BACK L terminals. d)When you connect a sub woofer with an auto standby function, turn off the function when watching movies. If the auto standby function is set to on, it turns to standby mode automatically based on the level of the input signal to a sub woofer, then sound may - Sony DG910 | Instructions Manual - Page 18
L L L L L L R FRONT A SPEAKERS L L R FRONT B L DMPORT R IN OUT R IN IN AUX SA-CD/CD/CD-R TV R R R AUDIO IN AUDIO IN AUDIO OUT AUDIO sound is output only if you make the connection to SA-CD/CD/CD-R IN jacks (analog input jack) on the receiver. Refer to the operating instructions - Sony DG910 | Instructions Manual - Page 19
L L L L L L R FRONT A SPEAKERS L L R FRONT B L DMPORT R IN OUT R IN IN AUX SA-CD/CD/CD-R TV R R R AUDIO IN AUDIO IN AUDIO OUT CENTER R SURROUND BACK SPEAKERS R SURROUND A CD player, MD deck, tape deck, etc. * A Audio cord (not supplied) * You can connect an audio component - Sony DG910 | Instructions Manual - Page 20
to the jacks on your components. Digital Analog High quality image Notes • Connect image display components such as a TV or a projector to the HDMI OUT or MONITOR OUT jack on the receiver. • Be sure to turn on the receiver when the video and audio of a playback component are being output to - Sony DG910 | Instructions Manual - Page 21
from the speakers connected to the receiver. This signal supports Dolby Digital, DTS, and linear PCM. • Analog video signals input to the VIDEO jack or COMPONENT VIDEO jacks can be output as HDMI signals. Audio signals are not output from an HDMI OUT jack when the image is converted. Blu-ray disc - Sony DG910 | Instructions Manual - Page 22
If you connect a Blu-ray disc player • Be sure to change the factory setting of the VIDEO 2 input button on the remote so that you can use the button to control your Bluray disc player. For details, see "Programming the remote" (page 85). • You can also rename the VIDEO 2 input so that it can be - Sony DG910 | Instructions Manual - Page 23
Getting Started Connecting a TV The image from a visual component connected to this receiver can be displayed on a TV screen. It is not necessary to connect all the cords. Connect audio and video cords according to the jacks of your components. Audio signals TV Video signals A B C DIGITAL ( - Sony DG910 | Instructions Manual - Page 24
connect the HDMI OUT or MONITOR VIDEO OUT jack to your TV. If you connect only the COMPONENT VIDEO MONITOR OUT jacks to the TV, the on-screen display is not output. • To output the TV sound from the speakers connected to the receiver, be sure to - connect the audio output jacks of the TV to the TV - Sony DG910 | Instructions Manual - Page 25
instructions supplied with the DVD player. Tip All the digital audio jacks are compatible with 32 kHz, 44.1 kHz, 48 kHz, and 96 kHz sampling frequencies. Connecting L L L L R FRONT A SPEAKERS L L R FRONT B L DMPORT R IN OUT R IN IN AUX SA-CD/CD/CD-R TV R R R AUDIO IN AUDIO IN - Sony DG910 | Instructions Manual - Page 26
you can use the button to control your DVD recorder. For details, see "Programming the remote" (page 85). • You can also rename the VIDEO 1 input so that it can be displayed on the receiver's display. For details, see "Naming inputs" (page 83). • When connecting optical digital cords, insert the - Sony DG910 | Instructions Manual - Page 27
top box Video signals Notes • When connecting optical digital cords, insert the plugs SA-CD/ CD/CD-R IN DVD IN COAXIAL SAT IN HDMI ANTENNA AM DVD IN VIDEO 2/BD IN OUT XM Y PB L L R FRONT A SPEAKERS L L R FRONT B L DMPORT R IN OUT R IN IN AUX SA-CD/CD/CD-R TV R R R AUDIO IN AUDIO - Sony DG910 | Instructions Manual - Page 28
connect a component which has analog jacks such as a VCR, etc. Audio signals VCR Video signals A B DIGITAL (ASSIGNABLE) SAT IN VIDEO 2/ BD IN VIDEO 1 IN OPTICAL SA-CD/ CD/CD-R IN DVD IN COAXIAL SAT IN HDMI A SPEAKERS L L R FRONT B L DMPORT R IN OUT R IN IN AUX SA-CD/CD/CD-R TV R - Sony DG910 | Instructions Manual - Page 29
R IN IN AUX SA-CD/CD/CD-R TV R R R AUDIO IN AUDIO IN AUDIO OUT AUDIO IN AUDIO OUT AUDIO IN SAT DVD VIDEO 2/BD VIDEO 1 AUDIO OUT SUB WOOFER CENTER R B SURROUN SPEAKERS A B C OUTPUT jack INPUT jack HDMI IN A VIDEO IN B COMPONENT VIDEO IN C HDMI OUT f a a COMPONENT VIDEO MONITOR OUT - Sony DG910 | Instructions Manual - Page 30
video signals from a VCR, etc., are converted on this receiver and then output to your TV, depending on the status of the video signal output, the image on the TV screen may appear distorted horizontally or no image may be output. • HDMI video signals cannot be converted to component video signals - Sony DG910 | Instructions Manual - Page 31
L R FRONT A SPEAKERS L L R FRONT B L DMPORT R IN OUT R IN IN AUX SA-CD/CD/CD-R TV R R R AUDIO SPEAKERS R SURROUND Notes • To prevent noise pickup, keep the AM loop antenna away from the receiver and other components. • Be sure to fully extend the FM wire antenna. • After connecting - Sony DG910 | Instructions Manual - Page 32
Preparing the receiver and the remote Connecting the AC power cord Connect the AC power cord to a wall outlet. AC power cord AC OUTLET L L AC OUTLET R FRONT A SPEAKERS L R FRONT B L R SURROUND BACK EAKERS R SURROUND To the wall outlet Notes • The AC OUTLET(s) on the rear of the receiver is - Sony DG910 | Instructions Manual - Page 33
. When the remote no longer operates the receiver, replace all the batteries with new ones. Press SPEAKERS (OFF/A/B/A+B) repeatedly to select the front speaker system you want to drive. To select The speakers connected to the SPEAKERS FRONT A terminals The speakers connected to the SPEAKERS FRONT - Sony DG910 | Instructions Manual - Page 34
connect other microphones to this jack. Doing so may damage the receiver and the microphone. • During the calibration, the sound that comes out of the speakers . - Headphones are connected. ?/1 SPEAKERS (OFF/A/B/A+B) TONE MODE TONE TUNING MODE TUNING AUTO CAL MIC PHONES VIDEO 3 IN/PORTABLE - Sony DG910 | Instructions Manual - Page 35
setting up the active sub woofer • When a sub woofer is connected, turn on the sub woofer and turn up the volume beforehand. Turn the VIDEO 3 DVD SAT TV SA-CD/CD TUNER AUX DMPORT RECEIVER 2CH A.F.D. MOVIE MUSIC CATEGORY SLEEP MODE D.TUNING AUTO CAL 123 456 7 -/-CLEAR >10 GUIDE 89 0/10 ENTER - Sony DG910 | Instructions Manual - Page 36
do the following during the measurement process: - Press ?/1, input buttons or MUTING. - Press SPEAKERS (OFF/A/B/A+B) on the receiver. - Change the volume level. - Press AUTO CAL again. - Connect the headphones. Confirming/saving the measurement results 1 Confirm the measurement result. When the - Sony DG910 | Instructions Manual - Page 37
33 The surround back speaker is connected only to the SPEAKERS SURROUND BACK R terminals. When you connect only one surround back speaker, connect it to the SPEAKERS SURROUND BACK L terminals. • CODE 31 1 Press RECEIVER. The RECEIVER indicator lights up and receiver operation is activated. 2 Press - Sony DG910 | Instructions Manual - Page 38
. WARN 41 The sound input from the optimizer microphone is out of range. It is louder than the loudest sound that can be measured speakers are connected properly. This is because of the speakers' specifications. In this case, you can continue to use the receiver. * xxx represent a speaker - Sony DG910 | Instructions Manual - Page 39
at 800 Hz. SYSTEM STANDBY VIDEO 1 VIDEO 2 VIDEO 3 DVD Input buttons SAT TV SA-CD/CD TUNER AUX DMPORT RECEIVER 1 2CH A.F.D. MOVIE MUSIC CATEGORY SLEEP MODE D.TUNING AUTO CAL 3-6 123 456 7 -/-CLEAR >10 GUIDE 89 0/10 V ENTER MEMORY DISPLAY B < B v RETURN/ EXIT MENU OPTIONS TOOLS - Sony DG910 | Instructions Manual - Page 40
TONE N". You can also press any input buttons. The test tone turns off. When a test tone is not output from the speakers • The speaker cords may not be connected securely. • The speaker cords may have the short-circuit problem. Note The test tone does not work when ANALOG DIRECT is selected. 40US - Sony DG910 | Instructions Manual - Page 41
also use INPUT SELECTOR on the receiver. The selected input appears on the display. Selected input Components that can [Display] be played back VIDEO 1 [VIDEO 1] VCR, etc., connected to the VIDEO 1 jack VIDEO 2 Blu-ray disc player, etc., [VIDEO 2/BD]* connected to the VIDEO 2/BD jack VIDEO - Sony DG910 | Instructions Manual - Page 42
To mute the sound Press MUTING. The muting function will be canceled when you do the following. • Press MUTING again. • Increase the volume. • Turn off the receiver. To avoid damaging your speakers Before you turn off the receiver, be sure to turn down the volume level. 42US - Sony DG910 | Instructions Manual - Page 43
Playback Listening/Watching a component Listening to a Super Audio CD/CD TV RM SET UP AV ?/1 ?/1 SYSTEM STANDBY VIDEO 1 VIDEO 2 VIDEO 3 DVD SAT TV SA-CD/CD TUNER AUX DMPORT RECEIVER 2CH A.F.D. MOVIE MUSIC CATEGORY SLEEP MODE D.TUNING AUTO CAL 123 456 7 -/-CLEAR >10 GUIDE 89 0/10 V - Sony DG910 | Instructions Manual - Page 44
instructions supplied with the TV and DVD player. • Check the following if you cannot listen to multi channel sound. - Be sure the audio source corresponds to the multi channel format (the MULTI CHANNEL DECODING lamp on the front panel lights up during playback). - Be sure this receiver is connected - Sony DG910 | Instructions Manual - Page 45
the receiver. AUX DMPORT RECEIVER 1 2CH A.F.D. MOVIE MUSIC CATEGORY SLEEP MODE D.TUNING AUTO CAL 3-7 123 456 7 -/-CLEAR >10 GUIDE 89 menus on the TV screen by setting the "OSD" in VIDEO menu to "OSD ON". < B 1 Press RECEIVER. The RECEIVER indicator lights up and receiver operation is - Sony DG910 | Instructions Manual - Page 46
on/off a) [EQ] Front speakers bass level [BASS LVL] Front speakers treble level [TRE LVL] Sound field selectiona) [S.F. SELCT] Surround MULTI ST., C.ST.EX A, C.ST.EX B, 2CH ST. for: C.ST.EX C, PORTABLE, HALL, TV, SA-CD/ JAZZ, CONCERT CD, TUNER, AUX, DMPORT SB OFF, SB AUTO, SB ON SB AUTO - Sony DG910 | Instructions Manual - Page 47
54) VIDEO [6-VIDEO] (page 55) Parameters [Display] FM station receiving modea) [FM MODE] Naming preset stationsa) [NAME IN] Digital audio 2, assigna) -VIDEO 3, -DVD, -SAT [DMPORT V.] HDMI AUDIOa)d) [AUDIO] AMP, TV+AMP HDMI CONTROLa)d) [CONTROL] CTRL ON, CTRL OFF Naming inputsa) [NAME IN] - Sony DG910 | Instructions Manual - Page 48
SPK] Center speakera) [CNT SPK] Surround speakersa) [SUR SPK] Surround back speakersa) [SB SPK] Front left speaker distancea)e) [FL DIST.] Front right speaker distancea)e) [FR DIST.] Center speaker distancea)e) [CNT DIST.] Settings YES, NO LARGE, SMALL LARGE, SMALL, NO LARGE, SMALL, NO DUAL, SINGLE - Sony DG910 | Instructions Manual - Page 49
the parentheses. b)You can only select this parameter when the surround back speakers are set to "SINGLE". c)You can only select this parameter when the surround back speakers are set to "DUAL". d)When you select this parameter, the "HDMI" flashes on the display. e)When you set "CAL LOAD" in A. CAL - Sony DG910 | Instructions Manual - Page 50
You can only select this parameter when the surround back speakers are set to "DUAL" in SYSTEM menu. x D. RANGE (Dynamic range compressor) Lets you compress the dynamic range of the sound track. This may be useful when you want to watch movies at low volumes late at night. Dynamic range compression - Sony DG910 | Instructions Manual - Page 51
The equalizer is turned off. x BASS LVL (Front speakers bass level)* x TRE LVL (Front speakers treble level)* * You can also adjust the front speaker bass and treble level with TONE MODE and TONE +/- on the receiver (page 5). Settings for the surround sound (SUR menu) You can use the SUR menu to - Sony DG910 | Instructions Manual - Page 52
signal of DVD software (etc.) recorded in Dolby Digital Surround EX, DTS-ES Matrix, DTS-ES Discrete 6.1, etc., format, you can enjoy the surround sound intended by the filmmakers. Select the surround back decoding mode using "SB DEC" in the SUR menu (page 46). Types of the surround back decoding - Sony DG910 | Instructions Manual - Page 53
surround back speakers are connected, the output channel will be 7.1 channel. Notes • There may be no sound from the surround back speaker in Dolby (TUNER menu) You can use the TUNER menu to set the FM station receiving mode and to name preset stations. Select "4-TUNER" in the amplifier menus. - Sony DG910 | Instructions Manual - Page 54
case, set to "DEC. AUTO". When signals from the HDMI IN jack are selected, only PCM signals are output from the connected component. When signals other than PCM signals are received, set this item to "DEC. AUTO". Note When set to "DEC. AUTO" and the sound from the digital audio jacks (for a CD, etc - Sony DG910 | Instructions Manual - Page 55
stereo speakers, the sound output from the receiver is also stereo as that of the TV, even if you play back multi channel software. • When you connect the receiver to an image display component (projector, etc.), sound may not be output from the receiver. In this case, select "AMP ". x CONTROL (HDMI - Sony DG910 | Instructions Manual - Page 56
of the speakers connected to this receiver. Select "7- connected a center speaker, select "NO". The sound of the center channel will be output from the front speakers. x SUR SPK (Surround speakers) The surround back speakers will be set to the same setting. • LARGE If you connect large speakers - Sony DG910 | Instructions Manual - Page 57
to "NO" and the setting cannot be changed. • DUAL If you connect two surround back speakers, select "DUAL". The sound will be output to a maximum of 7.1 channel. • SINGLE If you connect only one surround back speaker, select "SINGLE". The sound will be output to a maximum of 6.1 channel. • NO If you - Sony DG910 | Instructions Manual - Page 58
. This is important because incorrect speaker placement is not conductive to the enjoyment of surround sound. Please note that placing the speakers closer than the required will cause a delay in the output of the sound from that speaker. In other words, the speaker will sound like it is farther away - Sony DG910 | Instructions Manual - Page 59
in forming a cohesive space between the surround sound from the surround speakers and the sound of the front speakers. If you are not sure which sounds best, select "BEHD/LO" or "BEHD/HI" and then use the speaker distance parameter and speaker level adjustments to obtain proper balance. x CRS - Sony DG910 | Instructions Manual - Page 60
) The Auto Format Direct (A.F.D.) mode allows you to listen to higher fidelity sound and select the decoding mode for listening to a 2 channel stereo sound as multi channel sound. A.F.D. AUX DMPORT RECEIVER 2CH A.F.D. MOVIE MUSIC CATEGORY SLEEP MODE D.TUNING AUTO CAL Press A.F.D. repeatedly to - Sony DG910 | Instructions Manual - Page 61
mode can reproduce sound in 5.1 channel for watching videos of overdubbed receiver receives PCM signals of 2 channel or an XM Radio surround broadcast. When the receiver receives a stereo broadcast, the stereo sound is emphasized. Outputs 2 channel left/right signals from all speakers. However, sound - Sony DG910 | Instructions Manual - Page 62
can take advantage of surround sound simply by selecting one of the receiver's preprogrammed sound fields. They bring the exciting and powerful sound of movie theaters and concert halls into your home. 2CH A.F.D. SAT TV SA-CD/CD TUNER AUX DMPORT RECEIVER 2CH A.F.D. MOVIE MUSIC CATEGORY SLEEP - Sony DG910 | Instructions Manual - Page 63
watching science-fiction or action movies with lots of sound effects. Reproduces the sound characteristics of the Sony Pictures Entertainment scoring stage. This mode is ideal for watching , sound field, etc. * You can only select this sound field if the headphones are connected to the receiver. - Sony DG910 | Instructions Manual - Page 64
channel PCM signals are received via a HDMI IN jack. • The surround back decoding mode does not function when a sound field for movie or music is selected (page 52). • When one of the following sound fields is selected, no sound is output from the sub woofer if all the speakers are set to "LARGE - Sony DG910 | Instructions Manual - Page 65
use the input buttons on the remote. 2 Press DIRECT on the receiver. "A. DIRECT" appears on the display. The analog audio is output. To cancel ANALOG DIRECT Press DIRECT on the receiver again. You can also press any sound field buttons. Notes • When headphones are connected, "HP DIR" appears on the - Sony DG910 | Instructions Manual - Page 66
Resetting sound fields to the initial settings Be sure to use the buttons on the receiver for this operation. 1,2 ?/1 SPEAKERS (OFF/A/B/A+B) TONE MODE TONE TUNING MODE TUNING AUTO CAL MIC PHONES VIDEO 3 IN/PORTABLE AV IN VIDEO L AUDIO R MULTI CHANNEL DECODING DISPLAY INPUT MODE INPUT - Sony DG910 | Instructions Manual - Page 67
the controls on the receiver 1 Turn INPUT SELECTOR to select the FM or AM band. 2 Press TUNING MODE repeatedly to select "AUTO T.". 3 Turn TUNING +/-. In case of poor FM stereo reception If the FM stereo reception is poor and "ST" flashes on the display, select monaural audio so that the sound will - Sony DG910 | Instructions Manual - Page 68
tune in the stations you often listen to. Presetting radio stations SAT TV SA-CD/CD TUNER 1 AUX DMPORT RECEIVER 2CH A.F.D. MOVIE MUSIC CATEGORY SLEEP MODE D.TUNING AUTO CAL 123 4 456 7 -/-CLEAR >10 GUIDE 89 0/10 ENTER MEMORY DISPLAY V 3,5 B < B v RETURN/ EXIT MENU OPTIONS TOOLS - Sony DG910 | Instructions Manual - Page 69
you want. Then, press ENTER to enter the selection. Using the controls on the receiver 1 Turn INPUT SELECTOR to select the FM or AM band. 2 Press TV SA-CD/CD TUNER 1 AUX DMPORT RECEIVER 2CH A.F.D. MOVIE MUSIC 3 CATEGORY SLEEP MODE D.TUNING AUTO CAL 5-8 123 456 7 -/-CLEAR >10 GUIDE 89 - Sony DG910 | Instructions Manual - Page 70
Canadian customers, information about XM Canada is online at www.xmradio.ca blocking is available for XM radio receivers by calling 1-800XMRADIO (US commercial-free channels and advertising-supported channels, visit lineup.xmradio. 48 contiguous United States and Canada. ©2006 XM Satellite Radio - Sony DG910 | Instructions Manual - Page 71
system you are done. For more information or to subscribe in Canada, visit XM on the Web at www.xmradio.ca or call XM's Listener Care at 1877-GET-XMSR (1-877-438-9677). Connecting the XM Radio Before operating the receiver, connect the XM Connect-and-Play antenna to the XM jack. XM jack DIGITAL - Sony DG910 | Instructions Manual - Page 72
Checking the XM Radio ID SAT TV SA-CD/CD TUNER 1 AUX DMPORT RECEIVER 2CH A.F.D. MOVIE MUSIC CATEGORY SLEEP MODE D.TUNING AUTO CAL 123 456 7 -/-CLEAR >10 GUIDE 89 0/10 V ENTER MEMORY DISPLAY < B B v RETURN/ EXIT MENU OPTIONS TOOLS - CATEGORY + REPLAY ADVANCE .< > TUNING - m H - Sony DG910 | Instructions Manual - Page 73
category or all the categories by changing the category mode. SAT TV SA-CD/CD TUNER 1 AUX DMPORT RECEIVER 2CH A.F.D. MOVIE MUSIC CATEGORY SLEEP MODE D.TUNING AUTO CAL 2 123 456 7 -/-CLEAR >10 GUIDE 89 0/10 V ENTER MEMORY DISPLAY < B B v RETURN/ EXIT MENU OPTIONS TOOLS - CATEGORY - Sony DG910 | Instructions Manual - Page 74
(DIRECT TUNING) SAT TV SA-CD/CD TUNER 1 AUX DMPORT RECEIVER 2CH A.F.D. MOVIE MUSIC CATEGORY receiver. The selected channel is tune in. Displaying the XM-RADIO information on the front panel display DISPLAY ?/1 SPEAKERS (OFF/A/B/A+B) TONE MODE TONE TUNING MODE TUNING AUTO CAL MIC PHONES - Sony DG910 | Instructions Manual - Page 75
30 XM Radio channels. Presetting channels using the preset numbers SAT TV SA-CD/CD TUNER AUX DMPORT RECEIVER 2CH A.F.D. MOVIE MUSIC CATEGORY SLEEP MODE D.TUNING AUTO CAL 123 456 7 -/-CLEAR >10 GUIDE 89 0/10 V ENTER MEMORY DISPLAY < B B v RETURN/ EXIT MENU OPTIONS TOOLS - CATEGORY - Sony DG910 | Instructions Manual - Page 76
2 Note The preset channel information will be updated depending on the service provided by the XM Satellite Radio Inc. that you have subscribed to. 1 Press TUNER repeatedly to select "XM RADIO". You can also use INPUT SELECTOR on the receiver. 2 Press PRESET + or PRESET - repeatedly to select - Sony DG910 | Instructions Manual - Page 77
The XM antenna is not connected or transmission is not being received properly. Make sure that the antenna is securely connected. Try to disconnect the antenna then reconnect, or turn off the power then turn back on. UPDATING The encryption code is being updated. Wait until the encryption code - Sony DG910 | Instructions Manual - Page 78
audio input mode setting when you connect components to both digital and analog audio input jacks on the receiver. 1 Turn INPUT SELECTOR on the receiver to select the input. You can also use the input buttons on the remote. 2 Press INPUT MODE repeatedly on the receiver to select the audio input mode - Sony DG910 | Instructions Manual - Page 79
, SA-CD/ CD/CD-R IN) signals to another input when they are not currently being used. For example, to output the sound source for DVD player using the OPTICAL IN jack on the receiver, then: • Connect the optical output jack of the DVD player to the OPTICAL VIDEO 2/BD IN jack of the - Sony DG910 | Instructions Manual - Page 80
[CD COAX] VIDEO 3 SAT CD-VD1 CD-VD2 CD-VD3 CD-SAT TV CD-TV SA-CD/CD CD-CD Notes • You cannot reassign more than one digital connecting a DIGITAL MEDIA PORT adapter (not supplied), you can enjoy sound from the connected component on the receiver. For details, see the operating instructions - Sony DG910 | Instructions Manual - Page 81
to the sound from the component connected through the DIGITAL MEDIA PORT adapter to the DMPORT jack on the receiver. You can also view the images on the TV screen by connecting the video output of the DIGITAL MEDIA PORT adapter to the receiver. To view the images, proceed to "Watching a connected - Sony DG910 | Instructions Manual - Page 82
. The sound is played back on the receiver. For details, see the operating instructions supplied with the DIGITAL MEDIA PORT adapter. Watching a connected component through DMPORT connection You need to assign composite video input to DMPORT input so that you can view the images on the TV screen - Sony DG910 | Instructions Manual - Page 83
for inputs and display it on the receiver's display. This is convenient for labeling the jacks with the names of the connected components. 1 Press one of the You can check the sound field, etc., by changing the information on the display. Be sure to use the buttons on the receiver for this operation. - Sony DG910 | Instructions Manual - Page 84
the display dims. Note If you press any buttons on the remote or receiver after the display dims, the display brightens up. After a while receiver Recording onto a CD-R You can record onto a CD-R using the receiver. See the operating instructions Note Sound adjustments do not affect the signal output from the - Sony DG910 | Instructions Manual - Page 85
those components as part of your system. Furthermore, you can also program the remote for Sony components that the remote is unable to control. Note that the remote can only control components that accept infrared wireless control signals. 1 Press RM SET UP. The RM SET UP indicator slowly flashes - Sony DG910 | Instructions Manual - Page 86
reset the remote to factory settings. While holding down MASTER VOL -, press and hold ?/1 and then press AV ?/1. The indicator flashes 3 times, then goes off. The numeric codes corresponding to the component and the maker of the component Use the numeric codes in the tables below to control non-Sony - Sony DG910 | Instructions Manual - Page 87
215, 216 217, 218 To control an LD player Maker SONY PIONEER Code(s) 601, 602, 603 606 To control a video CD player Maker SONY Code(s) 605 To control a VCR Maker SONY AIWA* AKAI BLAUPUNKT EMERSON FISHER enter the code for AIWA, enter the code for Sony instead. continued 87US Using the Remote - Sony DG910 | Instructions Manual - Page 88
416 415, 423 419 417 406, 408, 425 407 409, 410 414 416, 422 404, 421 418, 420 To control a DVD recorder Maker SONY Code(s) 403 88US To control a TV Maker SONY AIWA AKAI AOC CENTURION CORONADO CURTIS-MATHES DAYTRON DAEWOO FISHER FUNAI FUJITSU GOLDSTAR/LG GRUNDIG HITACHI ITT/NOKIA J.C.PENNY JVC - Sony DG910 | Instructions Manual - Page 89
864, 874 851, 853, 854, 864 866, 871 868 867 873 872 875 869, 870 To control a cable box Maker SONY HAMLIN/REGAL JERROLD/G.I./ MOTOROLA JERROLD OAK PANASONIC PHILIPS PIONEER RCA SCIENTIFIC ATLANTA TOCOM/PHILIPS ZENITH Code(s) 821, 815, 816, 817 830, 831 826, 827 continued 89US Using the Remote - Sony DG910 | Instructions Manual - Page 90
control a tuner Maker SONY Code(s) 002, 005 To control a Blu-ray disc recorder Maker SONY Code(s) 310, 311, 312 To control a PSX Maker SONY Code(s) 313, 314, 315 To control a DVD/VHS COMBO Maker SONY Code(s) 411 To control a DVD/HDD COMBO Maker SONY more realistic sound with fuller - Sony DG910 | Instructions Manual - Page 91
surround sound. connection. The HDMI connection carries standard to high definition video signals and multi channel audio signals to audio/video components, such as HDMI equipped TVs, in digital form without degradation. The HDMI specification supports HDCP (High-bandwidth Digital Contents Protection - Sony DG910 | Instructions Manual - Page 92
on the back of the receiver. • The unit is not disconnected from the AC power source (mains) as long as it is connected to the wall outlet, a qualified service shop. On heat buildup Although the receiver heats up during operation, this is not a malfunction. If you continuously use this receiver at a - Sony DG910 | Instructions Manual - Page 93
following difficulties while using the receiver, use this troubleshooting guide to help you remedy the problem. Audio There is no sound, no matter which component is selected, or only a very low-level sound is heard. • Check that the speakers and components are connected securely. • Check that both - Sony DG910 | Instructions Manual - Page 94
IN" for the selected input (page 78). The source sound input from the HDMI jack on the receiver is not output from the receiver or TV speaker. • Check the setting of HDMI AUDIO in the VIDEO menu (page 55). • Check the HDMI connection. • The sound is not output when the amplifier menus are displayed - Sony DG910 | Instructions Manual - Page 95
not be possible. The source image input to the HDMI jack on the receiver is not output from the TV. • Check the HDMI connection. • Depending on the playback component, you may need to set up the component. Refer to the operating instructions supplied with each component. Recording cannot be carried - Sony DG910 | Instructions Manual - Page 96
error message appears while you perform Auto Calibration, see "When error codes appear" (page 37) to solve the problem. PROTECT Irregular current is output from the speakers. The receiver will automatically turn off after a few seconds. Check the speaker connection and turn on the power again. 96US - Sony DG910 | Instructions Manual - Page 97
the problem using the troubleshooting guide Clearing the receiver's memory may remedy the problem (page 32). However, note that all memorized settings will be reset to their factory settings and you will have to readjust all settings on the receiver. If the problem persist Consult your nearest Sony - Sony DG910 | Instructions Manual - Page 98
dB step 3)INPUT SHORT (with sound field and equalizer bypassed). 4)Weighted receiver. While holding down TUNING MODE, press ?/1. All preset stations will be erased when you change the tuning scale. To reset 360 VA (Canada) Power consumption (during standby mode) 0.3 W (When "CONTROL" in VIDEO - Sony DG910 | Instructions Manual - Page 99
-R 84 onto a recording media 85 Remote commander 10 S Satellite tuner/Set-top box connecting 27 Selecting component 41 sound field 62 speaker system 33 Sleep Timer 84 Sound fields resetting 66 selecting 62 Speakers connecting 16 installing 15 Super Audio CD player connecting 18, 19 playback 43 SUR - Sony DG910 | Instructions Manual - Page 100
(1) Sony Corporation Printed in Malaysia
-
 1
1 -
 2
2 -
 3
3 -
 4
4 -
 5
5 -
 6
6 -
 7
7 -
8
-
9
-
10
-
11
-
12
-
13
-
14
-
15
-
16
-
17
-
18
-
19
-
20
-
21
-
22
-
23
-
24
-
25
-
26
-
27
-
28
-
29
-
30
-
31
-
32
-
33
-
34
-
35
-
36
-
37
-
38
-
39
-
40
-
41
-
42
-
43
-
44
-
45
-
46
-
47
-
48
-
49
-
50
-
51
-
52
-
53
-
54
-
55
-
56
-
57
-
58
-
59
-
60
-
61
-
62
-
63
-
64
-
65
-
66
-
67
-
68
-
69
-
70
-
71
-
72
-
73
-
74
-
75
-
76
-
77
-
78
-
79
-
80
-
81
-
82
-
83
-
84
-
85
-
86
-
87
-
88
-
89
-
90
-
91
-
92
-
93
-
94
-
95
-
96
-
97
-
98
-
99
-
100
 |
 |
©2007 Sony Corporation
3-094-430-
11
(1)
Multi Channel AV
Receiver
Operating Instructions
Owner’s Record
The model and serial numbers are located on the rear of the unit. Record the
serial number in the space provided below. Refer to them whenever you call
upon your Sony dealer regarding this product.
Model No.
Serial No.
STR-DG910