Sony DG910 Instructions Manual - Page 17
a: Connecting the audio components, Component to be connected
 |
UPC - 027242707023
View all Sony DG910 manuals
Add to My Manuals
Save this manual to your list of manuals |
Page 17 highlights
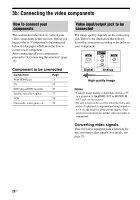
Getting Started a)If you have an additional front speaker system, connect them to the SPEAKERS FRONT B terminals. You can select the front speakers you want to use with the SPEAKERS (OFF/A/B/A+B) button on the receiver (page 33). b)If you have an additional sub woofer, connect it to any of the SUB WOOFER jacks. You can connect up to 4 sub woofers. c)If you connect only one surround back speaker, connect it to the SPEAKERS SURROUND BACK L terminals. d)When you connect a sub woofer with an auto standby function, turn off the function when watching movies. If the auto standby function is set to on, it turns to standby mode automatically based on the level of the input signal to a sub woofer, then sound may not be output. 3a: Connecting the audio components How to connect your components This section describes how to connect your audio components to this receiver. Before you begin, refer to "Component to be connected" below for the pages which describe how to connect each component. After connecting your audio component, proceed to "3b: Connecting the video components" (page 20) or "4: Connecting the antennas" (page 31). Component to be connected Component Super Audio CD player/ CD player/ CD recorder With Digital audio outputa) Analog audio output onlyb) Page 18 19 MD deck, tape deck, etc. Analog audio output 19 onlyb) a)Model with DIGITAL COAXIAL OUTPUT jack etc. b)Model equipped only with AUDIO OUT L/R jacks, etc. 17US
-
 1
1 -
2
-
3
-
4
-
5
-
6
-
7
-
8
-
9
-
10
-
11
-
 12
12 -
 13
13 -
 14
14 -
 15
15 -
 16
16 -
 17
17 -
 18
18 -
 19
19 -
 20
20 -
 21
21 -
 22
22 -
23
-
24
-
25
-
26
-
27
-
28
-
29
-
30
-
31
-
32
-
33
-
34
-
35
-
36
-
37
-
38
-
39
-
40
-
41
-
42
-
43
-
44
-
45
-
46
-
47
-
48
-
49
-
50
-
51
-
52
-
53
-
54
-
55
-
56
-
57
-
58
-
59
-
60
-
61
-
62
-
63
-
64
-
65
-
66
-
67
-
68
-
69
-
70
-
71
-
72
-
73
-
74
-
75
-
76
-
77
-
78
-
79
-
80
-
81
-
82
-
83
-
84
-
85
-
86
-
87
-
88
-
89
-
90
-
91
-
92
-
93
-
94
-
95
-
96
-
97
-
98
-
99
-
100
 |
 |