Sony HDR-PJ260V Operating Guide - Page 24
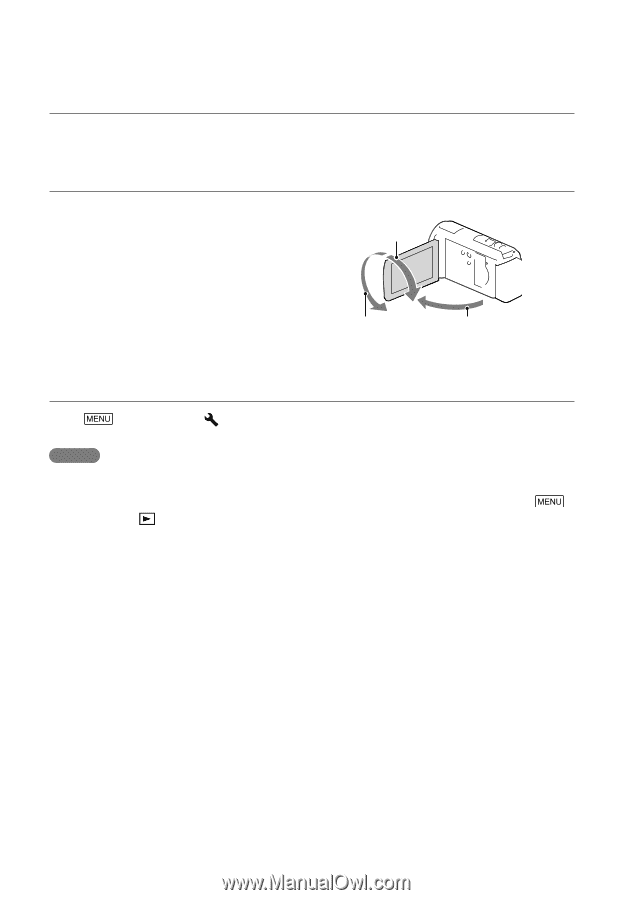
To turn off the power, To adjust the angle of the LCD panel, To turn off the beep sound
 |
View all Sony HDR-PJ260V manuals
Add to My Manuals
Save this manual to your list of manuals |
Page 24 highlights
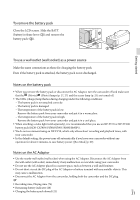
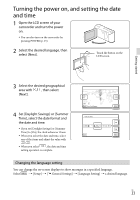
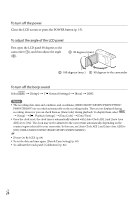
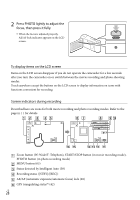
To turn off the power Close the LCD screen or press the POWER button (p. 15). To adjust the angle of the LCD panel First open the LCD panel 90 degrees to the camcorder (), and then adjust the angle (). 90 degrees (max.) 180 degrees (max.) 90 degrees to the camcorder To turn off the beep sound Select [Setup] [ General Settings] [Beep] [Off]. Notes The recording date, time and condition, and coordinates (HDR-CX260V/CX580V/PJ260V/PJ580V/ PJ600V/XR260V) are recorded automatically on the recording media. They are not displayed during recording. However, you can check them as [Data Code] during playback. To display them, select [Setup] [ Playback Settings] [Data Code] [Date/Time]. Once the clock is set, the clock time is automatically adjusted with [Auto Clock ADJ ] and [Auto Area ADJ] set to [On]. The clock may not be adjusted to the correct time automatically, depending on the country/region selected for your camcorder. In this case, set [Auto Clock ADJ ] and [Auto Area ADJ] to [Off] (HDR-CX260V/CX580V/PJ260V/PJ580V/PJ600V/XR260V). [Power On By LCD] (p. 69) To set the date and time again: [Date & Time Setting] (p. 69) To calibrate the touch panel: [Calibration] (p. 82) US 24
-
 1
1 -
2
-
3
-
4
-
5
-
6
-
7
-
8
-
9
-
10
-
11
-
12
-
13
-
14
-
15
-
16
-
17
-
18
-
 19
19 -
 20
20 -
 21
21 -
 22
22 -
 23
23 -
 24
24 -
 25
25 -
 26
26 -
 27
27 -
 28
28 -
 29
29 -
30
-
31
-
32
-
33
-
34
-
35
-
36
-
37
-
38
-
39
-
40
-
41
-
42
-
43
-
44
-
45
-
46
-
47
-
48
-
49
-
50
-
51
-
52
-
53
-
54
-
55
-
56
-
57
-
58
-
59
-
60
-
61
-
62
-
63
-
64
-
65
-
66
-
67
-
68
-
69
-
70
-
71
-
72
-
73
-
74
-
75
-
76
-
77
-
78
-
79
-
80
-
81
-
82
-
83
-
84
-
85
-
86
-
87
-
88
-
89
-
90
-
91
-
92
-
93
-
94
-
95
-
96
-
97
-
98
-
99
-
100
-
101
-
102
-
103
-
104
-
105
-
106
-
107
-
108
-
109
-
110
-
111
-
112
-
113
-
114
-
115
-
116
-
117
-
118
-
119
-
120
-
121
-
122
-
123
-
124
-
125
-
126
-
127
-
128
-
129
-
130
-
131
-
132
-
133
-
134
-
135
-
136
-
137
-
138
-
139
-
140
-
141
-
142
-
143
-
144
-
145
-
146
-
147
-
148
-
149
-
150
-
151
-
152
-
153
-
154
-
155
-
156
-
157
-
158
-
159
-
160
-
161
-
162
-
163
-
164
-
165
-
166
-
167
-
168
-
169
-
170
-
171
-
172
-
173
-
174
-
175
-
176
-
177
-
178
-
179
-
180
-
181
-
182
-
183
-
184
-
185
-
186
-
187
-
188
-
189
-
190
-
191
 |
 |