Sony HDWS280 Product Manual (Operation Manual 1st Edition (Revised 5)) - Page 22
Preparations
 |
View all Sony HDWS280 manuals
Add to My Manuals
Save this manual to your list of manuals |
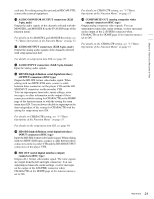
Page 22 highlights
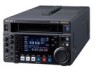
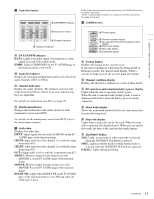
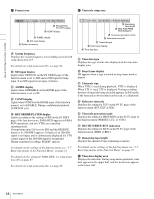
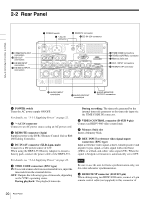
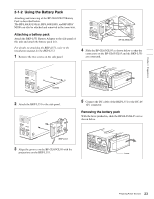
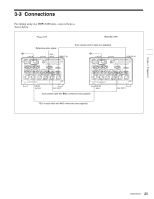
Chapter 3 Preparations Preparations 3 Chapter 3-1 Preparing Power Sources This unit can be powered by AC power, DC power, or a battery pack. Note If you load or remove a battery pack incorrectly, it may fall and cause bodily injury. Follow the procedures described below to load or remove them. 3-1-1 Supplying Power This unit has two power switches, one on the front panel and another on the rear panel. The power switch on the front panel is to turn DC power ON/OFF, and the POWER switch on the rear panel is to turn AC power ON/OFF. Power is supplied to the unit in combination of these two switches as shown below. When AC power is switched on, the AC power indicator lights on the front panel. When DC power is switched on, a battery mark appears in the display window on the front panel. POWER switch on the rear panel ON OFF Power switch on the front panel ? (ON) 1 (OFF) AC power supply No power supply AC indicator lit AC indicator lit DC power supply No power supply AC indicator not lit AC indicator not lit AC power supply Connect the AC IN connector to an AC power source using the specified AC power cord. To supply AC power to the unit, set the power switch on the front panel to ? (ON) and the POWER switch on the rear panel to ON. DC power supply Connect the DC IN 12V connector to a DC power source. To supply DC power to the unit, set the power switch on the front panel to ? (ON) and the POWER switch on the rear panel to OFF. If the POWER switch on the rear panel is set to ON, AC power is supplied. Battery power supply The BP-GL95 lithium-ion battery pack provides up to 80 minutes of continuous recording time, and the BP-L80S provides up to 55 minutes. For details on charging battery packs, refer to the operation manual for the battery charger. Applicable battery packs For safety, use only the Sony battery packs listed below. To use battery pack, a BKP-L551 Battery Adaptor and a BC-L100 Battery Charger are also required. • BP-L60(A)/L90(A) • BP-L60S/L80S • BP-GL65/GL95 • BP-M50/M100 Notes about battery usage • Before using the batteries, be sure to charge them fully with the special battery charger. Refer to the operating instructions for your battery charger for more information about how to charge the batteries. • Batteries may not be completely charged if you charge them immediately after use when they are still warm. You should wait until the batteries cool before charging them. 22 Preparing Power Sources
-
 1
1 -
2
-
3
-
4
-
5
-
6
-
7
-
8
-
9
-
10
-
11
-
12
-
13
-
14
-
15
-
16
-
 17
17 -
 18
18 -
 19
19 -
 20
20 -
 21
21 -
 22
22 -
 23
23 -
 24
24 -
 25
25 -
 26
26 -
 27
27 -
28
-
29
-
30
-
31
-
32
-
33
-
34
-
35
-
36
-
37
-
38
-
39
-
40
-
41
-
42
-
43
-
44
-
45
-
46
-
47
-
48
-
49
-
50
-
51
-
52
-
53
-
54
-
55
-
56
-
57
-
58
-
59
-
60
-
61
-
62
-
63
-
64
-
65
-
66
-
67
-
68
-
69
-
70
-
71
-
72
-
73
-
74
-
75
-
76
-
77
-
78
-
79
-
80
-
81
-
82
-
83
-
84
-
85
-
86
-
87
-
88
-
89
-
90
-
91
-
92
-
93
-
94
 |
 |
