Sony HDWS280 Product Manual (Operation Manual 1st Edition (Revised 5)) - Page 56
Setting Stored Ownership, Time zone settings
 |
View all Sony HDWS280 manuals
Add to My Manuals
Save this manual to your list of manuals |
Page 56 highlights
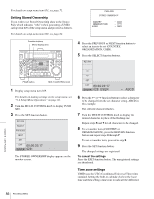
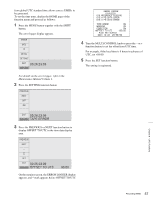
For details on setup menu item 653, see page 72. Setting Stored Ownership If you wish to set Stored Ownership (data in the Source Pack which indicates "who") when generating a UMID, call up item 029 of the setup menu and proceed as follows. For details on setup menu item 029, see page 64. ITEM-029 STORED OWNERSHIP COUNTRY ORGANIZATION *USER - XXXX - YYYY - ABCD Function buttons Menu display area HDW-S280 EJECT PB LEVEL 13 REC LEVEL 13 24 24 R/P LEVEL CTL VAR LEVEL PRESET PHONES REC INHI ON OFF KEY INHI ON OFF SHIFT PAGE HOME CHARACTR ON PB/EE PB CONFI ENABLE CTL/TC TC EMPH EMPH EMPH EMPH 0 0 -10 -10 -20 -20 -30 -30 -40 -40 1 23 4 HD INPUT : ANA CH1 IN : -60 CH2 IN : -4 COND OUT : +4 MONI L : 1 BANK 2 MONI R : 2 D-STOP DOLBY NR P ROLL ASSEMBLE 59.94i SDI ASMBL CONFI ON RECORDER OFF LTC DF VITC LTC EXT-LTC R-RUN REM:00M TCG SET HOME 00:00:00:00. DISPLAY MULTI CONTROL REMOTE MENU RESET PREROLL PUSH PITCH CTL JOG/SHUTTLE REW PLAY F FWD STOP REC PAUSE STANDBY PAGE button MULTI CONTROL knob 1 Display setup menu item 029. For details on making settings on the setup menu, see "9-2 Setup Menu Operations" on page 60. 2 Turn the MULTI CONTROL knob to display PUSH SET. 3 Press the SET function button. RETURN SELECT PREVIOUS NEXT SET EXIT 00:26:22:17 SETUP M 029: The STORED OWNERSHIP display appears on the monitor screen. 4 Press the PREVIOUS or NEXT function button to select an item to be set (COUNTRY, ORGANIZATION, USER). 5 Press the SELECT function buttons. RETURN K k SET EXIT 00:26:22:17 SETUP M 029: USER - ABCD 6 Press the T or t function button to select a character to be changed from the set character string, ABCD in this example. The selected character flashes. 7 Turn the MULTI CONTROL knob to display the desired character in place of the flashing one. Repeat steps 6 and 7 for all characters to be changed. 8 To set another item (COUNTRY or ORGANIZATION), press the RETURN function button and repeat steps 4 through 7. To not set another item, proceed to step 9. 9 Press the SET function button. The changed settings are registered. To cancel the settings Press the EXIT function button. The unregistered settings are abandoned. Time zone settings UMID uses the UTC (Coordinated Universal Time) time standard. Setting the built-in calendar clock to the local time and then setting a time zone to indicate the difference Chapter 8 UMID Functions 56 Recording UMIDs
-
 1
1 -
2
-
3
-
4
-
5
-
6
-
7
-
8
-
9
-
10
-
11
-
12
-
13
-
14
-
15
-
16
-
17
-
18
-
19
-
20
-
21
-
22
-
23
-
24
-
25
-
26
-
27
-
28
-
29
-
30
-
31
-
32
-
33
-
34
-
35
-
36
-
37
-
38
-
39
-
40
-
41
-
42
-
43
-
44
-
45
-
46
-
47
-
48
-
49
-
50
-
 51
51 -
 52
52 -
 53
53 -
 54
54 -
 55
55 -
 56
56 -
 57
57 -
 58
58 -
 59
59 -
 60
60 -
 61
61 -
62
-
63
-
64
-
65
-
66
-
67
-
68
-
69
-
70
-
71
-
72
-
73
-
74
-
75
-
76
-
77
-
78
-
79
-
80
-
81
-
82
-
83
-
84
-
85
-
86
-
87
-
88
-
89
-
90
-
91
-
92
-
93
-
94
 |
 |
