Sony HXR-MC2000U Operation Guide - Page 68
DISC BURN on the DVD, Insert an unused disc into
 |
View all Sony HXR-MC2000U manuals
Add to My Manuals
Save this manual to your list of manuals |
Page 68 highlights
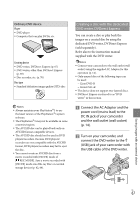
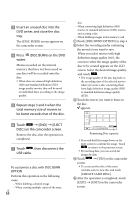
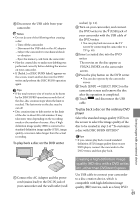
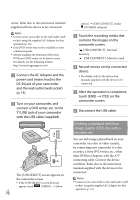
Insert an unused disc into the DVD writer, and close the disc tray. The [DISC BURN] screen appears on the camcorder screen. Press (DISC BURN) on the DVD writer. Movies recorded on the internal memory that have not been saved on any discs will be recorded onto the disc. When there are unsaved high definition (HD) and standard definition (STD) image quality movies, they will be saved on individual discs according to the image quality. Repeat steps 3 and 4 when the total memory size of movies to be burnt exceeds that of the disc. Touch [END] [EJECT DISC] on the camcorder screen. Remove the disc after the operation is completed. Touch , then disconnect the USB cable. To customize a disc with DISC BURN OPTION Perform this operation in the following cases: When dubbing a desired image When creating multiple copies of the same US 68 disc When converting high definition (HD) movies to standard definition (STD) movies, and creating a disc When dubbing images in the memory card Touch [DISC BURN OPTION] in step 4. Select the recording media containing the movie(s) you want to save. When you select movies with high definition image quality (HD), the screen to select the image quality of the disc to be created appears on the LCD screen. Select the desired image quality, and touch . The image quality of the disc depends on the recording time of the selected movies when you create a disc converting them from high definition image quality (HD) to standard definition image quality (STD). Touch the movie you want to burn on the disc. appears. Remaining Disc capacity Press and hold the image down on the LCD screen to confirm the image. Touch to return to the previous screen. By touching date, you can search for images by date. Touch [YES] on the camcorder screen. To create another disc of the same contents, insert a new disc and touch [CREATE SAME DISC]. After the operation is completed, touch [EXIT] [END] on the camcorder screen.
-
 1
1 -
2
-
3
-
4
-
5
-
6
-
7
-
8
-
9
-
10
-
11
-
12
-
13
-
14
-
15
-
16
-
17
-
18
-
19
-
20
-
21
-
22
-
23
-
24
-
25
-
26
-
27
-
28
-
29
-
30
-
31
-
32
-
33
-
34
-
35
-
36
-
37
-
38
-
39
-
40
-
41
-
42
-
43
-
44
-
45
-
46
-
47
-
48
-
49
-
50
-
51
-
52
-
53
-
54
-
55
-
56
-
57
-
58
-
59
-
60
-
61
-
62
-
 63
63 -
 64
64 -
 65
65 -
 66
66 -
 67
67 -
 68
68 -
 69
69 -
 70
70 -
 71
71 -
 72
72 -
 73
73 -
74
-
75
-
76
-
77
-
78
-
79
-
80
-
81
-
82
-
83
-
84
-
85
-
86
-
87
-
88
-
89
-
90
-
91
-
92
-
93
-
94
-
95
-
96
-
97
-
98
-
99
-
100
-
101
-
102
-
103
-
104
-
105
-
106
-
107
-
108
-
109
-
110
-
111
-
112
-
113
-
114
-
115
-
116
-
117
-
118
-
119
-
120
-
121
-
122
-
123
-
124
-
125
-
126
-
127
-
128
 |
 |
