Sony HXR-MC2000U Operation Guide - Page 69
Creating a high definition image quality (HD) disc with a DVD writer, etc.
 |
View all Sony HXR-MC2000U manuals
Add to My Manuals
Save this manual to your list of manuals |
Page 69 highlights
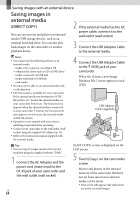
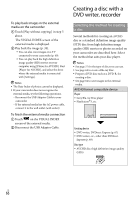
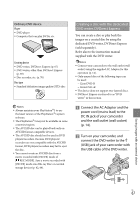
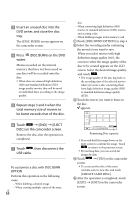
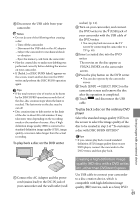
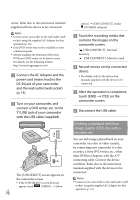
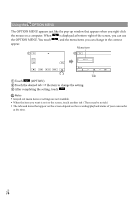
Disconnect the USB cable from your camcorder. Notes Do not do any of the following when creating a disc. Turn off the camcorder Disconnect the USB cable or the AC adaptor Subject the camcorder to mechanical shock or vibration Eject the memory card from the camcorder Play the created disc to make sure dubbing was performed correctly before deleting the movies on your camcorder. If [Failed.] or [DISC BURN failed.] appears on the screen, insert another disc into the DVD writer and perform the DISC BURN operation again. Tips If the total memory size of movies to be burnt by the DISC BURN operation exceeds that of the disc, disc creation stops when the limit is reached. The last movie on the disc may be cut off. Disc creation time to dub movies to the limit of the disc is about 20 to 60 minutes. It may take more time depending on the recording mode or the number of scenes. Also, if high definition image quality (HD) is converted to standard definition image quality (STD), image quality conversion takes longer than the actual recording. To play back a disc on the DVD writer Connect the AC Adaptor and the power cord (mains lead) to the DC IN jack of your camcorder and the wall outlet (wall socket) (p. 14). Turn on your camcorder, and connect the DVD writer to the (USB) jack of your camcorder with the USB cable of the DVD writer. You can play back movies on the TV screen by connecting the camcorder to a TV (p. 40). Insert a created disc into the DVD writer. The movies on the disc appear as VISUAL INDEX on the camcorder screen. Press the play button on the DVD writer. You can also operate by the camcorder screen. Touch [END] [EJECT DISC] on the camcorder screen and remove the disc after the operation is completed. Touch and disconnect the USB cable. To play back a disc on the ordinary DVD player Select the standard image quality (STD) on the screen to select the image quality of the disc to be created in step 2 of "To customize a disc with DISC BURN OPTION." Tips If you cannot play back created standard definition (STD) image quality discs on any DVD player, connect the camcorder to the DVD writer, and then play back. Creating a high definition image quality (HD) disc with a DVD writer, etc., other than DVDirect Express Use USB cable to connect your camcorder to a disc creation device, which is compatible with high definition image quality (HD) movies, such as a Sony DVD US 69 Saving images with an external device
-
 1
1 -
2
-
3
-
4
-
5
-
6
-
7
-
8
-
9
-
10
-
11
-
12
-
13
-
14
-
15
-
16
-
17
-
18
-
19
-
20
-
21
-
22
-
23
-
24
-
25
-
26
-
27
-
28
-
29
-
30
-
31
-
32
-
33
-
34
-
35
-
36
-
37
-
38
-
39
-
40
-
41
-
42
-
43
-
44
-
45
-
46
-
47
-
48
-
49
-
50
-
51
-
52
-
53
-
54
-
55
-
56
-
57
-
58
-
59
-
60
-
61
-
62
-
63
-
 64
64 -
 65
65 -
 66
66 -
 67
67 -
 68
68 -
 69
69 -
 70
70 -
 71
71 -
 72
72 -
 73
73 -
 74
74 -
75
-
76
-
77
-
78
-
79
-
80
-
81
-
82
-
83
-
84
-
85
-
86
-
87
-
88
-
89
-
90
-
91
-
92
-
93
-
94
-
95
-
96
-
97
-
98
-
99
-
100
-
101
-
102
-
103
-
104
-
105
-
106
-
107
-
108
-
109
-
110
-
111
-
112
-
113
-
114
-
115
-
116
-
117
-
118
-
119
-
120
-
121
-
122
-
123
-
124
-
125
-
126
-
127
-
128
 |
 |
