Sony KE-42M1 Operating Instructions (primary manual) - Page 18
Overview of the TV Controls and Connectors, Front Panel Controls and Connectors - power supply
 |
View all Sony KE-42M1 manuals
Add to My Manuals
Save this manual to your list of manuals |
Page 18 highlights
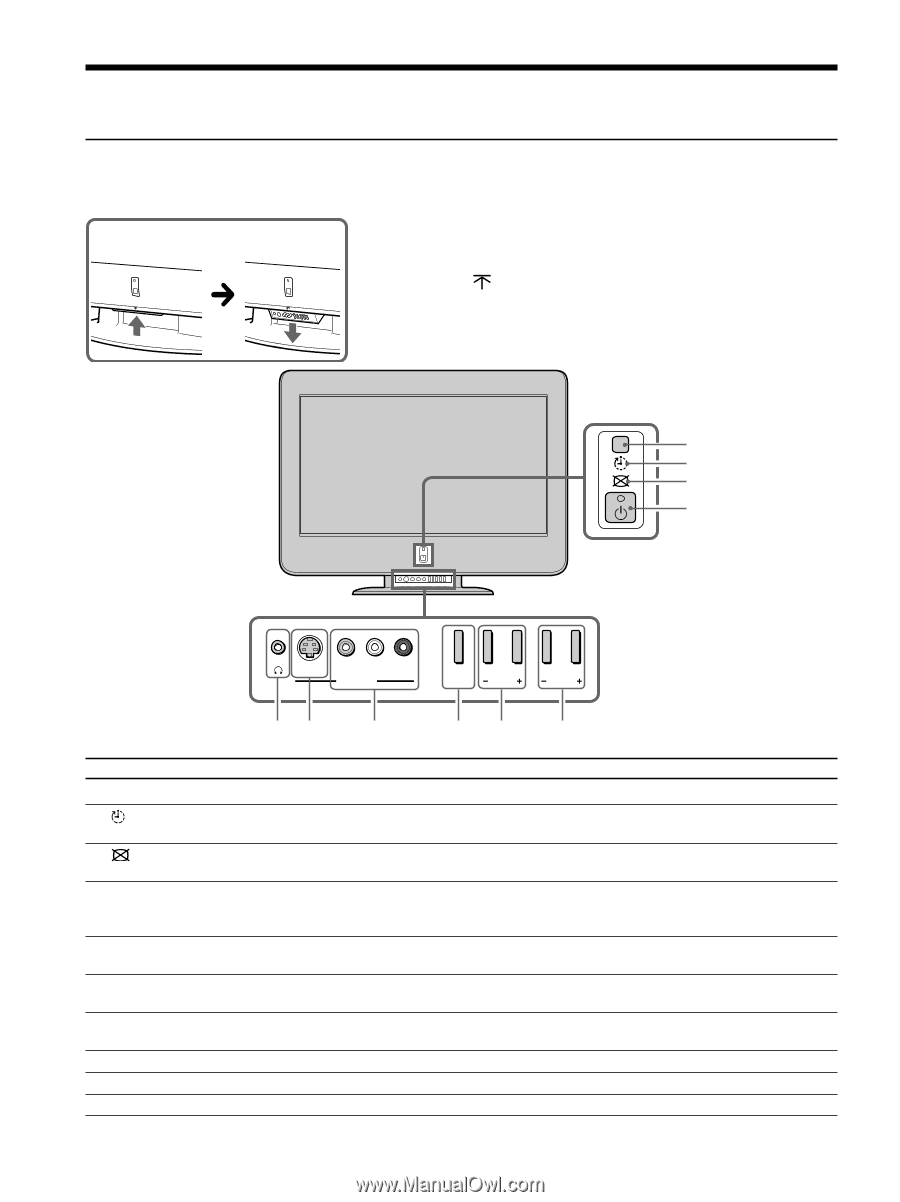
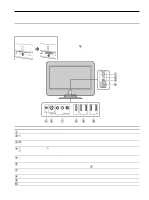
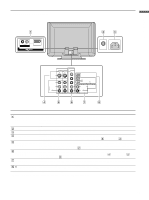
Overview of the TV Controls and Connectors Front Panel Controls and Connectors To open the drop-down panel To open the drop-down panel of your TV, push up the panel door just under the mark until you hear a click, then the panel door will open. 1 2 3 4 S VIDEO (MONO) VIDEO L AUDIO R VIDEO IN 2 INPUT VOLUME CHANNEL 56 7 89 0 Item/Jack Description 1 (IR) Infrared Receiver Receives IR signals from the remote control. 2 (Timer) LED When lit, indicates one of the timers is set. When the timer is set, this LED will remain lit. For details, see page 75. 3 (Picture off) LED When lit, indicates that the Picture Off feature is activated. For details, see page 48. 4 1 (Power) and Press 1 (Power) to turn on and off the TV. The LED lights up green when the TV is turned on. When in 1 (Power on/Stand by) standby mode, the LED lights up in red. If the LED blinks continuously, this may indicate the TV needs LED servicing (see page 77). 5 i Headphones jack Connects to your headphones. If your headphones do not match the jack, use a suitable plug adaptor (not supplied). 6 S VIDEO IN 2 Connects to the S VIDEO OUT jack on your camcorder or other video equipment that has S VIDEO. Provides better picture quality than composite video (7). 7 VIDEO/L-AUDIO-R Connects to the composite A/V output jacks on your camcorder or other video equipment. VIDEO IN 2 8 INPUT Press repeatedly to cycle through the video equipment connected to the TV's video inputs. 9 - VOLUME + Press to adjust the volume. 0 - CHANNEL + Press to scan through channels. To scan quickly through channels, press and hold down either CHANNEL. 18
-
 1
1 -
2
-
3
-
4
-
5
-
6
-
7
-
8
-
9
-
10
-
11
-
12
-
 13
13 -
 14
14 -
 15
15 -
 16
16 -
 17
17 -
 18
18 -
 19
19 -
 20
20 -
 21
21 -
 22
22 -
 23
23 -
24
-
25
-
26
-
27
-
28
-
29
-
30
-
31
-
32
-
33
-
34
-
35
-
36
-
37
-
38
-
39
-
40
-
41
-
42
-
43
-
44
-
45
-
46
-
47
-
48
-
49
-
50
-
51
-
52
-
53
-
54
-
55
-
56
-
57
-
58
-
59
-
60
-
61
-
62
-
63
-
64
-
65
-
66
-
67
-
68
-
69
-
70
-
71
-
72
-
73
-
74
-
75
-
76
-
77
-
78
-
79
-
80
-
81
-
82
-
83
-
84
 |
 |