Sony MEX-DV1700U Operating Instructions - Page 38
Setting the subwoofer, position, By the sound menu, By the visual setup menu
 |
View all Sony MEX-DV1700U manuals
Add to My Manuals
Save this manual to your list of manuals |
Page 38 highlights
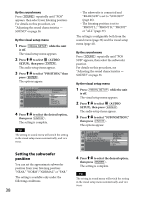
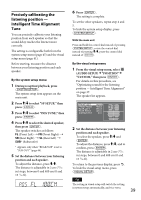
By the sound menu Press repeatedly until "POS" appears, then select your listening position. For details on this procedure, see "Adjusting the sound characteristics - SOUND" on page 36. By the visual setup menu 1 Press while the unit is off. The visual setup menu appears. 2 Press / to select (AUDIO SETUP), then press The audio setup items appear. 3 Press / to select "POSITION," then press The options appear. AUDIO SETUP AUDIO DRC : POSITION : SUB POSITION : MULTI CH OUTPUT : STANDARD FRONT L OFF FRONT ALL FRONT L FRONT R 4 Press / to select the desired option, then press The setting is complete. Tip The setting in sound menu will switch the setting in the visual setup menu automatically, and vice versa. Setting the subwoofer position You can set the approximate subwoofer position from your listening position: "NEAR," "NORM"/"NORMAL" or "FAR." The setting is available only under the following conditions. 38 - The subwoofer is connected and "REAR/SUB" is set to "SUB OUT" (page 46). - The listening position is set to "FRONT L," "FRONT R," "FRONT" or "ALL" (page 37). The setting is configurable both from the sound menu (page 36) and the visual setup menu (page 41). By the sound menu Press repeatedly until "POS SUB" appears, then select the subwoofer position. For details on this procedure, see "Adjusting the sound characteristics - SOUND" on page 36. By the visual setup menu 1 Press while the unit is off. The visual setup menu appears. 2 Press / to select (AUDIO SETUP), then press The audio setup items appear. 3 Press / to select "SUB POSITION," then press The options appear. AUDIO SETUP AUDIO DRC : POSITION : SUB POSITION : MULTI CH OUTPUT : STANDARD FRONT L NORMAL NEAR NORMAL FAR 4 Press / to select the desired option, then press The setting is complete. Tip The setting in sound menu will switch the setting in the visual setup menu automatically, and vice versa.
-
 1
1 -
2
-
3
-
4
-
5
-
6
-
7
-
8
-
9
-
10
-
11
-
12
-
13
-
14
-
15
-
16
-
17
-
18
-
19
-
20
-
21
-
22
-
23
-
24
-
25
-
26
-
27
-
28
-
29
-
30
-
31
-
32
-
 33
33 -
 34
34 -
 35
35 -
 36
36 -
 37
37 -
 38
38 -
 39
39 -
 40
40 -
 41
41 -
 42
42 -
 43
43 -
44
-
45
-
46
-
47
-
48
-
49
-
50
-
51
-
52
-
53
-
54
-
55
-
56
-
57
-
58
-
59
-
60
-
61
-
62
-
63
-
64
 |
 |
