Sony RDR VXD655 Operating Instructions - Page 55
Recording From Connected Equipment Without a Timer, Press DVD to operate the DVD recorder.
 |
UPC - 027242708792
View all Sony RDR VXD655 manuals
Add to My Manuals
Save this manual to your list of manuals |
Page 55 highlights
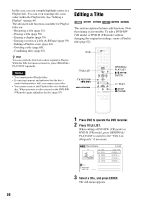
Timer List 10:10 AM No. Media 01 DVD 02 DVD 03 --04 --05 --06 --- Date 04/15 04/30 Start End Ch Mode Edit 09:00PM 10:00PM Ch8 Edit 09:15PM 09:45PM D11.1 Erase --:-- --:-- ---- --- --:-- --:-- ---- --- --:-- --:-- ---- --- --:-- --:-- ---- --- 5 Select one of the options, and press ENTER. "Edit": Changes the timer setting. Select an item using
-
 1
1 -
2
-
3
-
4
-
5
-
6
-
7
-
8
-
9
-
10
-
11
-
12
-
13
-
14
-
15
-
16
-
17
-
18
-
19
-
20
-
21
-
22
-
23
-
24
-
25
-
26
-
27
-
28
-
29
-
30
-
31
-
32
-
33
-
34
-
35
-
36
-
37
-
38
-
39
-
40
-
41
-
42
-
43
-
44
-
45
-
46
-
47
-
48
-
49
-
 50
50 -
 51
51 -
 52
52 -
 53
53 -
 54
54 -
 55
55 -
 56
56 -
 57
57 -
 58
58 -
 59
59 -
 60
60 -
61
-
62
-
63
-
64
-
65
-
66
-
67
-
68
-
69
-
70
-
71
-
72
-
73
-
74
-
75
-
76
-
77
-
78
-
79
-
80
-
81
-
82
-
83
-
84
-
85
-
86
-
87
-
88
-
89
-
90
-
91
-
92
-
93
-
94
-
95
-
96
-
97
-
98
-
99
-
100
-
101
-
102
-
103
-
104
-
105
-
106
-
107
-
108
-
109
-
110
-
111
-
112
-
113
-
114
-
115
-
116
-
117
-
118
-
119
-
120
-
121
-
122
-
123
-
124
-
125
-
126
-
127
-
128
-
129
-
130
-
131
-
132
-
133
-
134
-
135
-
136
-
137
-
138
-
139
-
140
-
141
-
142
-
143
-
144
-
145
-
146
-
147
-
148
-
149
-
150
-
151
-
152
-
153
-
154
-
155
-
156
-
157
-
158
-
159
-
160
 |
 |

55
DVD Recording
5
Select one of the options, and press
ENTER.
“Edit”: Changes the timer setting.
Select an item using
<
/
,
and adjust using
M
/
m
. Press ENTER.
“Erase”: Erases the timer setting.
Select “OK” and press ENTER when asked
for confirmation.
6
Press SYSTEM MENU to turn off the Timer
List.
To return to the previous display
Press
O
RETURN.
Notes
•
Even when correctly set, the program may not be
recorded if another recording is underway, or other
prioritized timer setting overlaps. For priority, see
page 52.
•
You cannot change the timer settings for a recording
currently underway.
•
The Timer List displays both the DVD recorder and
VCR timer settings.
Recording From Connected
Equipment Without a Timer
You can record from a connected VCR or similar
device. For connection details, see “Connecting
Another VCR or Similar Device” on page 32.
Use the DV IN jack on the front panel if the
equipment has a DV/D8 output jack (i.LINK
jack).
To record from a digital video camera connected
to the DV IN jack, see page 89.
1
Press DVD to operate the DVD recorder.
2
Insert a recordable disc.
3
Press INPUT repeatedly to select an input
source according to the connection you
made.
The front panel display changes as follows:
When selecting a digital channel
When selecting an analog channel
01
DVD
04/15
09:00PM
10:00PM
Ch8
---
--/--
--:--
--:--
----
---
04
---
--/--
--:--
--:--
----
---
05
---
--/--
--:--
--:--
----
---
06
03
---
--/--
--:--
--:--
----
---
02
DVD
04/30
09:15PM
09:45PM
10:10 AM
Timer List
No. Media
Date
Start
Ch
Mode Edit
D11.1
End
Edit
Erase
01
04
05
06
03
02
10:10 AM
No
Mode Edit
Timer – Standard
No.01
:
PM
DVD
PM
:
04/15
09
00
10
00
Ch 8
SP
Media
Date
Start
Ch
Mode
End
01
04
05
06
03
02
10:10 AM
No Media
Mode Edit
Timer List
Do you want to erase ‘‘No.01’’?
OK
Cancel
+
RW
+
R
-
RW
VR
-
RW
Video
-
R
VR
-
R
Video
1
2
3
4
5
6
7
8
0
9
INPUT
x
STOP
REC MODE
DVD
z
REC
LINE2
DV
LINE1
Digital Channel
LINE2
DV
LINE1
Analog Channel
,
continued