Sony RDR VXD655 Operating Instructions - Page 79
Recording From Connected Equipment With a Timer (Synchro Rec), Select Features, and press ENTER.
 |
UPC - 027242708792
View all Sony RDR VXD655 manuals
Add to My Manuals
Save this manual to your list of manuals |
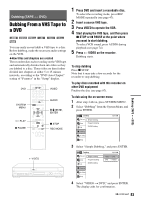
Page 79 highlights
z Hints • When the start time and the channel or input source to be recorded are the same but the "Media" setting differs, the program is recorded to both the DVD disc and the VHS tape. • You can also turn on the timer programming menu from the System Menu. Press SYSTEM MENU to select "Timer," and select "Timer-Standard." • You can use the number buttons and the dot (·) button to select a channel. • You can select a video source from the LINE 1 IN or LINE 2 IN jacks, using the INPUT button. Notes • To record a cable or satellite program, turn on the cable box or satellite receiver and select the program you want to record. Leave the cable box or satellite receiver turned on until the recorder finishes recording. • Even when correctly set, the program may not be recorded if another recording is underway, or other prioritized timer setting overlaps. • You cannot record on a tape with its safety tab removed. • Before the timer recording starts, "TIMER REC" flashes in the front panel display. • The recorder automatically turns off when a timer recording finishes, even if the recording started with the recorder turned on. • Digital closed captions cannot be recorded (page 35). • For audio settings, "Stream 1" is usually recorded (page 35). • When you set the Digital Rating, a program with a digital rating beyond your limit setting cannot be recorded correctly (page 103). Recording From Connected Equipment With a Timer (Synchro Rec) You can set the recorder to automatically record programs from connected equipment that has a timer function (such as a satellite tuner). Connect the equipment to the LINE 1 IN jacks on the rear of the recorder (page 18). When the connected equipment turns on, the recorder starts recording a program from the LINE 1 IN jacks. SYSTEM MENU 123 456 789 0 VIDEO M/m/
-
 1
1 -
2
-
3
-
4
-
5
-
6
-
7
-
8
-
9
-
10
-
11
-
12
-
13
-
14
-
15
-
16
-
17
-
18
-
19
-
20
-
21
-
22
-
23
-
24
-
25
-
26
-
27
-
28
-
29
-
30
-
31
-
32
-
33
-
34
-
35
-
36
-
37
-
38
-
39
-
40
-
41
-
42
-
43
-
44
-
45
-
46
-
47
-
48
-
49
-
50
-
51
-
52
-
53
-
54
-
55
-
56
-
57
-
58
-
59
-
60
-
61
-
62
-
63
-
64
-
65
-
66
-
67
-
68
-
69
-
70
-
71
-
72
-
73
-
 74
74 -
 75
75 -
 76
76 -
 77
77 -
 78
78 -
 79
79 -
 80
80 -
 81
81 -
 82
82 -
 83
83 -
 84
84 -
85
-
86
-
87
-
88
-
89
-
90
-
91
-
92
-
93
-
94
-
95
-
96
-
97
-
98
-
99
-
100
-
101
-
102
-
103
-
104
-
105
-
106
-
107
-
108
-
109
-
110
-
111
-
112
-
113
-
114
-
115
-
116
-
117
-
118
-
119
-
120
-
121
-
122
-
123
-
124
-
125
-
126
-
127
-
128
-
129
-
130
-
131
-
132
-
133
-
134
-
135
-
136
-
137
-
138
-
139
-
140
-
141
-
142
-
143
-
144
-
145
-
146
-
147
-
148
-
149
-
150
-
151
-
152
-
153
-
154
-
155
-
156
-
157
-
158
-
159
-
160
 |
 |
