Sony STR DA2400ES Operating Instructions - Page 105
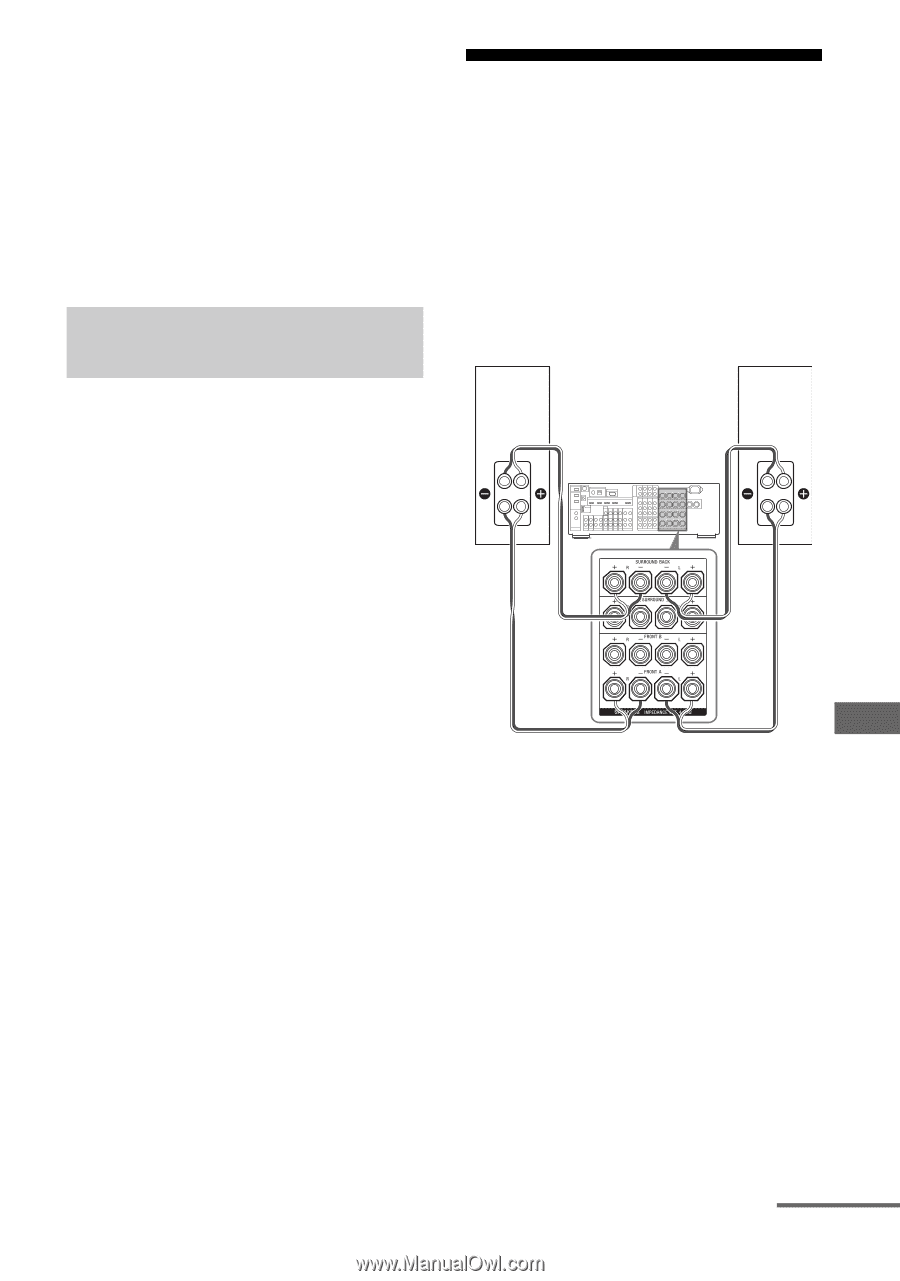
Using a bi-amplifier connection, To connect speakers
 |
UPC - 027242729872
View all Sony STR DA2400ES manuals
Add to My Manuals
Save this manual to your list of manuals |
Page 105 highlights
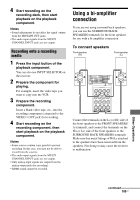
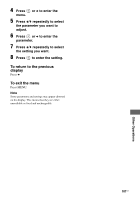
4 Start recording on the recording deck, then start playback on the playback component. Notes • Sound adjustments do not affect the signal output from the MD/TAPE OUT jacks. • The audio input signals from the MULTI CHANNEL INPUT jacks are not output. Recording onto a recording media 1 Press the input button of the playback component. You can also use INPUT SELECTOR on the receiver. 2 Prepare the component for playing. For example, insert the video tape you want to copy into the VCR. 3 Prepare the recording component. Insert a blank video tape, etc., into the recording component (connected to the VIDEO 1 OUT jack) for recording. 4 Start recording on the recording component, then start playback on the playback component. Notes • Some sources contain copy guards to prevent recording. In this case, you may not be able to record from the sources. • The audio input signals from the MULTI CHANNEL INPUT jacks are not output. • Only analog input signals are output from the analog output jack (for recording). • HDMI sound cannot be recorded. Using a bi-amplifier connection If you are not using surround back speakers, you can use the SURROUND BACK SPEAKERS terminals for the front speakers for use with a bi-amplifier connection. To connect speakers Front speaker (R) Front speaker (L) Hi Hi Lo Lo Connect the terminals on the Lo (or Hi) side of the front speakers to the FRONT SPEAKERS A terminals, and connect the terminals on the Hi (or Lo) side of the front speakers to the SURROUND BACK SPEAKERS terminals. Make sure that metal fittings of Hi/Lo attached to the speakers have been removed from the speakers. Not doing so may cause the receiver to malfunction. Other Operations continued 105US
-
 1
1 -
2
-
3
-
4
-
5
-
6
-
7
-
8
-
9
-
10
-
11
-
12
-
13
-
14
-
15
-
16
-
17
-
18
-
19
-
20
-
21
-
22
-
23
-
24
-
25
-
26
-
27
-
28
-
29
-
30
-
31
-
32
-
33
-
34
-
35
-
36
-
37
-
38
-
39
-
40
-
41
-
42
-
43
-
44
-
45
-
46
-
47
-
48
-
49
-
50
-
51
-
52
-
53
-
54
-
55
-
56
-
57
-
58
-
59
-
60
-
61
-
62
-
63
-
64
-
65
-
66
-
67
-
68
-
69
-
70
-
71
-
72
-
73
-
74
-
75
-
76
-
77
-
78
-
79
-
80
-
81
-
82
-
83
-
84
-
85
-
86
-
87
-
88
-
89
-
90
-
91
-
92
-
93
-
94
-
95
-
96
-
97
-
98
-
99
-
 100
100 -
 101
101 -
 102
102 -
 103
103 -
 104
104 -
 105
105 -
 106
106 -
 107
107 -
 108
108 -
 109
109 -
 110
110 -
111
-
112
-
113
-
114
-
115
-
116
-
117
-
118
-
119
-
120
-
121
-
122
-
123
-
124
-
125
-
126
-
127
-
128
-
129
-
130
-
131
-
132
-
133
-
134
-
135
-
136
-
137
-
138
-
139
-
140
 |
 |