Sony STR-DA3400ES Operating Instructions (Large File - 15.18 MB) - Page 120
Using the Remote, Operating each component using the remote
 |
View all Sony STR-DA3400ES manuals
Add to My Manuals
Save this manual to your list of manuals |
Page 120 highlights
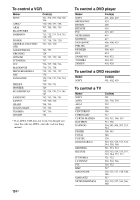
3 Turn on the amplifier in zone 2. 4 Press one of the input buttons (except PHONO, MULTI IN, TV and HDMI1-4) on the remote to select the source signals you want to output. For zone 2, analog video and audio signals are output. When you select SOURCE, the signals of the current input are output. 5 Adjust to a suitable volume. • In the case of illustration 1-1 (page 104), you can only adjust the surround back speaker volume in zone 2. Adjust the volume using MASTER VOL +/- on the remote. • In the case of illustration 1-2 (page 104), adjust the volume using the receiver of zone 2. Tips • Even when this receiver is in standby mode (press ?/1 on the remote to turned off this receiver), the receiver in zone 2 remains turned on. To turn off all receivers, press ?/1 and AV ?/1 on the RMAAL017 remote at the same time (SYSTEM STANDBY). • Only signals from components connected to the analog input jacks are output through the ZONE 2 jacks. No signals are output from components connected to only the digital input jacks. • When SOURCE is selected, the signals input to the MULTI CHANNEL INPUT jacks are not output from the ZONE 2 OUT jacks even when the multi channel input is selected. The analog audio signals of the current function are output. Using the Remote Operating each component using the remote When you program the remote to control the following Sony or non-Sony components, you can use the buttons on the remote that are marked with circles. Note, however, that some buttons may not operate your component. If you want to change the contents of the input list to match your particular components, see "Programming the remote" (page 122). 120US
-
 1
1 -
2
-
3
-
4
-
5
-
6
-
7
-
8
-
9
-
10
-
11
-
12
-
13
-
14
-
15
-
16
-
17
-
18
-
19
-
20
-
21
-
22
-
23
-
24
-
25
-
26
-
27
-
28
-
29
-
30
-
31
-
32
-
33
-
34
-
35
-
36
-
37
-
38
-
39
-
40
-
41
-
42
-
43
-
44
-
45
-
46
-
47
-
48
-
49
-
50
-
51
-
52
-
53
-
54
-
55
-
56
-
57
-
58
-
59
-
60
-
61
-
62
-
63
-
64
-
65
-
66
-
67
-
68
-
69
-
70
-
71
-
72
-
73
-
74
-
75
-
76
-
77
-
78
-
79
-
80
-
81
-
82
-
83
-
84
-
85
-
86
-
87
-
88
-
89
-
90
-
91
-
92
-
93
-
94
-
95
-
96
-
97
-
98
-
99
-
100
-
101
-
102
-
103
-
104
-
105
-
106
-
107
-
108
-
109
-
110
-
111
-
112
-
113
-
114
-
 115
115 -
 116
116 -
 117
117 -
 118
118 -
 119
119 -
 120
120 -
 121
121 -
 122
122 -
 123
123 -
 124
124 -
 125
125 -
126
-
127
-
128
-
129
-
130
-
131
-
132
-
133
-
134
-
135
-
136
-
137
-
138
-
139
-
140
-
141
-
142
-
143
-
144
 |
 |
