Sony TRV950 Operating Instructions - Page 7
Viewing Images Using your - tape
 |
UPC - 027242607460
View all Sony TRV950 manuals
Add to My Manuals
Save this manual to your list of manuals |
Page 7 highlights
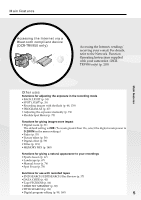
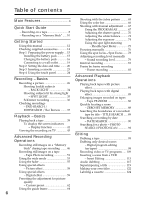
Table of contents Getting Started "Memory Stick" Operations Using a "Memory Stick" - Introduction 126 Recording still images on a "Memory Stick" - Memory Photo recording ......... 135 Recording images from a tape as still images 144 Superimposing a still image in the "Memory Stick" on an image - MEMORY MIX 148 Recording moving pictures on a"Memory Stick" - MPEG movie recording 153 Recording pictures from a tape as a moving picture 156 Recording edited pictures from a tape as a moving picture - Digital program editing (on a "Memory Stick 160 Copying still images from a tape - PHOTO SAVE 163 Viewing still images - Memory photo playback .......... 165 Viewing moving pictures - MPEG movie playback 168 Copying images recorded on a "Memory Stick" to a tape 171 Enlarging still images recorded on a "Memory Stick" - Memory PB ZOOM 173 Playing back images in a continuous loop - SLIDE SHOW 175 Preventing accidental erasure - Image protection 176 Deleting images - DELETE 177 Writing a print mark - PRINT MARK 180 Using the optional printer 181 Viewing images recorded on a "Memory Stick" on your computer - For Windows users 199 Connecting your camcorder to your computer using the USB cable - For Macintosh users 201 Viewing images recorded on a "Memory Stick" on your computer - For Macintosh users 203 Capturing images from an analog video unit on your computer - Signal convert function 204 Using the Network function (DCR-TRV950 only) Accessing the network 205 For the details, refer to the Network Function Operating Instructions supplied with your camcorder. Customizing Your Camcorder Changing the default settings with the menu 207 Troubleshooting Types of trouble and how to correct trouble 218 Self-diagnosis display 225 Warning indicators and messages .... 226 Additional Information Usable cassettes 228 About the "InfoLITHIUM" battery pack 231 About i.LINK 233 Using your camcorder abroad .......... 235 Maintenance information and precautions 236 Specifications 242 Viewing Images Using your Computer Viewing images on your computer - Introduction 183 Connecting your camcorder to your computer using the USB cable - For Windows users 186 Viewing images recorded on a tape on your computer - For Windows users 194 Quick Reference Identifying parts and controls 244 Index 254 7
-
 1
1 -
 2
2 -
 3
3 -
 4
4 -
 5
5 -
 6
6 -
 7
7 -
 8
8 -
 9
9 -
 10
10 -
 11
11 -
 12
12 -
13
-
14
-
15
-
16
-
17
-
18
-
19
-
20
-
21
-
22
-
23
-
24
-
25
-
26
-
27
-
28
-
29
-
30
-
31
-
32
-
33
-
34
-
35
-
36
-
37
-
38
-
39
-
40
-
41
-
42
-
43
-
44
-
45
-
46
-
47
-
48
-
49
-
50
-
51
-
52
-
53
-
54
-
55
-
56
-
57
-
58
-
59
-
60
-
61
-
62
-
63
-
64
-
65
-
66
-
67
-
68
-
69
-
70
-
71
-
72
-
73
-
74
-
75
-
76
-
77
-
78
-
79
-
80
-
81
-
82
-
83
-
84
-
85
-
86
-
87
-
88
-
89
-
90
-
91
-
92
-
93
-
94
-
95
-
96
-
97
-
98
-
99
-
100
-
101
-
102
-
103
-
104
-
105
-
106
-
107
-
108
-
109
-
110
-
111
-
112
-
113
-
114
-
115
-
116
-
117
-
118
-
119
-
120
-
121
-
122
-
123
-
124
-
125
-
126
-
127
-
128
-
129
-
130
-
131
-
132
-
133
-
134
-
135
-
136
-
137
-
138
-
139
-
140
-
141
-
142
-
143
-
144
-
145
-
146
-
147
-
148
-
149
-
150
-
151
-
152
-
153
-
154
-
155
-
156
-
157
-
158
-
159
-
160
-
161
-
162
-
163
-
164
-
165
-
166
-
167
-
168
-
169
-
170
-
171
-
172
-
173
-
174
-
175
-
176
-
177
-
178
-
179
-
180
-
181
-
182
-
183
-
184
-
185
-
186
-
187
-
188
-
189
-
190
-
191
-
192
-
193
-
194
-
195
-
196
-
197
-
198
-
199
-
200
-
201
-
202
-
203
-
204
-
205
-
206
-
207
-
208
-
209
-
210
-
211
-
212
-
213
-
214
-
215
-
216
-
217
-
218
-
219
-
220
-
221
-
222
-
223
-
224
-
225
-
226
-
227
-
228
-
229
-
230
-
231
-
232
-
233
-
234
-
235
-
236
-
237
-
238
-
239
-
240
-
241
-
242
-
243
-
244
-
245
-
246
-
247
-
248
-
249
-
250
-
251
-
252
-
253
-
254
-
255
-
256
 |
 |
