TEAC CRH227I Owners Manual - Page 15
Tuning, Preset, Time
 |
View all TEAC CRH227I manuals
Add to My Manuals
Save this manual to your list of manuals |
Page 15 highlights
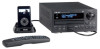
A STANDBY/ON Press this button to turn the unit on or standby. The standby indicator surrounding the STANBY/ON button lights when the unit is in the standby mode. When the unit is turned on, it goes off. B Remote Sensor When operating the remote control unit, point it towards the remote sensor. C Display D Disc tray E OPEN/CLOSE (L), TUNING MODE, ENTER In CD mode, use this button to open and close the disc tray. In TUNER mode, use this button to select the tuning mode. While setting the timer or the clock, use this button to set the time. In iPod mode, use this button to confirm selection in menus. This button is equivalent to the Center button on your iPod. F VOLUME, SELECT Turn this knob to adjust the volume. Turn this knob to adjust the tone, balance and dimmer together with the TONE/BAL/DIMMER button. G SKIP (.m/,/), TUNING, PRESET, TIME In iPod or CD mode, momentarily press these buttons to skip tracks. Hold down these buttons to search for a part of a track. In TUNER mode, use these buttons to tune in stations or select the preset stations. While setting the clock or the timer, use these buttons to adjust the time. H STOP (H), RDS MODE, MENU In CD mode, use this button to stop playback. In FM TUNER mode, this button is used to select the RDS mode. In iPod mode, use this button to go back to the previous menu. This button is equivalent to the MENU button on your iPod. I PAUSE (J), FM MODE In iPod or CD mode, use this button to pause playback. In FM mode, use this button to select stereo or monaural. J PLAY (y), BAND In iPod or CD mode, use this button to start playback. In TUNER mode, use this button to select FM or AM. K TONE, BAL, DIMMER Use this button together with the VOLUME/SELECT knob to adjust bass, treble, balance and dimmer. L TIME MODE Use this button to adjust the clock and to set a timer. M SOURCE Use this button to select a source. N iPod port Connect the Dock to this port See page 22 for details. O AUX 3 IN Jack You can connect a portable audio player to this jack. See page 11 for details. P PHONES For private listening, insert the headphones plug into this jack, and adjust the volume by turning the VOLUME/SELECT knob. 15
-
 1
1 -
2
-
3
-
4
-
5
-
6
-
7
-
8
-
9
-
 10
10 -
 11
11 -
 12
12 -
 13
13 -
 14
14 -
 15
15 -
 16
16 -
 17
17 -
 18
18 -
 19
19 -
 20
20 -
21
-
22
-
23
-
24
-
25
-
26
-
27
-
28
-
29
-
30
-
31
-
32
-
33
-
34
-
35
-
36
-
37
-
38
-
39
-
40
-
41
-
42
-
43
 |
 |
