TP-Link AC3200 Archer C3200 V1 User Guide - Page 40
Bandwidth Control
 |
View all TP-Link AC3200 manuals
Add to My Manuals
Save this manual to your list of manuals |
Page 40 highlights
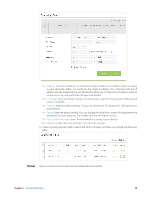
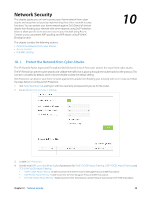
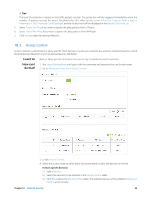
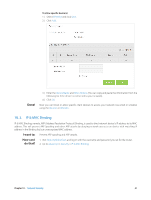
Bandwidth Control The Bandwidth Control feature is used to fully utilize your limit bandwidth and optimize the load respectively. With this feature enabled, you can assign a specific minimum or maximum bandwidth for each computer, thus minimizing the impact caused when the connection is under heavy load. 9 I want to: Use an independent bandwidth and enjoy a good Internet experience without being affected by other users who are sharing the same router. Tips: How can I do that? For example, my roommate and I share 512Kbps Upstream Bandwidth and 8Mbps Downstream Bandwidth via this router, she likes to watch live show and play online games, which may take up much bandwidth. I don't want to be affected, so we agree to equally distribute the bandwidth. Our IP addresses are 192.168.0.101 and 192.168.0.110. To use the bandwidth control feature, you'd better set static IP Address on each computer to be controlled or configure Address reservation on the router in order to manage easily. About how to configure address reservation, please refer to To reserve an IP address for a specified client device. 1. Visit http://tplinkwifi.net, and log in with the username and password you set for the router. 2. Go to Advanced > Bandwidth Control page. 3. Enable Bandwidth Control. 4. Enter the Total Upstream Bandwidth and the Total Downstream Bandwidth given by your ISP. (1Mbps=1024Kbps). Click Save to save the settings. 5. Click Add to add controlling rules for each computer respectively. Chapter 9 . Bandwidth Control 37
-
 1
1 -
2
-
3
-
4
-
5
-
6
-
7
-
8
-
9
-
10
-
11
-
12
-
13
-
14
-
15
-
16
-
17
-
18
-
19
-
20
-
21
-
22
-
23
-
24
-
25
-
26
-
27
-
28
-
29
-
30
-
31
-
32
-
33
-
34
-
 35
35 -
 36
36 -
 37
37 -
 38
38 -
 39
39 -
 40
40 -
 41
41 -
 42
42 -
 43
43 -
 44
44 -
 45
45 -
46
-
47
-
48
-
49
-
50
-
51
-
52
-
53
-
54
-
55
-
56
-
57
-
58
-
59
-
60
-
61
-
62
-
63
-
64
-
65
-
66
-
67
-
68
-
69
-
70
-
71
-
72
-
73
-
74
-
75
-
76
-
77
-
78
-
79
-
80
-
81
-
82
-
83
 |
 |
