Toshiba 65L7300U User's Guide for Model Series L4300U and L7300U TV - Page 59
GREEN, Brand, Model Name, Code Set, Input & Mode Key
 |
View all Toshiba 65L7300U manuals
Add to My Manuals
Save this manual to your list of manuals |
Page 59 highlights
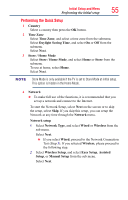
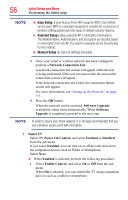
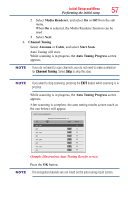
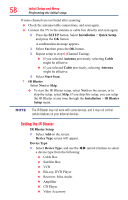
Initial Setup and Menu Performing the initial setup 59 2 Press the q (arrow) button then press the GREEN button. The Brand screen will appear. 3 Use the p/q (arrow) buttons to select the brand name then press the OK button. ❖❖ Select a field and press the OK button to show the software keyboard. Enter the first few characters of the brand name and press the GREEN button. The brand name starting with the entered characters will appear on the Brand screen. 4 Press the OK button. Model Name screen will appear. Model Name 1 Press the GREEN button. The Model Name screen will appear. 2 Use the p/q (arrow) buttons to select the model name then press the OK button. ❖❖ Select a field and press the OK button to show the software keyboard. Enter the first few characters of the model name and press the GREEN button. The model name starting with the entered characters will appear on the Model Name screen. 3 Press the q (arrow) button to select Code Set then press the OK button. Code Set screen will appear. Code Set 1 Use the t/u (arrow) buttons to select the code. ❖❖ After the code is selected, press the RED button to show the Test screen. The test will start automatically. NOTE If a model has more than one Code Set, a message will appear stating "This model has more than one Code Set. Please select and test your preferred Code Set." You will need to choose a code set using the p/q (arrow) buttons and perform the Test option to ensure the correct Code Set has been selected. 2 Press the OK. button Input & Mode Key screen will appear.
-
 1
1 -
2
-
3
-
4
-
5
-
6
-
7
-
8
-
9
-
10
-
11
-
12
-
13
-
14
-
15
-
16
-
17
-
18
-
19
-
20
-
21
-
22
-
23
-
24
-
25
-
26
-
27
-
28
-
29
-
30
-
31
-
32
-
33
-
34
-
35
-
36
-
37
-
38
-
39
-
40
-
41
-
42
-
43
-
44
-
45
-
46
-
47
-
48
-
49
-
50
-
51
-
52
-
53
-
 54
54 -
 55
55 -
 56
56 -
 57
57 -
 58
58 -
 59
59 -
 60
60 -
 61
61 -
 62
62 -
 63
63 -
 64
64 -
65
-
66
-
67
-
68
-
69
-
70
-
71
-
72
-
73
-
74
-
75
-
76
-
77
-
78
-
79
-
80
-
81
-
82
-
83
-
84
-
85
-
86
-
87
-
88
-
89
-
90
-
91
-
92
-
93
-
94
-
95
-
96
-
97
-
98
-
99
-
100
-
101
-
102
-
103
-
104
-
105
-
106
-
107
-
108
-
109
-
110
-
111
-
112
-
113
-
114
-
115
-
116
-
117
-
118
-
119
-
120
-
121
-
122
-
123
-
124
-
125
-
126
-
127
-
128
-
129
-
130
-
131
-
132
-
133
-
134
-
135
-
136
-
137
-
138
-
139
-
140
-
141
-
142
-
143
-
144
-
145
-
146
-
147
-
148
-
149
-
150
-
151
-
152
-
153
-
154
-
155
-
156
-
157
-
158
-
159
-
160
-
161
-
162
-
163
-
164
-
165
-
166
-
167
-
168
-
169
-
170
-
171
-
172
-
173
-
174
-
175
-
176
-
177
-
178
-
179
-
180
-
181
-
182
-
183
-
184
-
185
-
186
 |
 |