Uniden BC898T English Owners Manual - Page 21
Installing The Scanner In a Vehicle - antenna
 |
UPC - 050633650370
View all Uniden BC898T manuals
Add to My Manuals
Save this manual to your list of manuals |
Page 21 highlights
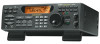
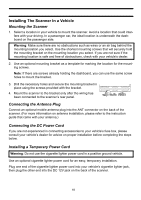
Installing The Scanner In a Vehicle Mounting the Scanner 1. Select a location in your vehicle to mount the scanner. Avoid a location that could interfere with your driving. In a passenger car, the ideal location is underneath the dashboard on the passenger side. Warning: Make sure there are no obstructions such as wires or an air bag behind the mounting location you select. Use the shortest mounting screws that will securely hold the mounting bracket on the mounting location you select. If you are not sure if the mounting location is safe and free of obstructions, check with your vehicle's dealer. 2. Use an optional mounting bracket as a template for marking the location for the mounting screws. Note: If there are screws already holding the dashboard, you can use the same screw holes to mount the bracket. 3. Drill the necessary holes and secure the mounting bracket in place using the screws provided with the bracket. 4. Mount the scanner to the bracket only after the wiring has been connected to the scanner's rear panel. Connecting the Antenna Plug Connect an optional mobile antenna plug into the ANT connector on the back of the scanner. (For more information on antenna installation, please refer to the instruction guide that came with your antenna.) Connecting the DC Power Cord If you are not experienced in connecting accessories to your vehicle's fuse box, please consult your vehicle's dealer for advice on proper installation before completing the steps below. Installing a Temporary Power Cord Warning: Do not use the cigarette lighter power cord in a positive ground vehicle. Use an optional cigarette lighter power cord for an easy, temporary installation. Plug one end of the cigarette lighter power cord into your vehicle's cigarette lighter jack, then plug the other end into the DC 12V jack on the back of the scanner. 18
-
 1
1 -
2
-
3
-
4
-
5
-
6
-
7
-
8
-
9
-
10
-
11
-
12
-
13
-
14
-
15
-
 16
16 -
 17
17 -
 18
18 -
 19
19 -
 20
20 -
 21
21 -
 22
22 -
 23
23 -
 24
24 -
 25
25 -
 26
26 -
27
-
28
-
29
-
30
-
31
-
32
-
33
-
34
-
35
-
36
-
37
-
38
-
39
-
40
-
41
-
42
-
43
-
44
-
45
-
46
-
47
-
48
-
49
-
50
-
51
-
52
-
53
-
54
-
55
-
56
-
57
-
58
-
59
-
60
-
61
-
62
-
63
-
64
 |
 |