Uniden UDS655 English Owner's Manual - Page 7
mm Drill Bit - cameras
 |
View all Uniden UDS655 manuals
Add to My Manuals
Save this manual to your list of manuals |
Page 7 highlights
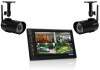
•• Avoid pointing the camera directly at any bushes, tree branches, or moving objects that might naturally move due to winds. Otherwise, the motion detection feature may record unnecessarily. You can mount the camera with the stand on the bottom (on a flat surface such as a table-top), on the side (on a wall), or on the top (on the ceiling). When you are positioning the camera, you might want to bring the monitor along; it's much easier to get the camera into the right position when you have the display handy. Mount the Camera Base The following tools are required: •• Electric Drill •• 5mm Drill Bit •• 15mm Drill Bit •• No. 2 Philips Screwdriver 1. Hold the base of the camera stand where you want to mount it and mark the location of the screw holes. 2. Use the included screws and anchors to attach the base to the wall or ceiling. You can also screw the base into a flat surface such as a tabletop if needed. 3. Before attaching the camera, tug gently on the stand to make sure it is securely in place. 7
-
 1
1 -
 2
2 -
 3
3 -
 4
4 -
 5
5 -
 6
6 -
 7
7 -
 8
8 -
 9
9 -
 10
10 -
 11
11 -
 12
12 -
13
-
14
-
15
-
16
-
17
-
18
-
19
-
20
-
21
-
22
-
23
-
24
-
25
-
26
-
27
-
28
-
29
-
30
-
31
-
32
-
33
-
34
-
35
-
36
-
37
-
38
-
39
-
40
-
41
-
42
-
43
-
44
-
45
-
46
-
47
-
48
-
49
-
50
-
51
-
52
-
53
-
54
-
55
-
56
-
57
-
58
-
59
-
60
 |
 |
