Uniden UDS655 English Owner's Manual - Page 8
Set Up the Monitor - 4 camera
 |
View all Uniden UDS655 manuals
Add to My Manuals
Save this manual to your list of manuals |
Page 8 highlights
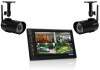
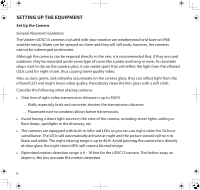
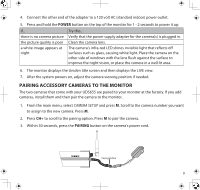
Attach the camera 1. For each camera, attach the camera bracket to the mounting screw. You can attach the stand to the top or the bottom of the camera as needed.Tighten it a few turns, then turn the camera to 2 Tighten the brace against the camera to secure it in place. face the direction you want. 3 2. Tighten the camera brace up against the camera to secure it into place. 3. Unlock the mounting post by turning the wingnut to the left a few turns. 4. Set the mounting post to the correct Loosen the wingnut to unlock the mounting post. angle, then tighten the wingnut until the post is locked into place. 1 Attach the camera to the mounting screw and turn it to the desired direction. 4 Adjust the post to the correct angle, then tighten the wingnut to lock the post into place. 5. Attach the antenna to the rear of the camera. 6. Connect one end of an AC adapter to the camera's power pigtail and plug the other end into a 120 volt AC (standard indoor) power outlet. (If necessary, connect the extension cord to the camera's pigtail and connect the AC adapter to the extension cord.) Be sure the power plug and the connector are tightly twisted together to avoid water leaking in. 7. Make sure the Power status light turns on. If it doesn't, try reconnecting the AC adapter, and make sure the power outlet isn't controlled by a wall switch. Set Up the Monitor 1. Remove the protective plastic from the monitor screen. 2. Flip out the stand on the back of the monitor and extend the antenna. 3. Connect an AC adapter to the power input on the side of the monitor. 8
-
 1
1 -
2
-
 3
3 -
 4
4 -
 5
5 -
 6
6 -
 7
7 -
 8
8 -
 9
9 -
 10
10 -
 11
11 -
 12
12 -
 13
13 -
14
-
15
-
16
-
17
-
18
-
19
-
20
-
21
-
22
-
23
-
24
-
25
-
26
-
27
-
28
-
29
-
30
-
31
-
32
-
33
-
34
-
35
-
36
-
37
-
38
-
39
-
40
-
41
-
42
-
43
-
44
-
45
-
46
-
47
-
48
-
49
-
50
-
51
-
52
-
53
-
54
-
55
-
56
-
57
-
58
-
59
-
60
 |
 |
