ViewSonic PJ1173 PJ1173 User Guide, English - Page 32
PICTURE Menu
 |
UPC - 766907299014
View all ViewSonic PJ1173 manuals
Add to My Manuals
Save this manual to your list of manuals |
Page 32 highlights
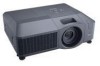
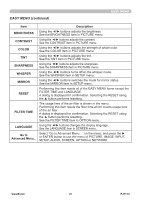
PICTURE Menu PICTURE Menu From the PICTURE menu, items shown in the table below can be performed. Select an item using the ▲/▼ cursor buttons on the projector or remote control, and press the ► cursor button on the projector or remote control, or the ENTER button on the remote control to execute the item. Then perform it according to the following table. Item BRIGHTNESS CONTRAST Description Using the ▲/▼ buttons adjusts the brightness. Light ó Dark Using the ▲/▼ buttons adjusts the contrast. Strong ó Weak Using the ▲/▼ buttons switches the gamma mode. #1 DEFAULT ó #1 CUSTOM ó #2 DEFAULT ó #2 CUSTOM ó #3 DEFAULT #6 CUSTOM #3 CUSTOM #6 DEFAULT ó #5 CUSTOM ó #5 DEFAULT ó #4 CUSTOM ó #4 DEFAULT To adjust CUSTOM GAMMA Selecting a mode whose name includes CUSTOM and then pressing the ► button or the ENTER button displays a dialog to aid you in adjusting the mode. This function is useful when you want to change the brightness of particular tones. Choose an item using the ◄/► buttons, and adjust the level using the ▲/▼ buttons. You can display a test pattern for checking the effect of your adjustment by pressing the ENTER button. Each time you press the ENTER button, the pattern changes as below. No pattern ð Gray scale of 9 steps Ramp Gray scale of 15 steps The eight equalizing bars correspond to eight tone levels of the test pattern (Gray scale of 9 steps) except the darkest in the left end. If you want to adjust the 2nd tone from left end on the test pattern, use the equalizing adjustment bar "1". The darkest tone at the left end of the test pattern cannot be controlled with any of equalizing adjustment bar. • When this function is performed, lines or other distortion may appear. (cVoinetwinSuoendicon next page) 27 PJ1173
-
 1
1 -
2
-
3
-
4
-
5
-
6
-
7
-
8
-
9
-
10
-
11
-
12
-
13
-
14
-
15
-
16
-
17
-
18
-
19
-
20
-
21
-
22
-
23
-
24
-
25
-
26
-
 27
27 -
 28
28 -
 29
29 -
 30
30 -
 31
31 -
 32
32 -
 33
33 -
 34
34 -
 35
35 -
 36
36 -
 37
37 -
38
-
39
-
40
-
41
-
42
-
43
-
44
-
45
-
46
-
47
-
48
-
49
-
50
-
51
-
52
-
53
-
54
-
55
-
56
-
57
-
58
-
59
-
60
-
61
-
62
-
63
-
64
-
65
-
66
-
67
-
68
-
69
-
70
-
71
-
72
-
73
-
74
-
75
-
76
-
77
-
78
-
79
-
80
-
81
-
82
-
83
-
84
-
85
-
86
-
87
-
88
-
89
-
90
-
91
-
92
-
93
-
94
-
95
-
96
-
97
-
98
-
99
-
100
-
101
-
102
-
103
-
104
-
105
-
106
-
107
-
108
-
109
-
110
-
111
-
112
-
113
-
114
-
115
-
116
-
117
-
118
-
119
-
120
-
121
-
122
-
123
-
124
-
125
-
126
-
127
 |
 |