ViewSonic PJ1173 PJ1173 User Guide, English - Page 43
AUDIO Menu
 |
UPC - 766907299014
View all ViewSonic PJ1173 manuals
Add to My Manuals
Save this manual to your list of manuals |
Page 43 highlights
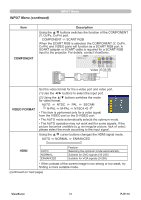
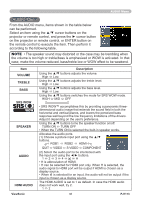
AUDIO Menu AUDIO Menu From the AUDIO menu, items shown in the table below can be performed. Select an item using the ▲/▼ cursor buttons on the projector or remote control, and press the ► cursor button on the projector or remote control, or ENTER button on the remote control to execute the item. Then perform it according to the following table. NOTE • The speaker sound may distorted or the case may be trembling when the volume is too high or treble/bass is emphasized or WOW is activated. In that case, make the volume reduced, bass/treble low or WOW effect to be weakend. Item VOLUME TREBLE BASS SRS WOW SPEAKER AUDIO HDMI AUDIO ViewSonic Description Using the ▲/▼ buttons adjusts the volume. High ó Low Using the ▲/▼ buttons adjusts the treble level. High ó Low Using the ▲/▼ buttons adjusts the bass level. High ó Low Using the ▲/▼ buttons switches the mode for SRS WOW mode. HIGH ó MID ó OFF • SRS WOW™ accomplishes this by providing a panoramic threedimensional audio image that extends the sound field in both the horizontal and vertical planes, and lowers the perceived bass response well beyond the low frequency limitations of the drivers. Adjust it depending on the user's preference. Using the ▲/▼ buttons turns the speaker function on/off. TURN ON ó TURN OFF • When the TURN ON is selected the built-in speaker works. Allocates the audio ports. (1) Choose a picture input port using the ▲/▼ buttons. RGB1 ó RGB2 ó HDMI QUIT ó VIDEO ó S-VIDEO ó COMPONENT (2) Select the audio port to be interlocked with the input port using the ◄/► buttons. 1ó2ó3ó4ó óH • H is abbreviation of HDMI. • H can be selected for HDMI port only. When H is selected, the audio signal to HDMI port will be output if HDMI is chosen as a display source. • When is selected for an input, the audio will not be output if the input is chosen as a display source. The HDMI AUDIO is set to 1 as default. In case the HDMI audio does not work well, try 2. 1 ó 2 38 PJ1173
-
 1
1 -
2
-
3
-
4
-
5
-
6
-
7
-
8
-
9
-
10
-
11
-
12
-
13
-
14
-
15
-
16
-
17
-
18
-
19
-
20
-
21
-
22
-
23
-
24
-
25
-
26
-
27
-
28
-
29
-
30
-
31
-
32
-
33
-
34
-
35
-
36
-
37
-
 38
38 -
 39
39 -
 40
40 -
 41
41 -
 42
42 -
 43
43 -
 44
44 -
 45
45 -
 46
46 -
 47
47 -
 48
48 -
49
-
50
-
51
-
52
-
53
-
54
-
55
-
56
-
57
-
58
-
59
-
60
-
61
-
62
-
63
-
64
-
65
-
66
-
67
-
68
-
69
-
70
-
71
-
72
-
73
-
74
-
75
-
76
-
77
-
78
-
79
-
80
-
81
-
82
-
83
-
84
-
85
-
86
-
87
-
88
-
89
-
90
-
91
-
92
-
93
-
94
-
95
-
96
-
97
-
98
-
99
-
100
-
101
-
102
-
103
-
104
-
105
-
106
-
107
-
108
-
109
-
110
-
111
-
112
-
113
-
114
-
115
-
116
-
117
-
118
-
119
-
120
-
121
-
122
-
123
-
124
-
125
-
126
-
127
 |
 |
