Weider 9250 Uk Manual - Page 24
Troubleshooting And Maintenance
 |
View all Weider 9250 manuals
Add to My Manuals
Save this manual to your list of manuals |
Page 24 highlights
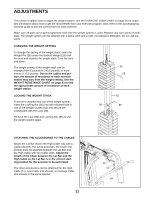
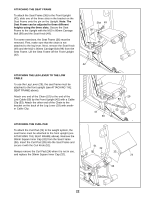
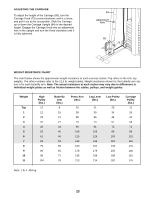
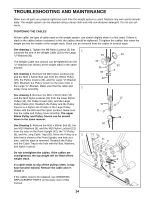
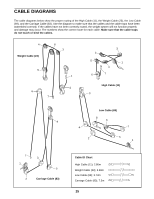
TROUBLESHOOTING AND MAINTENANCE Make sure all parts are properly tightened each time the weight system is used. Replace any worn parts immediately. The weight system can be cleaned using a damp cloth and mild non-abrasive detergent. Do not use solvents. TIGHTENING THE CABLES Woven cable, the type of cable used on the weight system, can stretch slightly when it is first used. If there is slack in the cables before resistance is felt, the cables should be tightened. To tighten the cables, first insert the weight pin into the middle of the weight stack. Slack can be removed from the cables in several ways: See drawing 1. Tighten the M8 Nylon Locknut (3) that 1 connects the end of the Weight Cable (23) to the Large "U"-Bracket (90). The Weight Cable (not shown) can be tightened into the "U"-Bracket (not shown) at the weight stack in the same manner. See drawing 1. Remove the M10 Nylon Locknut (21) and the M10 x 52mm Bolt (12) from the 90mm Pulley (15), the Pulley Covers (40), and the Large "U"-Bracket (90). Reattach the Pulley Covers to the lower hole in the Large "U"-Bracket. Make sure that the cable and pulley move smoothly. 2 15 40 21 90 23 40 12 3 See drawing 2. Remove the M10 x 52mm Bolt (12) and the M10 Nylon Locknut (21) from the lower 90mm Pulley (15), the Pulley Covers (40), and the Large Pulley Plates (91). Reattach the Pulley and the Pulley Covers to a higher set of holes in the Large Pulley Plates with the Bolt and the Nylon Locknut. Make sure that the cable and Pulley move smoothly. The upper 90mm Pulley and Pulley Covers can be moved down in the same manner. See Drawing 3. Remove the M10 x 80mm Bolt (8), the two M10 Washers (9), and the M10 Nylon Locknut (21) from the tube on the Front Upright (42), the "V"-Pulley (6), and the Long Cable Trap (50). Move the Pulley to a 3 hole that is closer to the Front Upright, one hole at a time, until the slack is removed. Reattach the Pulley and the Cable Trap to the hole with the Bolt, Washers, and Nylon Locknut. Do not overtighten the cables. If the cables are overtightened, the top weight will be lifted off the weight stack. 12 91 21 15 40 21 9 42 50 6 If a cable tends to slip off the pulleys often, it may have become twisted. Remove the cable and reinstall it. 9 8 If the cables need to be replaced, see ORDERING REPLACEMENT PARTS on the back cover of this manual. 24
-
 1
1 -
2
-
3
-
4
-
5
-
6
-
7
-
8
-
9
-
10
-
11
-
12
-
13
-
14
-
15
-
16
-
17
-
18
-
 19
19 -
 20
20 -
 21
21 -
 22
22 -
 23
23 -
 24
24 -
 25
25 -
 26
26 -
 27
27 -
 28
28 -
 29
29 -
30
-
31
-
32
-
33
-
34
-
35
 |
 |
