Weider 9250 Uk Manual - Page 8
Slide the Top Weight onto the Weight
 |
View all Weider 9250 manuals
Add to My Manuals
Save this manual to your list of manuals |
Page 8 highlights
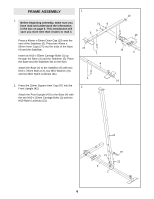
5. Orient the Weight Tube Bumper (62) so that the 5 lock holes (see drawing 6) are closer to the bot- tom. Insert the two Weight Guides into the indi- cated holes in the Base (4). Secure the Weight Guides (62) to the Base with an M10 x 155mm Bolt (60), two M10 Washers (9), two 15mm Spacers (61), and an M10 Nylon Locknut (21). Slide the two Weight Bumpers (19) onto the Weight Guides (62). Slide the eleven Weights (25) onto the Weight Guides (62). Have a second person hold the Weight Guides whilst the Weights are being put on. Make sure the pin grooves are on the side shown. 62 25 Pin Groove 6. Press the Weight Tube Bumper (72) into the bot- 6 tom of the Weight Tube (63). Insert the Weight Tube into the centre hole in the Weights (25). Make sure the pin on the Weight Tube rests in the indicated pin groove. Lubricate the indicated holes in the Top Weight (56). Slide the Top Weight onto the Weight Guides (62), with the pin groove on the side shown. 19 4 21 9 9 60 61 Lubricate 56 63 62 72 Lock Holes 25 Pin Groove Pin Pin Groove 8
-
 1
1 -
2
-
 3
3 -
 4
4 -
 5
5 -
 6
6 -
 7
7 -
 8
8 -
 9
9 -
 10
10 -
 11
11 -
 12
12 -
 13
13 -
14
-
15
-
16
-
17
-
18
-
19
-
20
-
21
-
22
-
23
-
24
-
25
-
26
-
27
-
28
-
29
-
30
-
31
-
32
-
33
-
34
-
35
 |
 |
