Weider 9400 Instruction Manual
Weider 9400 Manual
 |
View all Weider 9400 manuals
Add to My Manuals
Save this manual to your list of manuals |
Weider 9400 manual content summary:
- Weider 9400 | Instruction Manual - Page 1
7125 Please provide the following information when ordering replacement parts: • The MODEL NUMBER of the product (WEEVSY39530) • The NAME of the product (WEIDER® PRO 9400 weight system) • The SERIAL NUMBER of the product (see the front cover of this manual) • The KEY NUMBER and DESCRIPTION of the - Weider 9400 | Instruction Manual - Page 2
24 TROUBLESHOOTING 25 CABLE DIAGRAMS 26 ORDERING REPLACEMENT PARTS Back Cover Note: A PART IDENTIFICATION CHART and a PART LIST/EXPLODED DRAWING are attached in the centre of this manual. Remove the PART IDENTIFICATION CHART and the PART LIST/EXPLODED DRAWING before beginning assembly. WEIDER is - Weider 9400 | Instruction Manual - Page 3
each time the weight system is used. Replace any worn parts immediately. 6. Keep children under 12 and pets away from the weight system at all times. 14. Make sure that the cables remain on the pulleys at all times. If the cables bind while you are exercising, stop immediately and make sure that - Weider 9400 | Instruction Manual - Page 4
Thank you for selecting the versatile WEIDER® PRO 9400 weight system. The weight system offers cable slips off the pulleys repeatedly, it may have become twisted. Remove the cable and re-install it. If the cables need to be replaced, see ORDERING REPLACEMENT PARTS on the back cover of this manual - Weider 9400 | Instruction Manual - Page 5
weight plates as well as friction between the cables, pulleys, and weight guides. WEIGHT Top 1 2 3 4 5 6 Parts Tighten all parts as you assemble them, unless instructed to do otherwise. Questions? If you have questions after reading the assembly instructions, please call our Customer Service - Weider 9400 | Instruction Manual - Page 6
Make sure that you understand all of the information on page 5 before you begin assembling the weight system. 2 24 120 14 Locate and open the parts bags labelled "FRAME ASSEMBLY 1" and "FRAME ASSEMBLY 2." See the inset drawing. Attach the Base Cap (24) to the Short Base (2) with two M4 x 20mm Self - Weider 9400 | Instruction Manual - Page 7
ADJUSTMENTS The instructions below describe how each part of the weight system can be adjusted. Refer to the exercise guide accompanying this manual to see how the weight system should be set up for various exercises. IMPORTANT: When attaching the accessories, make sure that they are in the correct - Weider 9400 | Instruction Manual - Page 8
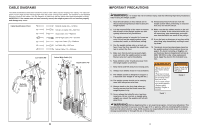
: If the cables are not properly installed, they may be damaged when heavy weight is used. See the CABLE DIAGRAMS on page 26 and 27 of this manual for proper cable routing. If there is any slack in the cables, you will need to remove the slack by tightening the cables. See TROUBLESHOOTING on page 25 - Weider 9400 | Instruction Manual - Page 9
sure that the Weight Tube is turned as shown. Lubricate the two outer holes in a Top Weight (45). Slide the Top Weight onto the Weight Guides (42). Make sure that the Top Weight is turned so the grooved side is facing downward. Apply a number "10" decal to the Top Weight (45 - Weider 9400 | Instruction Manual - Page 10
tighten the Bolts and Locknuts yet. Attach the four Weight Guides (42) to the Top Frame (6) with two M10 M12 Nut (118) halfway onto the end of the Squat Cable (73). Hold the Weight Tube (43) and the Top the weight stack. Replace the Pin. SEAT ASSEMBLY 56. Locate and open the parts bag labelled "SEAT - Weider 9400 | Instruction Manual - Page 11
18. IMPORTANT: Refer to the Cable Identification Chart on page 26 for help identifying the cables. Do not overtighten the bolts and locknuts attaching the pulleys; the pulleys must be able to turn freely. Locate and open the parts bags labelled "CABLE ASSEMBLY", "PULLEY COVERS", and "PULLEYS - Weider 9400 | Instruction Manual - Page 12
tabs on the Pulley Covers are on the top. 21. Wrap the Swivel High Cable (74) over a 115mm 21 Pulley (119). Attach the Pulley inside of the indicat tabs on the Pulley Covers are oriented as indicated. 47. Wrap the Swivel Low Cable (72) over a 90mm Pulley (78). Attach the Pulley and a pair of - Weider 9400 | Instruction Manual - Page 13
(not shown) from the "U"-bracket (64). Attach the end of the Leg Lever Cable (75) to the "U"-bracket (64) with an M8 Washer (90) and an preattached 90mm Pulleys (78) from the Offset Double "U"-bracket (61). Wrap the Swivel Cable (17) around a 90mm Pulley (78). Attach the Pulley to the Offset Double - Weider 9400 | Instruction Manual - Page 14
M10 Nylon Locknut (87). 32. Locate the Butterfly Cable (69), which is the 32 shortest Cable. Attach the Cable to the Pivot Bracket (70) on the Left 90mm Pulleys (78) from the Double "U"-bracket (62). 34 Wrap the Butterfly Cable (69) under a 90mm Pulley (78). Attach the Pulley and a pair of - Weider 9400 | Instruction Manual - Page 15
) 40mm x 50mm Inner Cap (21) This chart is provided to help you identify the small parts used in assembly. The number in parenthesis below each part refers to the key number of the part from the PART LIST in the centre of this manual. Important: Some parts may have been pre-assembled for shipping - Weider 9400 | Instruction Manual - Page 16
PART IDENTIFICATION CHART-Model No. WEEVSY39530 R0803A 12mm Spacer (89) 50mm Washer (1) M10 Washer (91) 16mm Spacer (98) Cable Clip (83) M8 Washer (90) M6 Washer (97) M4 Washer (120) M12 Nut (118) M10 Nylon Locknut (87) M8 Nylon Locknut (34) 115mm Pulley (119) ( - Weider 9400 | Instruction Manual - Page 17
120 3 121 2 122 1 # 1 # 1 #2 Lat Cable 12mm Spacer M8 Washer M10 Washer M10 x 95mm Bolt M10 x Manual Exercise Guide Grease Package Note: "#" indicates a non-illustrated part. Specifications are subject to change without notice. REMOVE THIS PART LIST/EXPLODED DRAWING FROM THE MANUAL. SAVE THIS PART - Weider 9400 | Instruction Manual - Page 18
EXPLODED DRAWING-Model No. WEEVSY39530 R0803A 58 31 92 18 18 91 87 58 78 87 92 91 87 78 85 89 78 68 31 68 91 87 7 91 78 68 100 52 91 87 122 87 91 30 89 91 91 87 89 18 93 87 91 87 93 102 87 91 100 6 21 109 20 54 19 87 34 26 51 103 100 69 60 87 51 60 70 34 100 34 69 103 21
-
 1
1 -
 2
2 -
 3
3 -
 4
4 -
 5
5 -
 6
6 -
 7
7 -
8
-
9
-
10
-
11
-
12
-
13
-
14
-
15
-
16
-
17
-
18
 |
 |
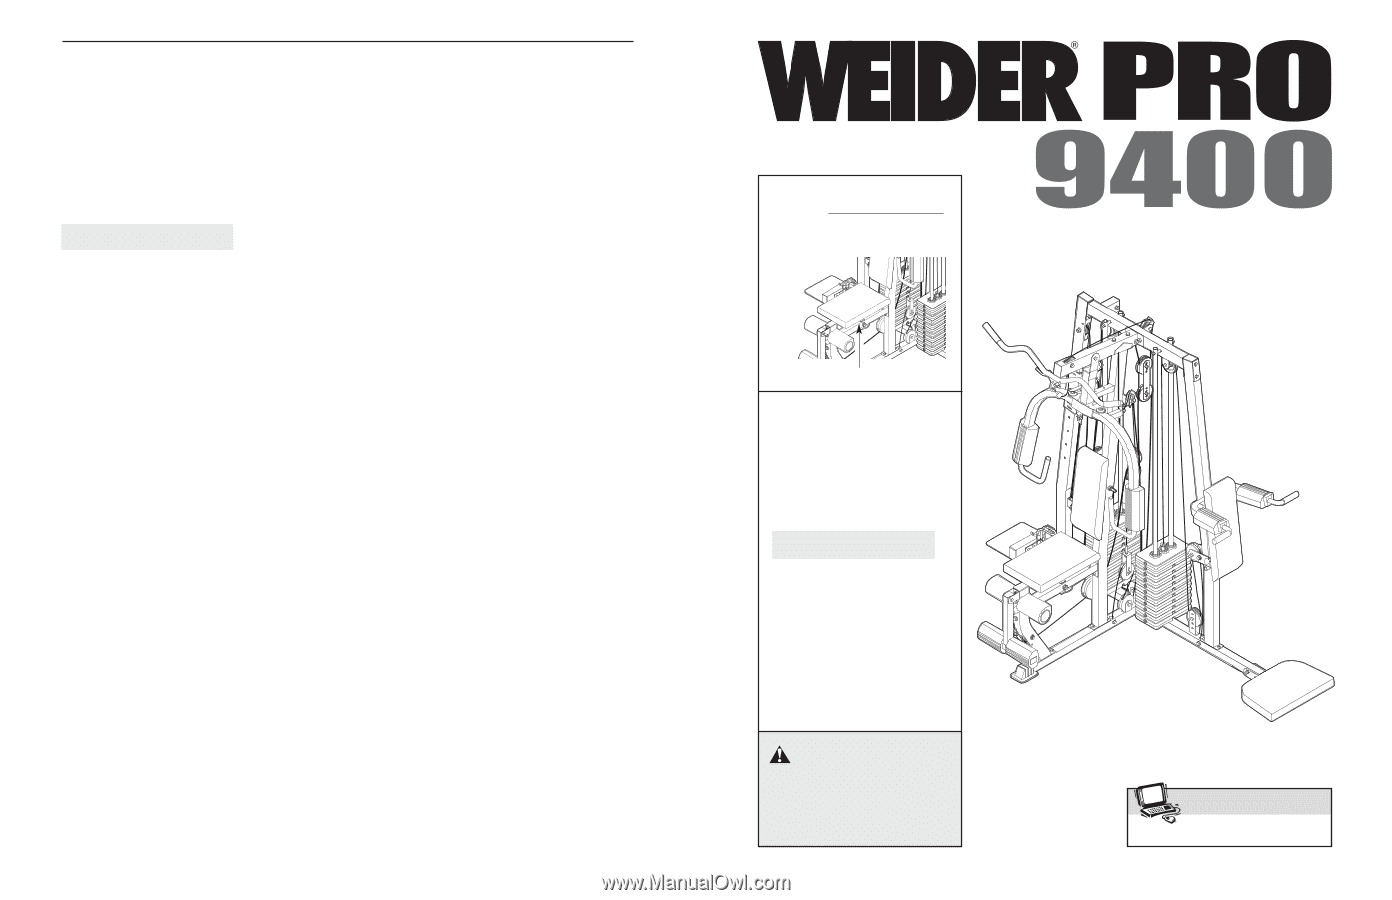
USER'S MANUAL
Model No. WEEVSY39530
Serial No.
Write the serial number in the
space above for future reference.
CAUTION
Read all precautions and instruc-
tions in this manual before using
this equipment. Save this manual
for future reference.
ORDERING REPLACEMENT PARTS
To order replacement parts, contact the ICON Health & Fitness, Ltd. office, or write:
Unit 4
Revie Road Industrial Estate
Revie Road
Beeston
Leeds, LS118JG
UK
Tel:
Outside the UK: 0 (044) 113 387 7133
Fax: 0 (044) 113 387 7125
Please provide the following information when ordering replacement parts:
•
The MODEL NUMBER of the product (WEEVSY39530)
•
The NAME of the product (WEIDER
®
PRO 9400 weight system)
•
The SERIAL NUMBER of the product (see the front cover of this manual)
•
The KEY NUMBER and DESCRIPTION of the part(s) (see the PART LIST and EXPLODED DRAWING
attached in the centre of this manual)
Part No. 200195 R0803A
Printed in China © 2003 ICON Health & Fitness, Inc.
www.iconeurope.com
Visit our website at
Serial Number Decal (Under Seat)
08457 089 009
QUESTIONS?
As a manufacturer, we are
committed to providing com-
plete customer satisfaction. If
you have questions, or if there
are missing or damaged parts,
please call:
Or write:
ICON Health & Fitness, Ltd.
Unit 4
Revie Road Industrial Estate
Revie Road
Beeston
Leeds, LS118JG
UK
email: [email protected]
08457 089 009
Class HC Fitness Product