Weider 9400 Instruction Manual - Page 7
Adjustments
 |
View all Weider 9400 manuals
Add to My Manuals
Save this manual to your list of manuals |
Page 7 highlights
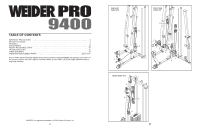
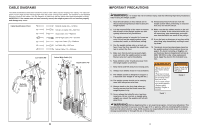
ADJUSTMENTS The instructions below describe how each part of the weight system can be adjusted. Refer to the exercise guide accompanying this manual to see how the weight system should be set up for various exercises. IMPORTANT: When attaching the accessories, make sure that they are in the correct starting position for the exercise to be performed. If there is any slack in the cables or chain as an exercise is performed, the effectiveness of the exercise will be reduced. CHANGING THE WEIGHT SETTING To change the weight setting of either weight stack, insert a Weight Pin (50) under the desired Weight (44) until the bent end of the Weight Pin is touching the Weights. Turn the bent end downward. The weight setting of each weight stack can be changed from 10 pounds to 110 pounds, in 10-pound increments. Note: Due to the cables and pulleys, the amount of resistance at each exercise station may vary from the weight setting. Use the WEIGHT RESISTANCE CHART on page 24 to find the approximate amount of resistance at each weight station. ATTACHING THE ACCESSORIES 50 44 Attach the Lat Bar (79) to the Lat Cable (88) with a Cable Clip (83). For some exercises, the Chain (81) should be attached between the Lat Bar and the Lat Cable with two Cable Clips. Adjust the length of the Chain between the Lat Bar and the Lat Cable so the Lat Bar is in the correct starting position for the exercise to be performed. The Lat Bar (79) can be attached to the Swivel Low Cable (not shown) in the same way. 88 83 81 83 The Row Bar (not shown), the Handle (not shown), or Ab Strap (not shown) can be attached to the Lat Cable 79 (88) or the Swivel Low Cable (not shown) in the same way. CONVERTING THE BUTTERFLY ARMS To use the Butterfly Arms (25, 26) as butterfly arms, insert the "L"-pins w/Tethers (60) into the butterfly holes in the Butterfly Upright (3). To use the Butterfly Arms (25, 26) as press arms, insert the "L"-pins w/Tethers (60) into the press holes in the Butterfly Frame (47). 26 Make sure that both "L"-pins w/Tethers (60) are fully inserted into the same set of holes before performing any exercise. 22 60 Butterfly Holes 3 47 Press Holes 25 4. Press a 38mm Square Inner Cap (67) into the 4 Upright Extension (12). Attach the Upright Extension (12) to the Butterfly Upright (3) with two M10 x 95mm Bolts (92), two M10 Washers (91), and two M10 Nylon Locknuts (87). Make sure the warning decals on each side of the Extension are right-side up. Slide the Butterfly Upright (3) onto the two indicated M10 x 65mm Carriage Bolts (110) in the Short Base (2). Finger tighten an M10 Nylon Locknut (87) onto each Carriage Bolt. Do not tighten the Locknuts yet. Tighten an Adjustment Handle (65) into the Butterfly Upright (3). 92 12 67 92 3 87 91 Warning Decal 65 87 5. Press a 50mm x 75mm Inner Cap (58) into the top of the Seat Upright (9). Attach the Leg Lever Bumper (77) to the Seat Upright with an M4 x 20mm Self-tapping Screw (14) and an M4 Washer (120). Slide the Seat Upright (9) onto the two indicated M10 x 65mm Carriage Bolts (110) in the Short Base (2). Finger tighten an M10 Nylon Locknut (87) onto each Carriage Bolt. Do not tighten the Locknuts yet. 87 2 110 5 58 77 14 120 87 9 87 2 6. Hold the Seat Frame (8) between the Seat Upright (9) and the Butterfly Upright (3). Attach the Seat Frame to the Seat Upright with two M10 x 95mm Bolts (92), two M10 Washers (91), and two M10 Nylon Locknuts (87). Do not tighten the Locknuts yet. Attach the Seat Frame (8) to the Butterfly Upright (3) with two M10 x 95mm Bolts (92), two M10 Washers (91), and two M10 Nylon Locknuts (87). Do not tighten the Locknuts yet. Tighten an Adjustment Handle (65) into the Seat Frame (8). 110 6 8 87 87 65 91 92 91 3 9 91 92 91 7
-
 1
1 -
 2
2 -
 3
3 -
 4
4 -
 5
5 -
 6
6 -
 7
7 -
 8
8 -
 9
9 -
 10
10 -
 11
11 -
 12
12 -
13
-
14
-
15
-
16
-
17
-
18
 |
 |
