Weider Pro 2000 Uk Manual - Page 11
the Nylon Locknut; the Weight Tube must
 |
View all Weider Pro 2000 manuals
Add to My Manuals
Save this manual to your list of manuals |
Page 11 highlights
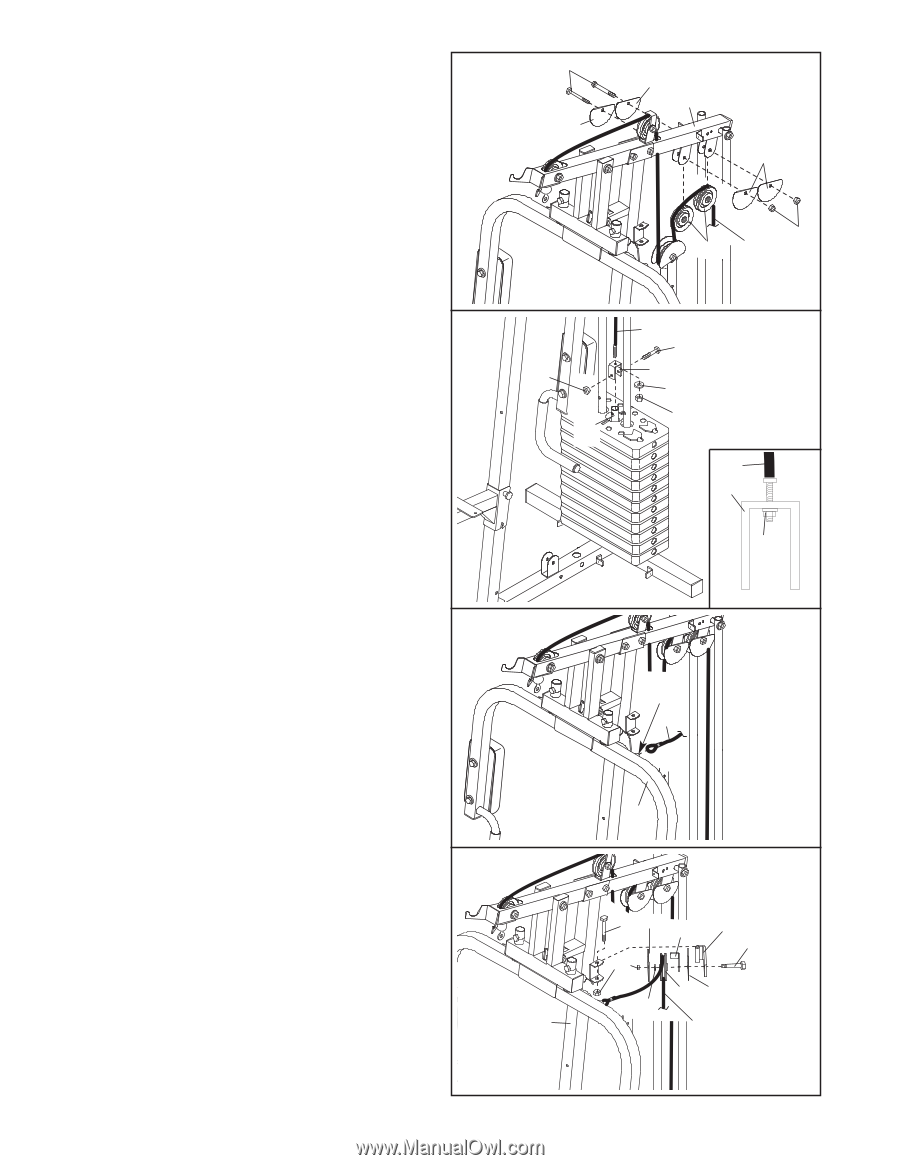
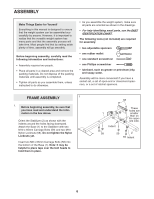
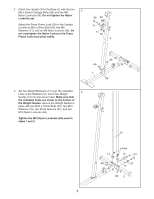
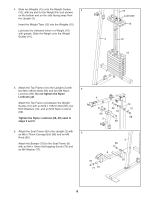
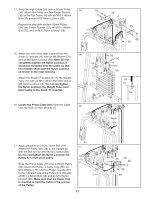
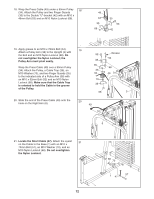
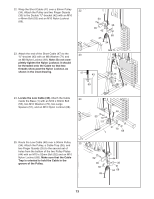
14. Wrap the High Cable (50) over a 90mm Pulley 14 (34). Attach the Pulley and two Finger Guards (35) to the Top Frame (4) with an M10 x 46mm Bolt (53) and an M10 Nylon Locknut (68). Repeat this step with another 90mm Pulley (34), two Finger Guards (35), an M10 x 46mm Bolt (53), and an M10 Nylon Locknut (68). 53 35 4 35 35 68 34 50 15. Attach the end of the High Cable (50) to the 15 Small "U"-bracket (11) with an M8 Washer (71) and an M8 Nylon Locknut (69). Note: Do not completely tighten the Nylon Locknut; it should be threaded onto the Cable so that two threads show past the Nylon Locknut, as shown in the inset drawing. Attach the Small "U"-bracket (11) to the Weight Tube (12) with an M8 x 45mm Bolt (60) and an M8 Nylon Locknut (69). Do not overtighten the Nylon Locknut; the Weight Tube must pivot easily in the Small "U"-bracket. 69 12 50 60 11 71 69 50 11 69 16. Locate the Press Cable (49). Slide the Cable 16 onto the hook on the Left Arm (7). Hook 49 17. Apply grease to an M10 x 78mm Bolt (54). 17 Attach the Pulley Arm (38) to the Upright (3) with the Bolt and an M10 Nylon Locknut (68). Do not overtighten the Nylon Locknut; the Pulley Arm must pivot easily. Wrap the Press Cable (49) over a 90mm Pulley (34). Attach the Pulley, a Cable Trap (36), an M10 Washer (70), and two Finger Guards (35) to the indicated side of the Pulley Arm (38) with an M10 x 52mm Bolt (52) and an M10 Nylon Locknut (68). Make sure that the Cable Trap is oriented to hold the Cable in the groove of the Pulley. 11 7 54 35 36 68 38 52 34 35 70 3 49
-
 1
1 -
2
-
3
-
4
-
5
-
 6
6 -
 7
7 -
 8
8 -
 9
9 -
 10
10 -
 11
11 -
 12
12 -
 13
13 -
 14
14 -
 15
15 -
 16
16 -
17
-
18
-
19
-
20
-
21
-
22
-
23
-
24
 |
 |