Xerox 5550N User Guide (English) - Page 101
Printing Envelopes from the Optional Envelope Tray, long-edge feed, faceup, first, Envelope, Tray 2
 |
UPC - 095205737257
View all Xerox 5550N manuals
Add to My Manuals
Save this manual to your list of manuals |
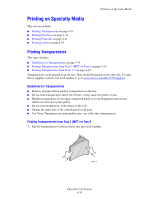
Page 101 highlights
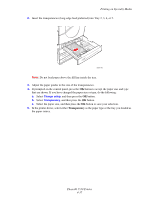
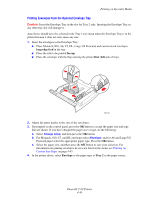
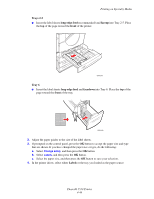
Printing on Specialty Media Printing Envelopes from the Optional Envelope Tray Caution: Insert the Envelope Tray in the slot for Tray 2 only. Inserting the Envelope Tray in any other tray slot will damage it. Auto Sense should never be selected in the Tray 2 size menu when the Envelope Tray is in the printer because it does not auto-sense any size. 1. Insert the envelopes in the Envelope Tray: ■ Place Monarch, #10, A6, C5, DL, Large US Postcard, and custom-sized envelopes long-edge feed in the tray. ■ Place the side to be printed faceup. ■ Place the envelope with the flap entering the printer first (left side of tray). 5550-203 2. Adjust the paper guides to the size of the envelopes. 3. If prompted on the control panel, press the OK button to accept the paper size and type that are shown. If you have changed the paper size or type, do the following: a. Select Change setup, and then press the OK button. b. For Monarch, #10, C5, and DL envelopes select Envelope, and for A6 and Large US Postcard paper select the appropriate paper type. Press the OK button. c. Select the paper size, and then press the OK button to save your selection. For information on printing envelopes in sizes not listed in the menu, see Printing on Custom Size Paper on page 4-45. 4. In the printer driver, select Envelope as the paper type or Tray 2 as the paper source. Phaser® 5550 Printer 4-40
-
 1
1 -
2
-
3
-
4
-
5
-
6
-
7
-
8
-
9
-
10
-
11
-
12
-
13
-
14
-
15
-
16
-
17
-
18
-
19
-
20
-
21
-
22
-
23
-
24
-
25
-
26
-
27
-
28
-
29
-
30
-
31
-
32
-
33
-
34
-
35
-
36
-
37
-
38
-
39
-
40
-
41
-
42
-
43
-
44
-
45
-
46
-
47
-
48
-
49
-
50
-
51
-
52
-
53
-
54
-
55
-
56
-
57
-
58
-
59
-
60
-
61
-
62
-
63
-
64
-
65
-
66
-
67
-
68
-
69
-
70
-
71
-
72
-
73
-
74
-
75
-
76
-
77
-
78
-
79
-
80
-
81
-
82
-
83
-
84
-
85
-
86
-
87
-
88
-
89
-
90
-
91
-
92
-
93
-
94
-
95
-
 96
96 -
 97
97 -
 98
98 -
 99
99 -
 100
100 -
 101
101 -
 102
102 -
 103
103 -
 104
104 -
 105
105 -
 106
106 -
107
-
108
-
109
-
110
-
111
-
112
-
113
-
114
-
115
-
116
-
117
-
118
-
119
-
120
-
121
-
122
-
123
-
124
-
125
-
126
-
127
-
128
-
129
-
130
-
131
-
132
-
133
-
134
-
135
-
136
-
137
-
138
-
139
-
140
-
141
-
142
-
143
-
144
-
145
-
146
-
147
-
148
-
149
-
150
-
151
-
152
-
153
-
154
-
155
-
156
-
157
-
158
-
159
-
160
-
161
-
162
-
163
-
164
-
165
-
166
-
167
-
168
-
169
-
170
-
171
-
172
-
173
-
174
-
175
-
176
-
177
-
178
-
179
-
180
-
181
-
182
-
183
-
184
-
185
-
186
-
187
-
188
-
189
-
190
-
191
-
192
-
193
-
194
-
195
-
196
-
197
-
198
-
199
-
200
-
201
-
202
-
203
-
204
-
205
-
206
-
207
-
208
-
209
-
210
-
211
-
212
-
213
-
214
-
215
-
216
-
217
-
218
-
219
-
220
-
221
-
222
-
223
-
224
-
225
-
226
-
227
-
228
-
229
-
230
-
231
-
232
-
233
-
234
-
235
-
236
-
237
 |
 |
