Xerox 6180MFP Features Setup Guide - Page 10
Step 4: Using CentreWare IS to Create an Email Address, Step 5: Using CentreWare IS to Set Up - d printer
 |
UPC - 095205733839
View all Xerox 6180MFP manuals
Add to My Manuals
Save this manual to your list of manuals |
Page 10 highlights
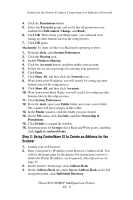
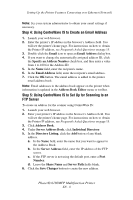
Setting Up the Printer Features Connecting over Ethernet (Network) Note: See your system administrator to obtain your email settings if necessary. Step 4: Using CentreWare IS to Create an Email Address 1. Launch your web browser. 2. Enter the printer's IP address in the browser's Address field. You will see the printer's home page. For instructions on how to obtain the Printer IP address, see Frequently Asked Questions on page 15. 3. Double-click the Email icon to open an Email Address dialog box. 4. If you want to change the automatically assigned address ID, click the Specify an Address Number check box, and then enter a value from 1 to 100 for the Address ID. 5. In the Name field, enter the recipient's name. 6. In the Email Address field, enter the recipient's email address. 7. Click the OK button. The email address is added to the printer email address book. Note: Email addresses in the address book appear on the printer when information is updated in the Address Book Editor menu or toolbar. Step 5: Using CentreWare IS to Set Up for Scanning to an FTP Server To create an address for the scanner using CentreWare IS: 1. Launch your web browser. 2. Enter your printer's IP address in the browser's Address field. You will see the printer's home page. For instructions on how to obtain the Printer IP address, see Frequently Asked Questions on page 15. 3. Click Address Book. 4. Under Server Address Book, click Individual Directory. 5. In the Directory Listing, click the Add button of any blank address. a. In the Name field, enter the name that you want to appear in the Address Book. b. In the Server Address field, enter the IP address of the FTP server. c. If the FTP server is not using the default port, enter a Port Number. d. Leave the Share Name and Server Path fields blank. 6. Click the Save Changes button to create the new address. Phaser® 6180MFP Multifunction Printer EN - 8
-
 1
1 -
2
-
3
-
4
-
 5
5 -
 6
6 -
 7
7 -
 8
8 -
 9
9 -
 10
10 -
 11
11 -
 12
12 -
 13
13 -
 14
14 -
 15
15 -
16
-
17
-
18
-
19
-
20
-
21
-
22
-
23
-
24
-
25
-
26
-
27
-
28
-
29
-
30
-
31
-
32
-
33
-
34
-
35
-
36
-
37
-
38
-
39
-
40
-
41
-
42
-
43
-
44
-
45
-
46
-
47
-
48
-
49
-
50
-
51
-
52
-
53
-
54
-
55
-
56
-
57
-
58
-
59
-
60
-
61
-
62
-
63
-
64
-
65
-
66
-
67
-
68
-
69
-
70
-
71
-
72
-
73
-
74
-
75
-
76
-
77
-
78
-
79
-
80
-
81
-
82
-
83
-
84
-
85
-
86
-
87
-
88
-
89
-
90
-
91
-
92
-
93
-
94
-
95
-
96
-
97
-
98
-
99
-
100
-
101
-
102
-
103
 |
 |
