Xerox 6180MFP Features Setup Guide - Page 15
Step 3: Setting Up the Fax, Step 4: Using the Address Book Editor to Add an Individual, to Your Fax - phaser manual
 |
UPC - 095205733839
View all Xerox 6180MFP manuals
Add to My Manuals
Save this manual to your list of manuals |
Page 15 highlights
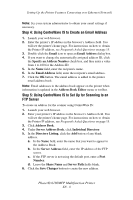
Setting Up the Printer Features Connecting over USB Step 3: Setting Up the Fax 1. Verify that your fax phone line is connected. 2. From the control panel: a. Press the System button. b. Select the Admin Menu. c. Select the Fax Settings. d. Select your country. e. Enter your fax number (this number prints on the header of the faxes). Step 4: Using the Address Book Editor to Add an Individual to Your Fax Addresses 1. Windows: On the Start menu, select All Programs/Xerox/ Phaser 6180MFP/Address Book Editor, and then click OK. Macintosh: From the Application folder, click Xerox/ Phaser 6180MFP, and then double-click Address Book Editor. 2. In the left navigation panel, right-click the Fax icon and then select New and New Entry. The Speed Dial dialog box opens. The Address Book Editor automatically assigns the speed dial number to the first empty entry. 3. To manually specify the speed dial number, click Specify an Address Number, and then enter a value from 1 to 200 for the speed dial number. The first ten entries in the Address Book correspond to the ten one-touch buttons found on the left navigation panel of the control panel. 4. Type in a value for Name and Phone Number. 5. To add this entry to an existing group: a. Click Group Membership. b. Select the group(s) to add this entry to, and then click OK. 6. Confirm the group members, and click OK. 7. Click OK. 8. Windows: On the File menu, select Save all. Macintosh: On the File menu, select Save. The address book is saved with the new fax entry. Phaser® 6180MFP Multifunction Printer EN - 13
-
 1
1 -
2
-
3
-
4
-
5
-
6
-
7
-
8
-
9
-
 10
10 -
 11
11 -
 12
12 -
 13
13 -
 14
14 -
 15
15 -
 16
16 -
 17
17 -
 18
18 -
 19
19 -
 20
20 -
21
-
22
-
23
-
24
-
25
-
26
-
27
-
28
-
29
-
30
-
31
-
32
-
33
-
34
-
35
-
36
-
37
-
38
-
39
-
40
-
41
-
42
-
43
-
44
-
45
-
46
-
47
-
48
-
49
-
50
-
51
-
52
-
53
-
54
-
55
-
56
-
57
-
58
-
59
-
60
-
61
-
62
-
63
-
64
-
65
-
66
-
67
-
68
-
69
-
70
-
71
-
72
-
73
-
74
-
75
-
76
-
77
-
78
-
79
-
80
-
81
-
82
-
83
-
84
-
85
-
86
-
87
-
88
-
89
-
90
-
91
-
92
-
93
-
94
-
95
-
96
-
97
-
98
-
99
-
100
-
101
-
102
-
103
 |
 |
