Xerox 6180MFP Features Setup Guide - Page 12
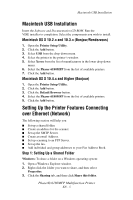
Setting Up the Printer Features Connecting, over USB - phaser multifunction printer
 |
UPC - 095205733839
View all Xerox 6180MFP manuals
Add to My Manuals
Save this manual to your list of manuals |
Page 12 highlights
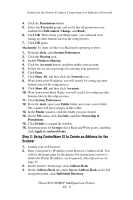
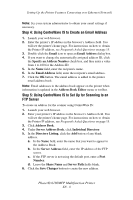
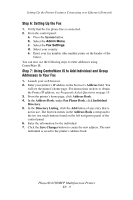
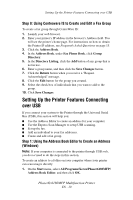
Setting Up the Printer Features Connecting over USB Step 8: Using Centreware IS to Create and Edit a Fax Group To create a fax group through CentreWare IS: 1. Launch your web browser. 2. Enter your printer's IP address in the browser's Address field. You will see the printer's home page. For instructions on how to obtain the Printer IP address, see Frequently Asked Questions on page 15. 3. Click the Address Book. 4. In the Address Book, under Fax Phone Book, click Group Directory. 5. In the Directory Listing, click the Add button of any group that is not in use. 6. Enter a group name, and then click the Save Changes button. 7. Click the Return button when you receive a "Request Acknowledged" message. 8. Click the Edit button for the group you created. 9. Select the check box of individuals that you want to add to the group. 10. Click Save Changes. Setting Up the Printer Features Connecting over USB If you connect your system to the Printer through the Universal Serial Bus (USB), this section will help you: ■ Use the Address Editor to create an address for your computer. ■ Use the Express Scan Manager to setup USB scanning. ■ Set up the fax. ■ Add an individual to your fax addresses. ■ Create and edit a fax group. Step 1: Using the Address Book Editor to Create an Address (Windows) Note: If your computer is connected to the printer through USB only, you do not need to do the steps in this section. To create an address to a folder on your computer where your printer can scan images directly: 1. On the Start menu, select All Programs/Xerox/Phaser6180MFP/ Address Book Editor, and then click OK. Phaser® 6180MFP Multifunction Printer EN - 10
-
 1
1 -
2
-
3
-
4
-
5
-
6
-
 7
7 -
 8
8 -
 9
9 -
 10
10 -
 11
11 -
 12
12 -
 13
13 -
 14
14 -
 15
15 -
 16
16 -
 17
17 -
18
-
19
-
20
-
21
-
22
-
23
-
24
-
25
-
26
-
27
-
28
-
29
-
30
-
31
-
32
-
33
-
34
-
35
-
36
-
37
-
38
-
39
-
40
-
41
-
42
-
43
-
44
-
45
-
46
-
47
-
48
-
49
-
50
-
51
-
52
-
53
-
54
-
55
-
56
-
57
-
58
-
59
-
60
-
61
-
62
-
63
-
64
-
65
-
66
-
67
-
68
-
69
-
70
-
71
-
72
-
73
-
74
-
75
-
76
-
77
-
78
-
79
-
80
-
81
-
82
-
83
-
84
-
85
-
86
-
87
-
88
-
89
-
90
-
91
-
92
-
93
-
94
-
95
-
96
-
97
-
98
-
99
-
100
-
101
-
102
-
103
 |
 |
