Xerox 6180MFP Features Setup Guide - Page 5
Installing the Windows Scan Driver, over USB - phaser printer driver
 |
UPC - 095205733839
View all Xerox 6180MFP manuals
Add to My Manuals
Save this manual to your list of manuals |
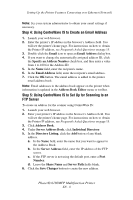
Page 5 highlights
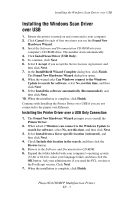
Installing the Windows Scan Driver over USB Installing the Windows Scan Driver over USB 1. Ensure the printer is turned on and connected to your computer. 2. Click Cancel for each of first two times you see the Found New Hardware Wizard. 3. Insert the Software and Documentation CD-ROM into your computer's CD-ROM drive. The installer starts automatically. 4. Click Install Scan Driver (USB Only). 5. To continue, click Next. 6. Select I Accept if you accept the Xerox License Agreement, and then click Next. 7. In the InstallShield Wizard Complete dialog box, click Finish. The Found New Hardware Wizard dialog box opens. 8. When the wizard asks Can Windows connect to the Windows Update to search for software, select No, not this time, and then click Next. 9. Select Install the software automatically (Recommended), and then click Next. 10. When the installation is complete, click Finish. Continue with Installing the Printer Driver over USB if you are not connected to the printer over Ethernet. Installing the Printer Driver over a USB Only Connection 1. The Found New Hardware Wizard prompts you to install the Printer Driver. 2. When asked if Windows can connect to the Windows Update to search for software, select No, not this time, and then click Next. 3. Select Install from a list or specific location (Advanced), and then click Next. 4. Check Include this location in the search, and then click the Browse button. 5. Browse to the Software and Documentation CD-ROM. 6. Expand the folder labeled with your computer's operating system (32-bit or 64-bit), select your language folder, and then click the OK button. Ask your administrator if you need the PCL version or the PostScript version. Click Next. 7. When the installation is complete, click Finish. Phaser® 6180MFP Multifunction Printer EN - 3
-
 1
1 -
 2
2 -
 3
3 -
 4
4 -
 5
5 -
 6
6 -
 7
7 -
 8
8 -
 9
9 -
 10
10 -
 11
11 -
12
-
13
-
14
-
15
-
16
-
17
-
18
-
19
-
20
-
21
-
22
-
23
-
24
-
25
-
26
-
27
-
28
-
29
-
30
-
31
-
32
-
33
-
34
-
35
-
36
-
37
-
38
-
39
-
40
-
41
-
42
-
43
-
44
-
45
-
46
-
47
-
48
-
49
-
50
-
51
-
52
-
53
-
54
-
55
-
56
-
57
-
58
-
59
-
60
-
61
-
62
-
63
-
64
-
65
-
66
-
67
-
68
-
69
-
70
-
71
-
72
-
73
-
74
-
75
-
76
-
77
-
78
-
79
-
80
-
81
-
82
-
83
-
84
-
85
-
86
-
87
-
88
-
89
-
90
-
91
-
92
-
93
-
94
-
95
-
96
-
97
-
98
-
99
-
100
-
101
-
102
-
103
 |
 |
