Xerox 6180MFP Features Setup Guide - Page 13
Phaser® 6180MFP Multifunction Printer - d network scan
 |
UPC - 095205733839
View all Xerox 6180MFP manuals
Add to My Manuals
Save this manual to your list of manuals |
Page 13 highlights
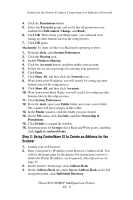
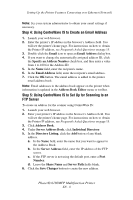
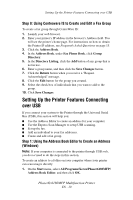
Setting Up the Printer Features Connecting over USB 2. Double-click on the Server icon to open the Server Address dialog box. 3. If you want to change the automatically assigned address ID, click the Specify an Address Number check box, and then enter a value from 1 to 32 for the Address ID. 4. In the Name field, enter the name you want this address to appear under in the Address Book. 5. Select the Computer (SMB) option. 6. Click the Computer Settings wizard button. 7. Enter the folder where you want to scan in the Save In Folder field, or click the Browse button to locate an existing folder. Selecting an existing folder from the Browse button will automatically populate the Shared Folder and Share Name fields when Use a network shared folder as the Save In folder and Auto Share are checked. 8. Click OK to select the appropriate folder. 9. Click Next. The Computer Folder User Settings dialog box opens. 10. Enter the name and password that you log in with. 11. Select the Use Scan Service User check box to allow user access only to the shared directory they create. 12. Click Next. 13. Click Finish to confirm the new settings. The Computer Settings wizard closes. The Server Address dialog box will automatically populate with the information you just set. 14. Enter the Path for forwarding scans. 15. Clear the Use Default Port Number check box to enter the Port Number used by Server Type. The default values are: ■ SMB: 139 ■ FTP: 21 16. Click OK. The Address Book is saved with the new entry for your computer. You are now ready to scan images to the network computer. Note: For more information about the Address Book Editor, click the Help button while in the editor. Phaser® 6180MFP Multifunction Printer EN - 11
-
 1
1 -
2
-
3
-
4
-
5
-
6
-
7
-
 8
8 -
 9
9 -
 10
10 -
 11
11 -
 12
12 -
 13
13 -
 14
14 -
 15
15 -
 16
16 -
 17
17 -
 18
18 -
19
-
20
-
21
-
22
-
23
-
24
-
25
-
26
-
27
-
28
-
29
-
30
-
31
-
32
-
33
-
34
-
35
-
36
-
37
-
38
-
39
-
40
-
41
-
42
-
43
-
44
-
45
-
46
-
47
-
48
-
49
-
50
-
51
-
52
-
53
-
54
-
55
-
56
-
57
-
58
-
59
-
60
-
61
-
62
-
63
-
64
-
65
-
66
-
67
-
68
-
69
-
70
-
71
-
72
-
73
-
74
-
75
-
76
-
77
-
78
-
79
-
80
-
81
-
82
-
83
-
84
-
85
-
86
-
87
-
88
-
89
-
90
-
91
-
92
-
93
-
94
-
95
-
96
-
97
-
98
-
99
-
100
-
101
-
102
-
103
 |
 |
