Yamaha DD-50 Owner's Manual
Yamaha DD-50 Manual
 |
View all Yamaha DD-50 manuals
Add to My Manuals
Save this manual to your list of manuals |
Yamaha DD-50 manual content summary:
- Yamaha DD-50 | Owner's Manual - Page 1
ENGLISH DEUTSCH FRANÇAIS DIGITAL Owner's Manual Bedienungsanleitung Mode d'emploi Manual de instrucciones 2 ESPAÑOL - Yamaha DD-50 | Owner's Manual - Page 2
. This product should be used only with the components supplied or; a cart, rack, or stand that is recommended by Yamaha. If a cart, etc., is used, please observe all safety markings and instructions that accompany the accessory product. SPECIFICATIONS SUBJECT TO CHANGE: The information contained in - Yamaha DD-50 | Owner's Manual - Page 3
equipment. s Data Backup q Custom data and some settings (see page 21) will be retained in memory even if the power switch is turned OFF as long as an AC power adaptor is connected or batteries are installed. s Service and Modification q The DD-50 contains no user serviceable parts. Opening it or - Yamaha DD-50 | Owner's Manual - Page 4
Setting up the DD-50 3 Power Supply 3 When Using headphones (About the PHONES/AUX OUT jack 3 Control Panel 4 Connecting the foot pedals 1/2 5 Supplied Accessories 5 Playing the Demo Song 6 q MASTER VOLUME 6 q SONG VOLUME 6 Try Recording 15 RECORD 15 Playback 15 Using the MIDI - Yamaha DD-50 | Owner's Manual - Page 5
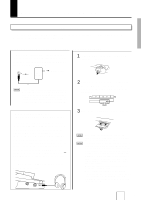
Setting up the DD-50 Power Supply Your DD-50 will run either from batteries or an optional power adaptor. Follow the instructions below according to the power source you intend to use. OPEN OPEN Using an AC-Adaptor (sold separately) Installing Batteries Connect the optional power adaptor (Yamaha - Yamaha DD-50 | Owner's Manual - Page 6
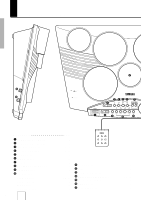
Control Panel * ( & DC IN 10 - 12V PHONES / AUX OUT SONG VOLUME 2 3 456 ASSIGN PAD KIT PRESET TEMPO SONG TEMPO 7 BEAT 88 POWER OFF ON MASTER VOLUME REVERB DRUM 1 DRUM 2 BASS BACKING CLICK 1 89 0 ! Front Panel Page 1 POWER ON/OFF Switch 6 2 SONG VOLUME buttons 6 3 PAD ASSIGN - Yamaha DD-50 | Owner's Manual - Page 7
they can also be assigned to play other voices as well. • Do not press the pedal while connecting it to the DD-50 or while turning on the power. (Connecting in this manner with the power on, the pedal's function may be reversed.) q Supplied Accessories Foot Pedal x 2 Drum Stick x 2 Owner's Manual 5 - Yamaha DD-50 | Owner's Manual - Page 8
power Turn the [POWER] switch ON. DEMO MASTER VOLUME Small Large SONG VOLUME Small Large 2 Start the Demo Song Press the [DEMO] button, the demo song will start playback. q MASTER VOLUME The overall volume level of the DD-50 is controlled * When the SONG VOLUME is set to L0, the song's volume - Yamaha DD-50 | Owner's Manual - Page 9
Play the Pads/Pedals Strike the pad with the supplied drum sticks to play the drum voices. Drum Kit "00" is automatically chosen whenever the power is turned on (see the "Drum Kit List" page 24). Striking the pads with different force results in relatively loud or soft sounds accordingly. Loudness - Yamaha DD-50 | Owner's Manual - Page 10
a Voice to Individual Pads and Pedals ("CU" Custom Kit) The DD-50 contains a total of 75 high quality drum sounds (see the "Drum Voice List" page 23) that can be assigned to each of the 7 drum pads and 2 foot pedals. Try assigning some different voices to the "CU" Custom Drum Kit. • Any change made - Yamaha DD-50 | Owner's Manual - Page 11
. Repeat the previous steps for any or all of the DD-50's pads and pedals and try playing your own original drum kit. REVERB REVERB REVERB ON/OFF Different depths of the DD-50's reverb effect can be selected to add to the DD-50's overall sound. To turn on the reverb effect, press the [REVERB - Yamaha DD-50 | Owner's Manual - Page 12
will be shown in the display. Try playing the pads and pedals along with the song. To stop playback of the song, press the [START/STOP] button once again. • You can also use the TAP START function to start songs (see page 12). The DD-50's songs consists of two types, loop type and - Yamaha DD-50 | Owner's Manual - Page 13
• The Auto Kit Select is automatically set to "OFF" when the MIDI Transmit Note is changed to another channel. Adjusting the TEMPO The song tempo can be set anywhere from 40 to 280 beats per minute. As tempo numbers increase, the tempo will become faster. PRESET TEMPO SONG TEMPO BEAT 50 1 Press - Yamaha DD-50 | Owner's Manual - Page 14
notes produced by song accompaniment, pads, foot pedals, and note data received through the MIDI IN jack. TRACK ON/OFF The DD-50's song accompaniment consists of 4 tracks; Drum 1/2, Bass, and Backing tracks. DRUM 1 DRUM 2 BASS BACKING Main Drum track Main Percussion track Bass track Main Backing - Yamaha DD-50 | Owner's Manual - Page 15
indicator will turn off). 2 Break Strike any pad and the accompaniment will mute until the end of the measure you played in. You can play a drum fill or drum solo during this break. REC. START/ STOP A-B REPEAT BREAK/ TAPSTART 3 Exit the BREAK mode The DD-50 returns to the BREAK standby mode when - Yamaha DD-50 | Owner's Manual - Page 16
you like. REC. START/ STOP A-B REPEAT BREAK/ TAPSTART BEAT A 1 To set the "A" (start repeat) point When the song playback has reached the start of the [A-B REPEAT] button once again and the A to B repeat points are set, "b" appears in the display. "Ab" will appear in the display and after - Yamaha DD-50 | Owner's Manual - Page 17
DD-50's Custom Song feature (song number "CU") allows you to record and playback one original song (600 notes approximately). q Data that can be recorded in the Custom Song Mode. • Drum pad and pedal data. • Song data (the number cannot be changed while in the RECORD Mode). • Track ON/OFF settings - Yamaha DD-50 | Owner's Manual - Page 18
voices can be played from a MIDI keyboard. Using a keyboard as a controller, it is possible to play DD-50 voices that are not assigned to the pads/pedals. q Connect the DD-50's MIDI IN terminal to a MIDI sequencer's MIDI OUT terminal. The sequencer's data can be used to drive the DD-50's sounds. 16 - Yamaha DD-50 | Owner's Manual - Page 19
the MIDI mode. • Pads and pedals do not sound while in the MIDI/Utility mode. To exit the MIDI mode, once again press the [START/STOP] and [DEMO] buttons simultaneously, the MIDI mode will be exited and the DD-50 will return to its normal play mode. Setting the Clock Connecting the DD-50, by MIDI - Yamaha DD-50 | Owner's Manual - Page 20
played and controlled by the DD-50 and its pads. Data received via MIDI will also be played by the DD-50. q oF (Local OFF) Striking the pads will not produce any sound from the voices. However, data received via MIDI will be played by the DD-50. DRUM 2 1 Display the Local On/Off Setting BEAT on - Yamaha DD-50 | Owner's Manual - Page 21
all pads/pedals have been assigned MIDI transmit channels, exit the MIDI/Utility mode. • For further information on what type of data is transmitted via MIDI, see the "MIDI Implementation Chart" (page 29), and try out the DD-50's advanced MIDI features. s Setting the MIDI Transmit Channel . Drum - Yamaha DD-50 | Owner's Manual - Page 22
by one. 4 Exit the MIDI/Utility mode After each pad is assigned a MIDI note number, exit the MIDI/Utility mode. • For information on transmit notes and voices, refer to the DD-50 "Drum Map" (note - voice, list) on page 27. • When the Pad Assign or Kit Assign is set, the MIDI Note Number will be - Yamaha DD-50 | Owner's Manual - Page 23
Initialize The DD-50's Custom Song, Custom Kit, and Panel Setting data are backed up so long as power is supplied to the DD-50 by means of batteries or an AC adaptor. Initialize is the term which refers to this data being restored to its original factory settings. To initialize the DD-50, follow - Yamaha DD-50 | Owner's Manual - Page 24
the DD-50 to an authorized Yamaha dealer for proper diagnosis and repair. Do not attempt to repair this digital instrument by yourself as serious damage may occur. Problem A buzz or click occurs momentarily when the DD-50 is turned ON or OFF The LED display is completely dark. When the pads are - Yamaha DD-50 | Owner's Manual - Page 25
controlled with the foot pedal as follows: • Strike the pad while pressing the Foot Pedal, the "Closed" Hi-Hat voice will sound. • Strike the pad without pressing the Foot Pedal, the "Open" Hi-Hat voice will sound. • Press the Foot Pedal without striking the pad, the Hi-Hat "Pedal" voice will sound - Yamaha DD-50 | Owner's Manual - Page 26
und Spezifikationen / Données / Datos Small Pad 1 Small Pad 2 Pad 2 Pad 3 Pad 1 Pad 4 Small Pad 3 Pedal 2 Pedal 1 Drum Kit List / Drum Kit-Verzeichnis / Liste des kits de batterie / Lista No. Kit Name Pad 1 Pad 2 Pad 3 Pad 4 0 Standard 1 8 Snare Drum Hi 16 High Tom-H 18 Mid Tom - Yamaha DD-50 | Owner's Manual - Page 27
Open/Closed (Pedal 2 Off/On) 0 Bass Drum Lo 63 Cabasa-2 48 Rock Cowbell Pedal 2 34 HH Pedal 34 HH Pedal 35 Rock HH Pedal 34 HH Pedal 34 HH Pedal 34 HH Pedal 35 Rock HH Pedal 35 Rock HH Pedal 36 Dance HH Pedal 36 Dance HH Pedal 45 Tambourine 37 Crash Cymal-L 38 Crash Cymbal-H 50 Latin Cowbell - Yamaha DD-50 | Owner's Manual - Page 28
Loop Type (Short) Song No. 70-99 : Sequence Type (Long) * Morceaux n° 0 à 69 : en boucle (court) Morceaux n° 70 à 99 : en séquence (long) 49 Bossa Nova 50 Samba 51 Salsa 52 Latin Rock 53 Cha Cha 54 Mambo 55 Rhumba 56 Afro Cuban Swing 57 Swing 1 58 Swing 2 59 Swing 3 60 Swing - Yamaha DD-50 | Owner's Manual - Page 29
columm to the left : No sound - Yamaha DD-50 | Owner's Manual - Page 30
Dimensions (WxDxH) 552 x 348 x 136 (21" 3/4 x 13" 2/3 x 5" 3/8) Weight 3.0 kg (6 Ibs. 10 oz) Supplied Accessories Drum stick x 2, Foot Pedal x 2, Owner's Manual Optional Accessories Headphones AC Power Adaptor Foot Switch HPE-150, HPE-3 PA-3, PA3B FC4, FC5 * Specifications subject to change - Yamaha DD-50 | Owner's Manual - Page 31
chaque pad de batterie et pour la pédale n'est pas transmise via MIDI. *1 El valor del efecto panorámico (Pan) para cada pulsador y pedal de batería no se transmite a través de MIDI. *2 The DD-50 can accept Start/Stop signals, received via MIDI, by setting the MIDI clock to "External". *2 Das DD-50 - Yamaha DD-50 | Owner's Manual - Page 32
setting for pad sensitivity should provide you with trouble-free use. However, it is possible to adjust the pad's sensitivity (0-3, factory default = 2) if you are experiencing one of the problems shown below. • Striking two pads simultaneously results in one of the pads not sounding. ¡ Set the pad - Yamaha DD-50 | Owner's Manual - Page 33
plus, appuyez en même temps sur les boutons [START/STOP] et [DEMO] pour sortir du mode de sensibilité de pad et terminer la procédure de réglage. • Le réglage de sensibilité de pad reste mémorisé, même quand l'alimentation est coupée, aussi longtemps que les piles sont en place ou que l'adaptateur - Yamaha DD-50 | Owner's Manual - Page 34
Tel: 9-634-0099 COUNTRIES AND TRUST TERRITORIES IN PACIFIC OCEAN Yamaha Corporation, International Marketing Division Nakazawa-cho 10-1, Hamamatsu, Japan 430 Tel: 053-460-2317 HEAD OFFICE Yamaha Corporation, Electronic Musical Instrument Division Nakazawa-cho 10-1, Hamamatsu, Japan 430 [PK
-
 1
1 -
 2
2 -
 3
3 -
 4
4 -
 5
5 -
 6
6 -
 7
7 -
8
-
9
-
10
-
11
-
12
-
13
-
14
-
15
-
16
-
17
-
18
-
19
-
20
-
21
-
22
-
23
-
24
-
25
-
26
-
27
-
28
-
29
-
30
-
31
-
32
-
33
-
34
 |
 |

2
DIGITAL
Owner’s Manual
Bedienungsanleitung
Mode d’emploi
Manual de instrucciones
DEUTSCH
FRANÇAIS
ESPAÑOL
ENGLISH