Yamaha DTX500 Owner's Manual - Page 16
Playing Along With the Click - owners manual
 |
UPC - 086792942155
View all Yamaha DTX500 manuals
Add to My Manuals
Save this manual to your list of manuals |
Page 16 highlights
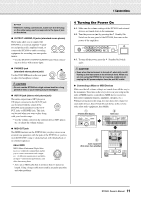
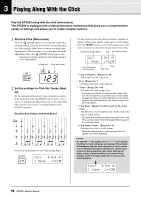
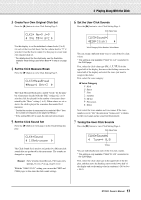
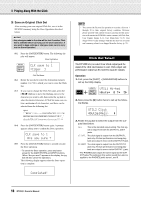
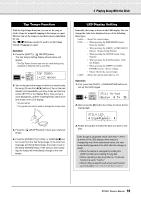
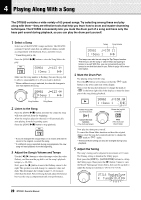
3 Playing Along With the Click Play the DTX500 along with the click (metronome). The DTX500 is equipped with a high-performance metronome that gives you a comprehensive variety of settings and allows you to create complex rhythms. 1 Start the Click (Metronome) Press the [ ON/OFF] button to start the click sound. The left lamp lights in red on the first beat of every measure when the click is playing. Other beats are indicated with the right lamp in green. The click tempo (q=) is also indicated on the LED display. Press the [ ON/OFF] button again to stop. * If tempo is not shown, change the LED display setting (p. 19) to "Disp=tempo." 1st beat (red) Other beats (green) 123 2 Set the settings for Click Set, Tempo, Beat, etc. By fine tuning the different note value clicks that are shown in the illustration below, the DTX500 can be used to create a variety of click patterns. The patterns you set are called Click Sets, and you can save up to 30 original patterns in the DTX500's memory. Example: Beat timings used when Beat=4 Press the [CLICK] button to view Click Setting Page 1. CLK1~~~~∫~B=4~÷ç 1~:User~~~⁄=123, Use this display to select the desired Click Set, and then set the beat, tempo, timer, and the click sound's overall volume. Press the [] buttons to move the flashing cursor to the item you want to set, then rotate the jog dial to set its value. Click Setting display (page 1) Beat Click Master Volume CLK1~~~~∫~B=4~÷ç 1~:User~~~⁄=123, Click Set Number: Click Set Name Tempo Click Timer • Click Set Number [Range] 1 to 30 Selects the Click Set to be used. • Beat [Range] 1 to 9 Determines the click's time signature. • Tempo [Range] 30 to 300 Determines the click's tempo (q=). * The tempo can also be set using the Tap Tempo Function. This function lets you set the song or click's tempo by tapping in tempo on a pad. With this, you can set the tempo to one that feels best to you. Refer to page 19 for more information. • Click Timer [Range] 0 to 600 seconds (in 30-second steps) This function is used to automatically stop the click at the time set in this setting. * The value (the remaining number of seconds) of the Click Timer can be shown in the LED display. Refer to page 19 for more information. • Click Master Volume [Range] 0 to 16 Determines the click's overall volume. * When the flashing cursor is not positioned here, the speaker icon will be displayed. NOTICE • An asterisk "*" will appear next to "CLK1" in the display if settings for beat and tempo are changed. This asterisk will disappear after the Store operation (p. 18) is carried out. If a different Click Set is selected, etc., before carrying out the Store Operation, the current settings will return to their original condition. If you want to keep changes made to the data, make sure to carry out the Store Operation. CLK1*~~~∫~B=4~÷ç 1~:User~~~⁄=130, 16 DTX500 Owner's Manual
-
 1
1 -
2
-
3
-
4
-
5
-
6
-
7
-
8
-
9
-
10
-
 11
11 -
 12
12 -
 13
13 -
 14
14 -
 15
15 -
 16
16 -
 17
17 -
 18
18 -
 19
19 -
 20
20 -
 21
21 -
22
-
23
-
24
-
25
-
26
-
27
-
28
-
29
-
30
-
31
-
32
-
33
-
34
-
35
-
36
-
37
-
38
-
39
-
40
-
41
-
42
-
43
-
44
-
45
-
46
-
47
-
48
 |
 |
