Yamaha DTX500 Owner's Manual - Page 33
Factory Set, Use the same procedure to create Drum
 |
UPC - 086792942155
View all Yamaha DTX500 manuals
Add to My Manuals
Save this manual to your list of manuals |
Page 33 highlights
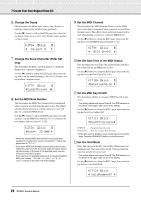
7 Create Your Own Original Drum Kit 26-3. If you want to change the Drum Kit name, press the [] buttons to move the flashing cursor to the character you want to edit, then rotate the jog dial to select a character. A Drum Kit name can contain a maximum of 12 characters, and these can be selected from the following list. space 0123456789:;?@ ABCDEFGHIJKLMNOPQRSTUVWXYZ[\]^_` abcdefghijklmnopqrstuvwxyz{|}≥≤ 26-4. Press the [SAVE/ENTER] button again. A prompt appears asking you to confirm the Store operation. KIT~save~to~51 ~Are~you~sure~? 26-5. Press the [SAVE/ENTER] button once more to actually execute the Store operation. *To cancel the Store operation, press any button except for the [SAVE/ENTER] and [SHIFT] buttons. (When "Are you sure?" appears in the display, the jog dial will also cancel the operation.) When the Store operation is complete, the following display appears. ~~~Completed! With this operation, you have now created a Drum Kit that has an original bass Drum Voice. Use the same procedure to create Drum Voices for the other pads (input sources) and create a complete custom Drum Kit of your own. Factory Set This operation returns all of the DTX500's internal settings back to their original factory defaults. Please proceed with caution, since executing this operation will also rewrite the entire memory contents of the DTX500 (all Click Sets, User Trigger Setups 8-11, User Drum Kits 51-70, User Songs 64-83, Utility data) with the data that was set in the unit's memory when it was shipped from the factory. Operation 1. First, press the [SHIFT] + [SAVE/ENTER] buttons to call up the Utility pages. UTIL1~Hi-hat HHofs=~~0~T=~~5, 2. Press the [>] button several times to call up the UTIL8 page. UTIL8 "~Factory~Set 3. From the page shown above, press the [SAVE/ ENTER] button to call up the prompt shown below, asking for confirmation of the Factory Set operation. * To cancel the Factory Set operation, press any button except for the [SAVE/ENTER] and [SHIFT] buttons (the jog dial can also be used to cancel the operation). All~data~will~be lost.AreYouSure? 4. Once again, press the [SAVE/ENTER] button to proceed with the operation. ~All~Memory ~Initializing... 33 DTX500 Owner's Manual
-
 1
1 -
2
-
3
-
4
-
5
-
6
-
7
-
8
-
9
-
10
-
11
-
12
-
13
-
14
-
15
-
16
-
17
-
18
-
19
-
20
-
21
-
22
-
23
-
24
-
25
-
26
-
27
-
 28
28 -
 29
29 -
 30
30 -
 31
31 -
 32
32 -
 33
33 -
 34
34 -
 35
35 -
 36
36 -
 37
37 -
 38
38 -
39
-
40
-
41
-
42
-
43
-
44
-
45
-
46
-
47
-
48
 |
 |
