Yamaha DTX500 Owner's Manual - Page 28
Set the Gate Time of the MIDI Output, Change the Voice Character Filter Set
 |
UPC - 086792942155
View all Yamaha DTX500 manuals
Add to My Manuals
Save this manual to your list of manuals |
Page 28 highlights
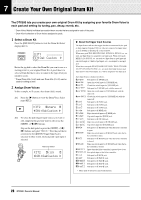
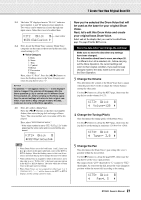
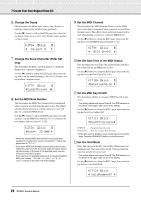
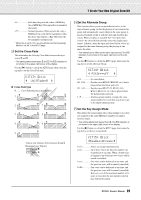
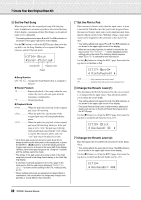
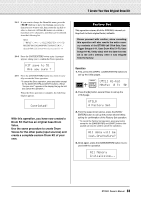
7 Create Your Own Original Drum Kit 6 Change the Decay This determines the Drum Voice's decay time (the time it takes the sound to fade out after being produced). Use the [>] button to call up the KIT6 page, then rotate the jog dial to set the decay (-64-0-+63). Positive values produce a crisper sound. KIT6*~~äkick~~~˙ "~~Decay=+~8~~~, 7 Change the Voice Character (Filter Set- ting) This determines the filter's cutoff frequency to change the Drum Voice's character (brightness). Use the [>] button to call up the KIT7 page, then rotate the jog dial to set the cutoff frequency (-64-0-+63). Positive values produce a brighter sound. KIT7*~~äkick~~~˙ "CutOffFreq=+~4, 8 Set the MIDI Note Number This determines the MIDI Note Number that is transmitted when a signal is received from the input source. This affects which particular percussion or drum sound of a voice will play on a connected MIDI device. Use the [>] button to call up the KIT8 page, then rotate the jog dial to set the MIDI Note Number (0-127). Displays the note number and note name (C-2-G8). KIT8*~~äkick~~~˙ "Note=~~32/G#0~, * When the selected MIDI Note Number has already been assigned to another input source, an asterisk "*" will be displayed next to "Note=." * If the same MIDI Note Number is set to more than one pad within the same Drum Kit, the lowest numbered Input Source will take priority. In the case of the duplicate input sources, the same voice will be output. If the setting is not available because of an already assigned MIDI note number, "(Note# in use)" or "(# in use)" is shown in the lower half of the display. 9 Set the MIDI Channel This determines the MIDI Transmit Channel for the MIDI note on data that is transmitted when a signal is received from the input source. This affects which particular channel will be used when playing a voice on a connected MIDI device. Use the [>] button to call up the KIT9 page, then rotate the jog dial to set the MIDI Transmit Channel (1-16). KIT9*~~äkick~~~˙ "~~MIDI~Ch=10~~, 10 Set the Gate Time of the MIDI Output This determines the Gate Time (the length of time from Key On to Key Off) for the MIDI note on data. Use the [>] button to call up the KIT10 page, then rotate the jog dial to set the Gate Time (0.0s-9.9s). KIT10*~äkick~~~˙ "GateTime=0.3s~, 11 Set the MIDI Key On/Off This determines whether to recognize MIDI Key Off events or not. * This setting affects both layers ˙ and ¶. The ˙/¶ indication is not shown in the upper right corner of the display. Use the [>] button to call up the KIT11 page, then rotate the jog dial to set Key On/Key Off. KIT11*~äkick "KeyOff=disable, enable Recognizes Key Off events. disable .........Does not recognize Key Off events. * When this is set to "disable," some voices may sound continu- ously. Press the [DRUM KIT] button to stop the sound. 12 Set the Hold Mode Every time the pad is hit, Key On and Key Off messages are alternately sent. This means that one hit of the pad turns the sound on and the next turns it off. * This setting affects both layers ˙ and ¶. The ˙/¶ indication is not shown in the upper right corner of the display. Use the [>] button to call up the KIT12 page, then rotate the jog dial to set the Hold Mode. KIT12*~äkick "~HoldMode=off~, 28 DTX500 Owner's Manual
-
 1
1 -
2
-
3
-
4
-
5
-
6
-
7
-
8
-
9
-
10
-
11
-
12
-
13
-
14
-
15
-
16
-
17
-
18
-
19
-
20
-
21
-
22
-
 23
23 -
 24
24 -
 25
25 -
 26
26 -
 27
27 -
 28
28 -
 29
29 -
 30
30 -
 31
31 -
 32
32 -
 33
33 -
34
-
35
-
36
-
37
-
38
-
39
-
40
-
41
-
42
-
43
-
44
-
45
-
46
-
47
-
48
 |
 |
