Yamaha DTX500 Owner's Manual - Page 24
Record Your Performance, Recording System
 |
UPC - 086792942155
View all Yamaha DTX500 manuals
Add to My Manuals
Save this manual to your list of manuals |
Page 24 highlights
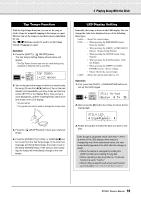
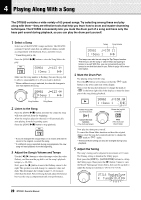
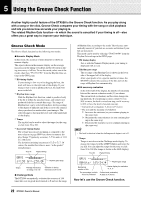
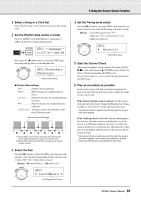
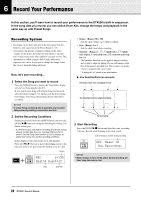
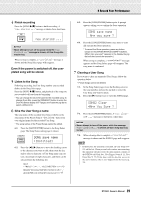
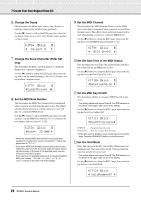
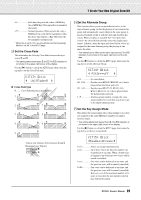
6 Record Your Performance In this section, you'll learn how to record your performance to the DTX500's built-in sequencer. In the song data you record, you can switch Drum Kits, change the tempo and playback in the same way as with Preset Songs. Recording System • Recording can be done with any of the User Songs (64-83). However, you cannot record to Preset Songs (1-63). • A recorded song doesn't contain recordings of the audio 'sounds' of the drums, but rather the performance 'information' or data of precisely when and how each pad was hit. This information is called sequence data. Unlike audio data, sequence data can be freely used to change the tempo, select the voice or drum kit during playback. Now, let's start recording... 1 Select the Song you want to record Press the [SONG] button to display the Song Select display, select a User Song number (64-83). If you want to play along with a Preset Song and record it, select the desired song (1-63). In this case, the lowest numbered empty User Song will automatically be selected for recording. NOTICE • If a User Song containing data is selected, any recorded data previously existing is overwritten and lost. 2 Set the Recording Conditions Simultaneously hold down the [SHIFT] button and press the [SONG >/■] button to call up the following Recording Conditions setting page. * If a Preset Song is selected for recording and all User Songs already contain data, the error message "Memory full" is shown. Use the Song Clear function (p. 25) to prepare an empty User Song, then set the recording conditions. In this display set the click tempo, beat, and quantize. Press the [] buttons to move the flashing cursor to the item you want to set, then rotate the jog dial to set its value. Tempo REC~~~~~~~~⁄=130 Beat=4~Quant=⁄3 Beat Quantize • Tempo [Range] 30 to 300 Sets the click's tempo (q=) when recording. • Beat [Range] 1 to 9 Sets the click's beat when recording. • Quantize [Range] ⁄, ⁄3, Ö (eighth note), Ö3 (eighth note triplet), Ü (sixteenth note), Ü3 (sixteenth note triplet), no The Quantize function can be applied during recording and is used to align the timing of your performance with that of the nearest specified beat. The accuracy of quantization is assigned with a note value. * A setting of "no" results in no quantization. ● How Quantize Works (an example) Recorded notes were not played in time. The Quantize Function aligns the timing. Perfect timing 3 Start Recording Press the [SONG >/■] button and after the count, recording will start. Record while listening to the click sound. Current measure number during recording REC~~Meas=~10 ~Now~Recording. NOTICE • Never attempt to turn off the power during recording. All User Song data may be lost. 24 DTX500 Owner's Manual
-
 1
1 -
2
-
3
-
4
-
5
-
6
-
7
-
8
-
9
-
10
-
11
-
12
-
13
-
14
-
15
-
16
-
17
-
18
-
 19
19 -
 20
20 -
 21
21 -
 22
22 -
 23
23 -
 24
24 -
 25
25 -
 26
26 -
 27
27 -
 28
28 -
 29
29 -
30
-
31
-
32
-
33
-
34
-
35
-
36
-
37
-
38
-
39
-
40
-
41
-
42
-
43
-
44
-
45
-
46
-
47
-
48
 |
 |
