Yamaha DTXPLORER Owner's Manual - Page 20
Create Your Own Original Drum Kit - hi hat pedal
 |
View all Yamaha DTXPLORER manuals
Add to My Manuals
Save this manual to your list of manuals |
Page 20 highlights
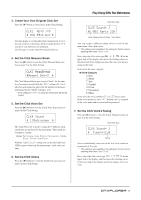
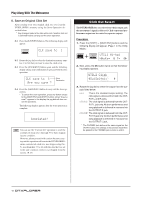
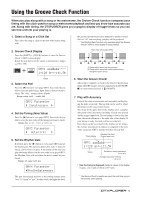
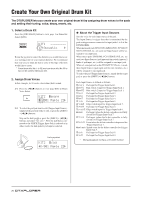
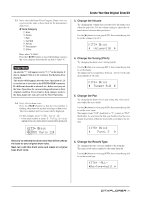
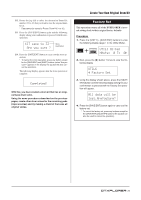
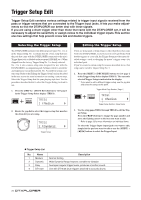
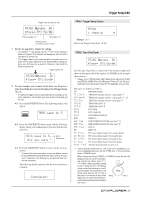
Create Your Own Original Drum Kit The DTXPLORER lets you create your own original drum kit by assigning drum voices to the pads and setting their tuning, voice, decay, reverb, etc. 1. Select a Drum Kit Press the [DRUM KIT] button to view page 1 in Drum Kit Select (KIT1). KIT1 _________ 1 :Acoustic , Rotate the jog dial to select the drum kit you would like to use as a starting point for your original drum kit. We recommend that you select a drum kit that is close to the type of kit you would like to create. * Preset drum kits (No. 1 to 32) and user drum kits (No. 33 to 42) can be used for editing as well. 2. Assign Drum Voices In this example, we'll create a bass drum (kick) sound. 2-1. Press the [] buttons to view page KIT2 in Drum Voice Select. KIT2 ¡snare -K/001 Maple 22, 2-2. To select the pad you want to edit (Trigger Input Source), simply hit the pad you'd like to edit, or press the [SHIFT] + [] buttons. Step on the kick pedal or press the [SHIFT] + [] buttons and select "•kick". Now the pad that is connected to the 8 KICK Trigger Input Jack is selected or in other words, the kick pedal's pad input is selected. Pad being edited KIT2 •kick -K/001 Maple 22, ● About the Trigger Input Sources Sets the voice for each input source of the pad. The Input Source is trigger data that is transmitted by the pads or trigger sensors connected to input jacks 1 to 9 of the DTXPLORER. When monaural pads TP60/65/80, KP60/65/80, PCY60/65/ 80/130, DT10/20, etc. are used, one Input Source will be assigned to one input jack. When stereo pads TP65S/80S, PCY65S/80S/130S, etc. are used, two Input Sources (pad input and rim switch input or 2 kinds of pad input, etc.) will be assigned to one input jack. When a 3-zone pad such as the TP65S/PCY150S, etc., is used, three Input Sources (pad input and two rim switches, etc.) will be assigned to one input jack. To select the pad (Trigger Input Source), simply hit the target pad, or press the [SHIFT] + [] buttons. Each Input Source is defined as follows. ¡snare Pad input for Trigger Input Jack 1. ¡snrR1 Rim switch 1 input for Trigger Input Jack 1. ¡snrR2 Rim switch 2 input for Trigger Input Jack 1. ™tom1 Pad input for Trigger Input Jack 2. £tom2 Pad input for Trigger Input Jack 3. ¢tom3 Pad input for Trigger Input Jack 4. Øride Pad input for Trigger Input Jack 5. ØrideE Edge switch input for Trigger Input Jack 5. §crash Pad input for Trigger Input Jack 6. §crashE Edge switch input for Trigger Input Jack 6. ¶open Pad input (when the hi-hat controller is not fully closed) for Trigger Input Jack 7. ¶close Pad input (when the hi-hat controller is fully closed) for Trigger Input Jack 7. ¶footCl Event when the hi-hat controller is depressed for Trigger Input Jack 7. ¶splash Splash event for the hi-hat controller for Trigger Input Jack 7. •kick Pad input for Trigger Input Jack 8. ªpad9 Pad input for Trigger Input Jack 9. * Monaural pads do not have a rim switch function. 20
-
 1
1 -
2
-
3
-
4
-
5
-
6
-
7
-
8
-
9
-
10
-
11
-
12
-
13
-
14
-
 15
15 -
 16
16 -
 17
17 -
 18
18 -
 19
19 -
 20
20 -
 21
21 -
 22
22 -
 23
23 -
 24
24 -
 25
25 -
26
-
27
-
28
-
29
-
30
-
31
-
32
-
33
-
34
-
35
-
36
 |
 |
